Alysrazor is among the first four bosses in the Firelands raid, which players can choose to face in any order. This flaming bird boss can be found at Shatterstone in the northeast corner of the raid map. Alysrazor can be encountered on either Normal or Heroic difficulty with both 10 and 25 player groups, like the other bosses in Firelands.


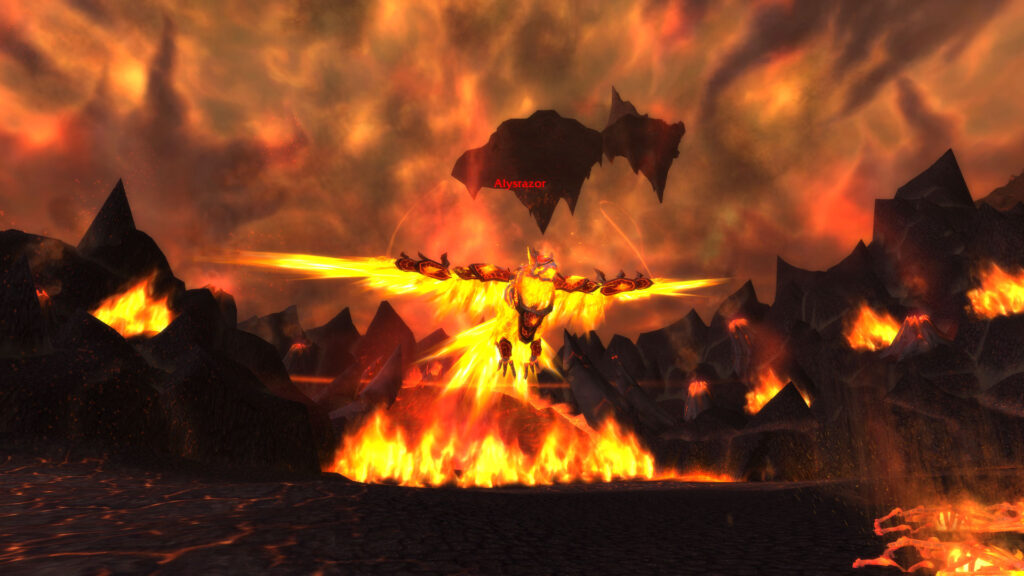
While most of the inhabitants of the Firelands were born in it, that is certainly not the case for Alysrazor. Corrupted by a promise of power and a newfound love for ever-burning cinders, the Green Dragon Alysra betrayed both the Cenarion Circle and the Green Dragonflight, aiding Ragnaros’ minions in freeing Archdruid Staghelm, ensuring his betrayal against his former people. By doing so, Alysra was granted a boon by the Fire Lord Ragnaros himself, forsaking her former shape and becoming a phoenix-like creature, made out of scorching fire and pure hatred. This can be clearly seen in the Firelands, as the newborn Alysrazor loves to toy with any prey that dares approach her.
The Alysrazor Encounter is one of the most interactive encounters, consisting of four massive stages. The first stage has some iconic flying action against Alysrazor as players will combat her in the air while also dealing with adds. The second stage consists of Alysrazor denying players any aerial action, forcing them to the ground, and attempting to finish them off with a powerful attack. The third stage is defined by a short period of vulnerability, in which Alysrazor falls to the ground in a weakened state, and players can massively damage her. The fourth stage is a ground combat endurance test where Alysrazor attacks players with powerful abilities, with players simply having to survive the onslaught. If Alysrazor is not killed during the fourth stage of her encounter, she resets the cycle of her stages, beginning to use the abilities from Stage 1 once again! Depending on the group’s DPS output, she may be killed during the second cycle of her phases.
(You can reference the Alysrazor Loot list if you want to see all of the boss drops.)
Role Summaries
- Everyone must make sure to respect the groups they have been assigned at all times! (Air Group & Ground Group)
- Everyone in the ground group must avoid standing in the middle of the arena when Blazing Claw is being used.
- Everyone has to make sure to avoid being hit by Cataclysm and Molten Meteor on the Heroic Difficulty!
- Everyone must make sure to leave the Molten Feathers to the assigned players!
- Everyone must interrupt and stun the Fieroblast and Brushfire effects cast by Burning Talon Initiates.
- Everyone must avoid going into the Incendiary Cloud!
- Everyone must avoid standing in Lava Spew!
- Everyone must stack behind the Molten Meteor whenever Alysrazor casts Firestorm on the Heroic Difficulty.
- Everyone must make sure to avoid standing near the Fiery Vortex! Players must also avoid being hit by the Fiery Tornado spawned by the Fiery Vortex.
- Everyone must not stay close enough to the Fiery Vortex to avoid triggering Harsh Winds.
- Everyone must use defensive abilities when Alysrazor uses Blazing Buffet.
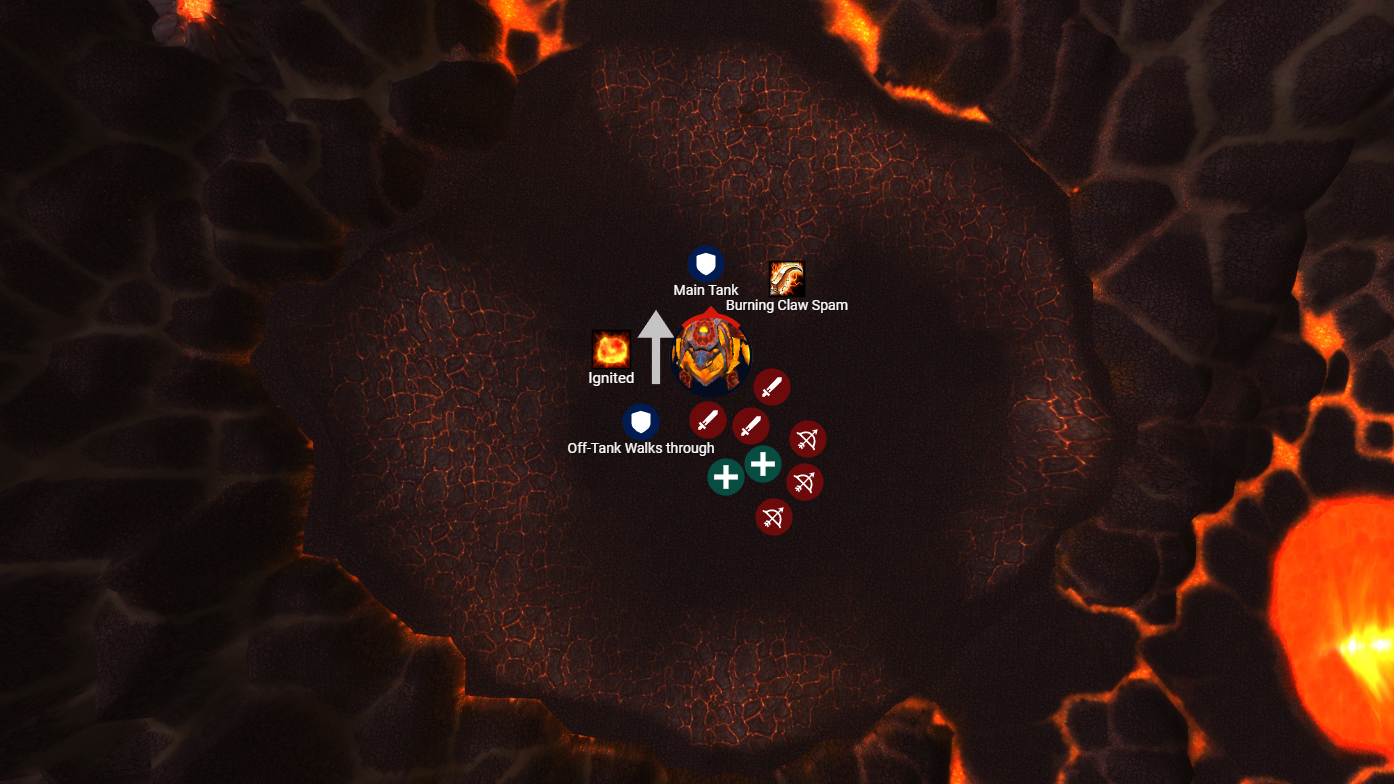
- Everyone except the tanks must make sure to stack behind Alysrazor when she uses Blazing Claw in Phase 4.
- Tanks must make sure to position themselves properly before Voracious Hatchlings spawn.
- Tanks must have Defensive Cooldowns available in case Tantrum triggers!
- Tanks should reposition Voracious Hatchlings for them to consume Plump Lava Worms.
- Tanks have to pick up Blazing Talon Initiates.
- Tanks have to make sure to tank Alysrazor away from the raid in Phase 4.
- Tanks must make sure to have Defensive Cooldowns available for Blazing Claw during Phase 4.
- Healers must top off the entire raid at the beginning of the fight due to the Firestorm mechanic.
- Healers must make sure to top off tanks after the Gushing Wound effects end.
- Healers must make sure to assist tanks when they are dealing with the Tantrum mechanic.
- Healers must make sure to use Offensive Spells during Phase 3 when the Essence of the Green effect is available.
- Healers have to top off the entire raid after they are afflicted by the Blazing Buffet effect.
- Healers must focus on the tanks in Phase 4 while they are under the assault of Blazing Claw.
- DPS assigned to the Air Group must make sure to pick up Molten Feathers and remain airborne by going through the fire rings created by Blazing Power.
- DPS assigned to the Air Group must attempt to trigger the Alysra’s Razor effect.
- DPS must make sure to kill Blazing Talon Initiates, Voracious Hatchlings, and Blazing Talon Clawshaper ASAP!
- Ranged DPS must focus Molten Meteors as soon as they spawn!
- DPS should make sure to have their big Offensive Cooldowns available when Alysrazor reaches Burnout!
- Raid Leaders must assign specific groups for Phase 1, having a dedicated Ground Group and a dedicated Air Group.
- Raid Leaders should make sure to call out incoming Firestorms on the Heroic Difficulty!
- Raid Leaders must make sure to call out Fiery Vortex whenever it’s about to start!
- Raid Leaders must make sure to remind the group to interrupt and crowd control the adds!
- Raid Leaders have to call out Heroism/Bloodlust/Time Warp at the proper time when Burnout occurs!
Abilities
Adds
Raid Composition & Preparation
Encounter Mechanics & Strategy
Normal vs Heroic Difficulty
There are only a few differences between Normal Difficulty and Heroic Difficulty! The main difference is the Firestorm which occurs on the Heroic Difficulty every 85-90 seconds and the addition of the Herald of the Burning End add which is tied to the Firestorm mechanic through the Molten Meteor ability. The rest of the differences are related to the overall damage dealt by Alysrazor and the rest of the adds in the encounter.
The Fight
Just as stated previously, the Alysrazor Encounter functions differently from all the other encounters in the Firelands raid! Instead of having a specific progressive encounter or a 1-phase encounter with a specific gimmick, Alysrazor cycles through her 4 phase encounter until either she is dead or the raid group is dies.
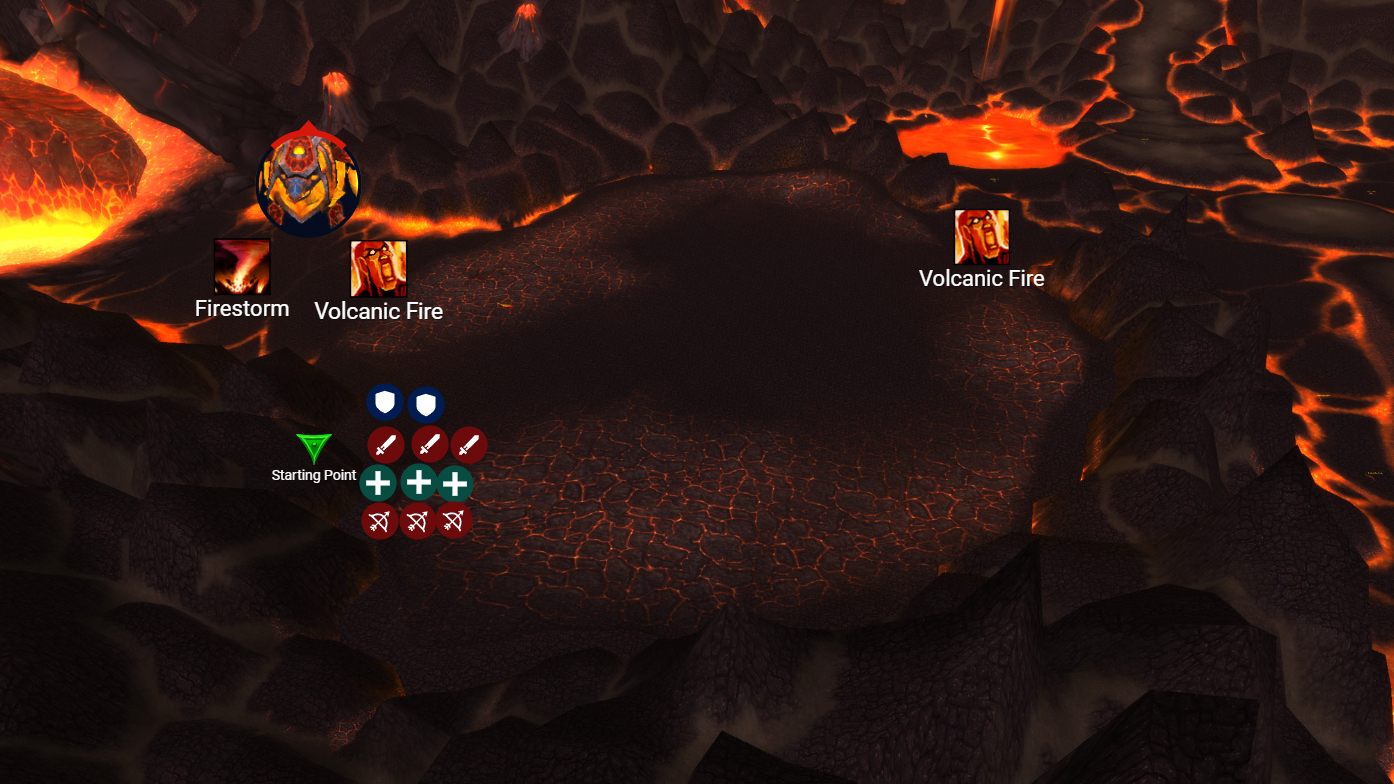
Due to the unique nature of Phase 1, the raid group must be split into two specific groups: Ground Group and Air Group! Additionally, the ground group must be split into two separate groups again, with one group taking the left side of the arena while the other group stays the right side of the arena. The central part of the arena will mostly be left empty, especially on the Heroic Difficulty due to the Molten Meteor mechanic.
Pull
Upon being engaged, Alysrazor triggers 2 specific abilities: Firestorm and Volcanic Fire! Both of those abilities are triggered at the same time, but only Volcanic Fire persists through the entirety of the encounter. Firestorm will deal Fire Damage to all players every 1 second for up to 10 seconds while Alysrazor ascends toward the sky from her nest. The ability stops as Alysrazor lands on the ground. Volcanic Fire creates a barrier at the entrance of Alysrazor’s nest and near the volcano she erupts from, seriously harming any player that comes as close as 6 yards to the fire barriers.
The Alysrazor Encounter also has a specific pull location from which the group should start the encounter, especially since Alysrazor begins using Blazing Claw right after she lands.
Phase 1
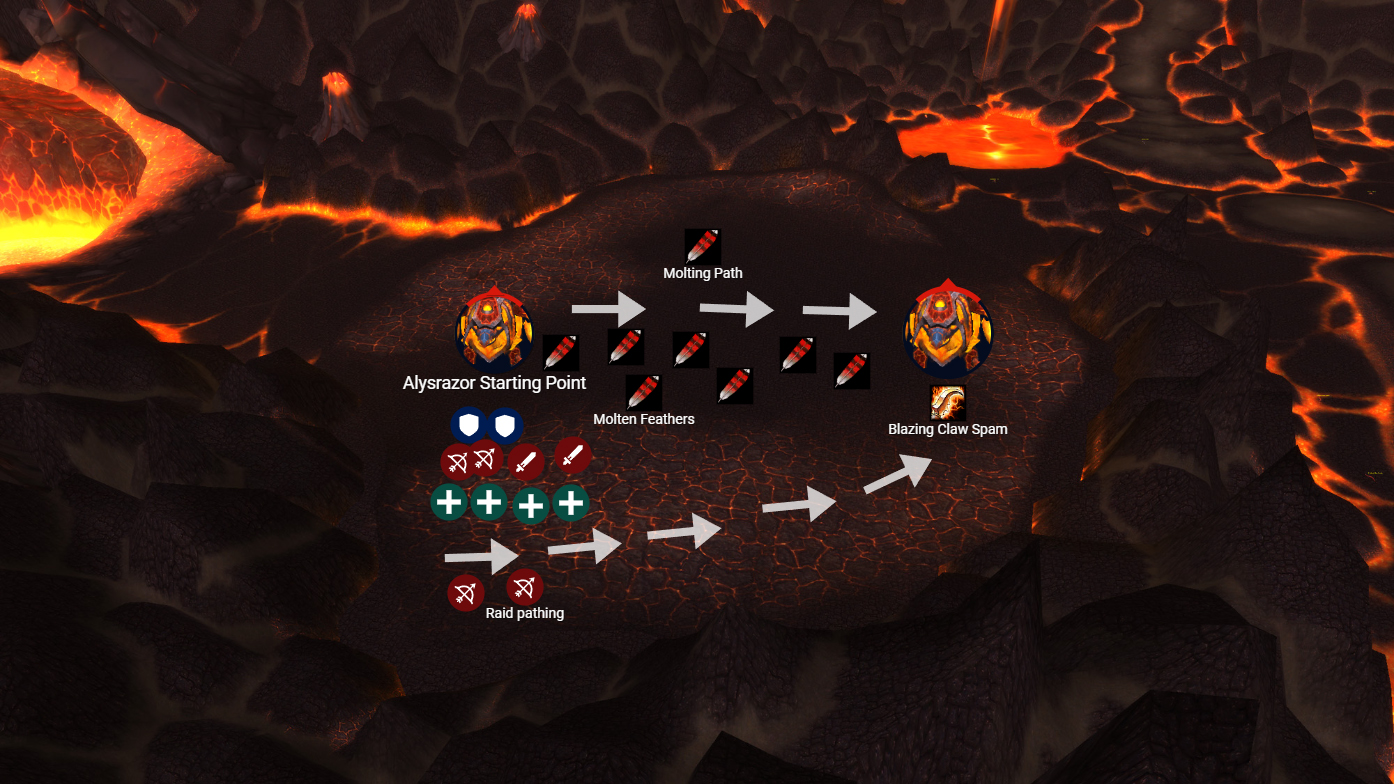
As Phase 1 begins Alysrazor immediately casts Blazing Claw, walking across the middle section of the arena and dealing massive Physical Damage to any player that comes in contact with the frontal cone radius of the ability. Additionally, Blazing Claw debuffs the players whenever it hits them, increasing all Physical Damage and Fire Damage received by 10% per stack. Due to this ability, no player should sit in front of Alysrazor, with the indicated spot in the image above being the best possible starting location because of this mechanic.
While Alysrazor uses Blazing Claw, she also uses Molting! Molting will last the same duration as Blazing Claw, precisely 9 seconds. While Molting occurs, Alysrazor leaves Molten Feathers behind, with players being able to right-click them to pick them up. Whenever a player picks up a Molten Feather, they receive a buff that allows them to cast while moving and increases their movement speed by 30%. The buff can be stacked up to 3 times. Once players pick up 3 x Molten Feathers, they gain Wings of Flame, allowing them to fly while also keeping the movement speed buff.
While this interaction occurs, the raid group must move as a blob and walk by Alysrazor! Ideally, the designated players from the Air Group, especially the casters, should pick up one Molten Feather and walk behind Alysrazor.
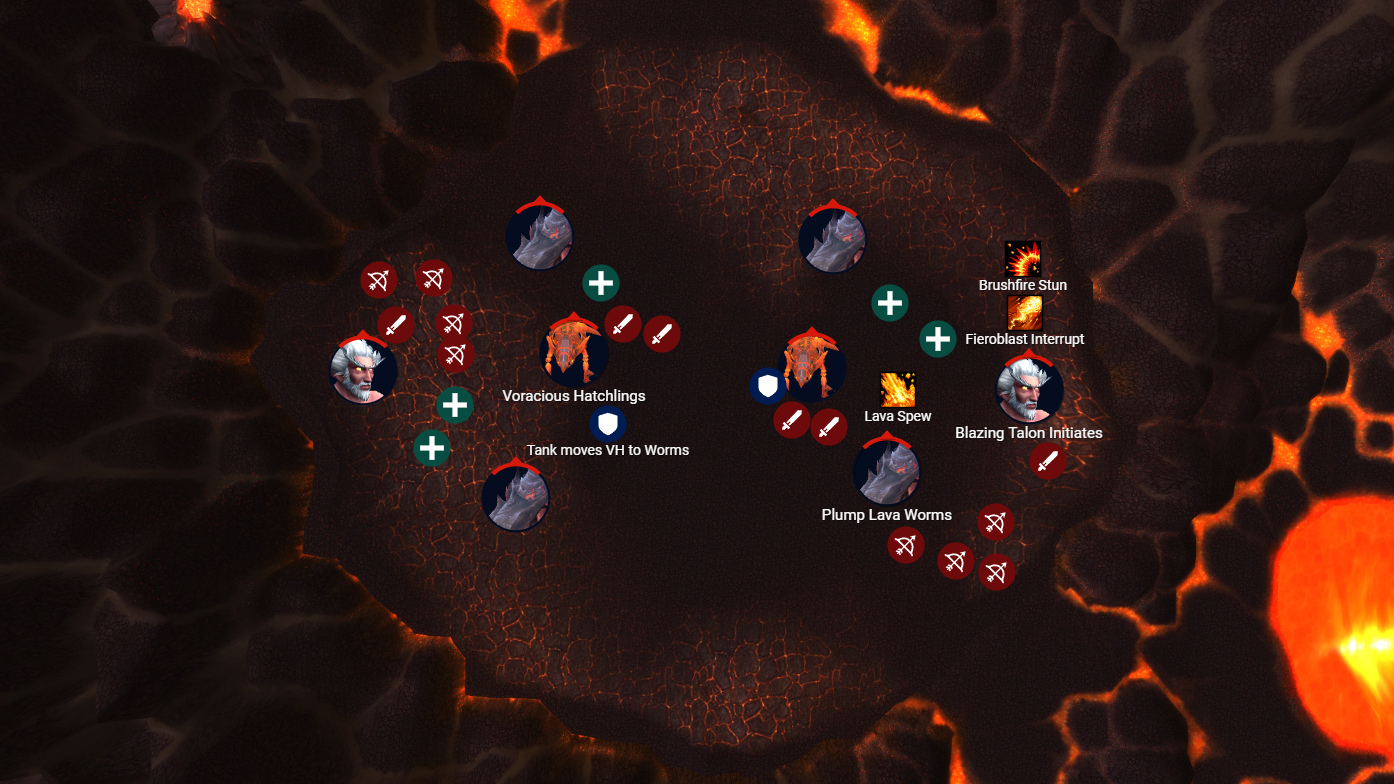
This is when the raid group will be split into two separate interactions, with the Ground Group having to deal with adds while the Air Group has to deal with Alysrazor!
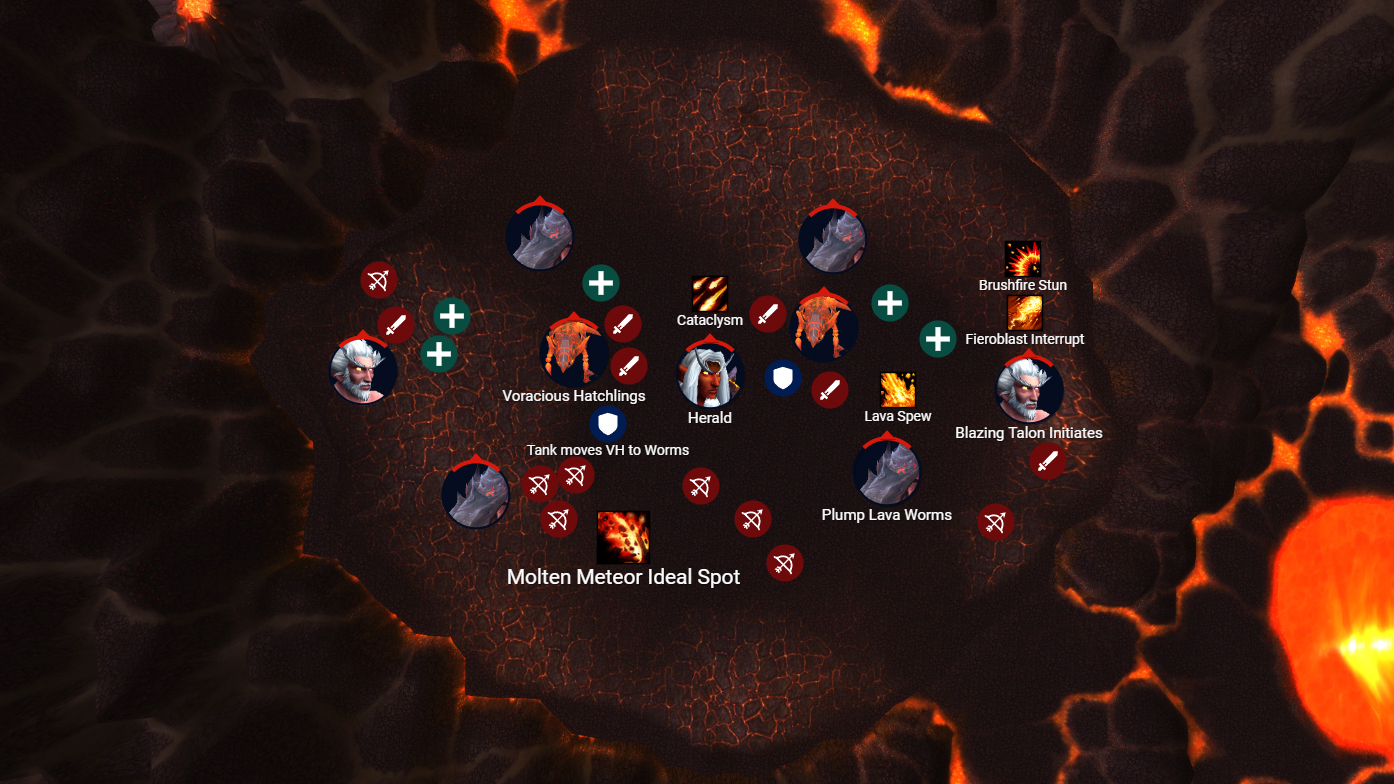
The Ground Group will have to deal with 3 separate types of adds on the Normal Difficulty and 4 adds on the Heroic Difficulty! The main 3 adds from this phase act the same on both difficulties. Once Alysrazor ascends to the sky alongside the Air Group, the Ground Group will deal with Blazing Talon Initiates, Plump Lava Worms, and Voracious Hatchlings.
All of those adds spawn nearly at the same time, with Blazing Talon Initiates appearing first on the sides of the arena, followed by Plump Lava Worms spread across the arena, and finally, Voracious Hatchlings spawning in pairs of two from the center of the arena. The Voracious Hatchlings will be brought by small Fire Hawks, with the adds being initially brought in egg form.
The Blazing Talon Initiates don’t have to be picked up by tanks, instead, they will be dealt with by the DPS, with a specific group of people cycling interrupt effects on every Fieroblast cast and stun effects on every Brushfire. DPS should focus those adds as fast as possible to allow them to have enough time to deal with the Voracious Hatchlings.
Plump Lava Worms should be avoided at all times due to their Lava Spew mechanic. Since they can’t be attacked at all, they must be avoided altogether until they can be interacted with by the Voracious Hatchlings.
The Voracious Hatchlings have to be picked up by tanks immediately, with the tanks having to stand right next to the eggs to trigger Imprinted. The Voracious Hatchlings will spawn with the Satiated buff which will last 15 seconds, transitioning into the Hungry effect. Tanks have to move the Voracious Hatchling to the Plump Lava Worms in order for them to devour the worms and avoid the Tantrum mechanic. If a Tantrum is triggered, tanks must use defensive cooldowns and also have nearby healers aid them! Voracious Hatchlings will also afflict tanks with Gushing Wound. It is smarter to allow the tank to reach the 50% Health Pool threshold rather than attempt to overheal through the effect, as this mechanic can chug through a healer’s Mana Pool extremely fast.
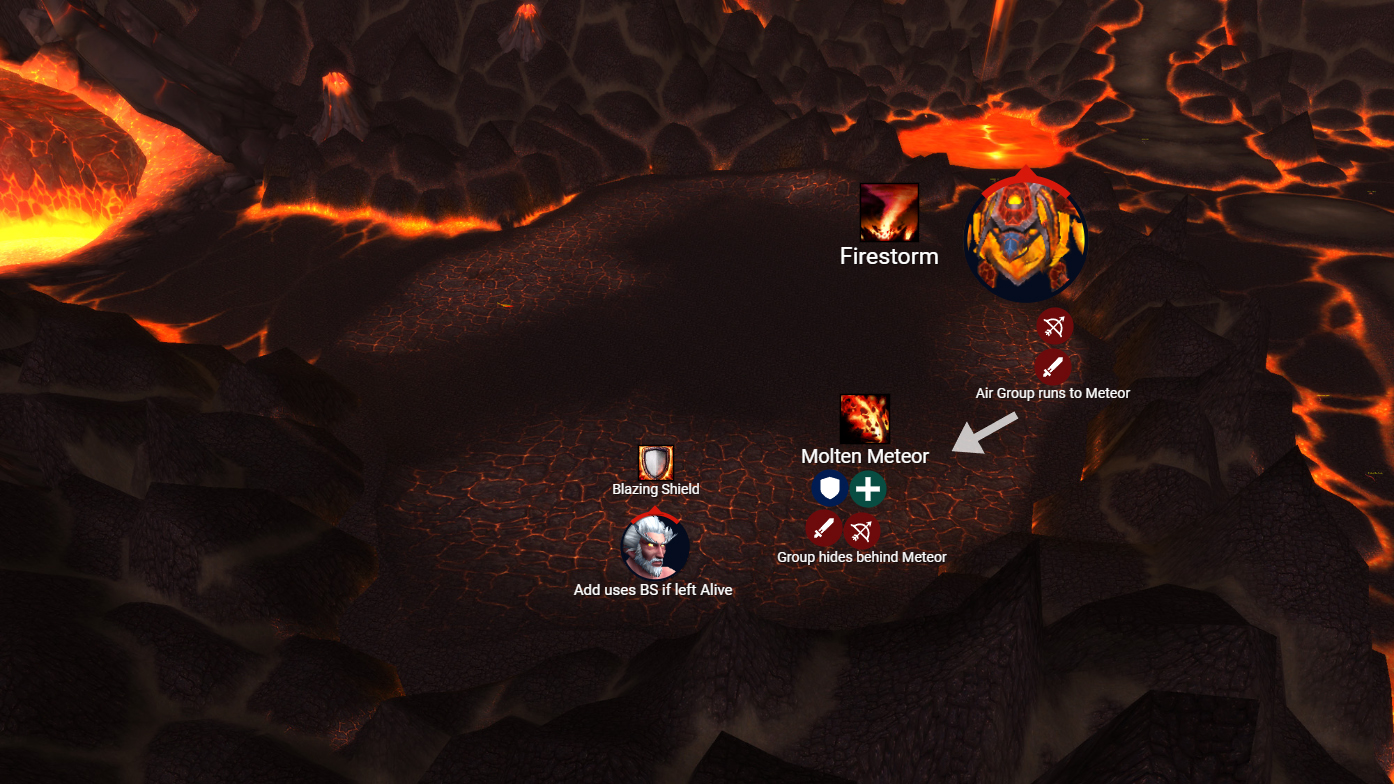
On the Heroic Difficulty, the Herald of the Burning End add will also spawn in the center of the boss arena, but this add must be ignored at all times. The only time in which this mechanic should be given attention is the very moment upon which the Molten Meteors summoned by the herald will land! Once the Molten Meteors land, Ranged DPS must focus the meteors ASAP, ensuring that the meteor stops in its tracks. The meteor will serve as a cover spot for the Firestorm mechanic.
Every 85-90 seconds, Alysrazor will unleash a deadly Firestorm which has a 5-second cast time, with the Firestorm itself lasting another 5 seconds. During this time, all players, including those from the Air Group must hide behind the Molten Meteors to avoid a raid wipe!
While the Ground Group deals with all the previously mentioned mechanics, the Air Group will have to deal with separate mechanics altogether!
Once every member of the assigned Air Group picks up 3 x Molten Feathers, they gain the Wings of Flame effect! Once the group gains the Wings of Flame effect, they will be able to fly and follow Alysrazor into the sky as she soars across the arena. While flying, Alysrazor will leave behind fire rings caused by the Blazing Power effect and dangerous Incendiary Clouds which can lead to swift deaths.
Since the Air Group should only be made out of DPS players, all players should avoid the Incendiary Cloud mechanic! Additionally, players must coordinate to move together through the fire rings created by the Blazing Power effect to gain the 8% Haste buff. This mechanic should be attempted at all times due to the possibility of triggering Alysra’s Razor. Even without the 75% increased Critical Strike Chance offered by the buff, players should attempt to go through the fire rings at all times due to the massive Haste buff which they can end up stacking.

After a considerable amount of time, Phase 1 will end, transitioning into Phase 2 with the arrival of the Fiery Vortex mechanic.
Phase 2
Once Phase 1 ends, Alysrazor transitions into Phase 2 by casting Fiery Vortex! The Fiery Vortex is placed in the center of the boss arena, dealing extreme damage to any player that comes in a 15-yard radius. When the Fiery Vortex is placed, Fiery Tornados spawn from it, circling the arena. During this time, Alysrazor also uses Harsh Winds, preventing any player from straying too far away from the Fiery Vortex!
Fiery Vortex deals high Fire Damage every 0.5 seconds while Fiery Tornado deals high Fire Damage every 1 second to any player in their proximity. Harsh Winds is a clear death sentence to any player affected by the effect as it is placed on a player in the form of a DoT effect that can’t be mitigated.
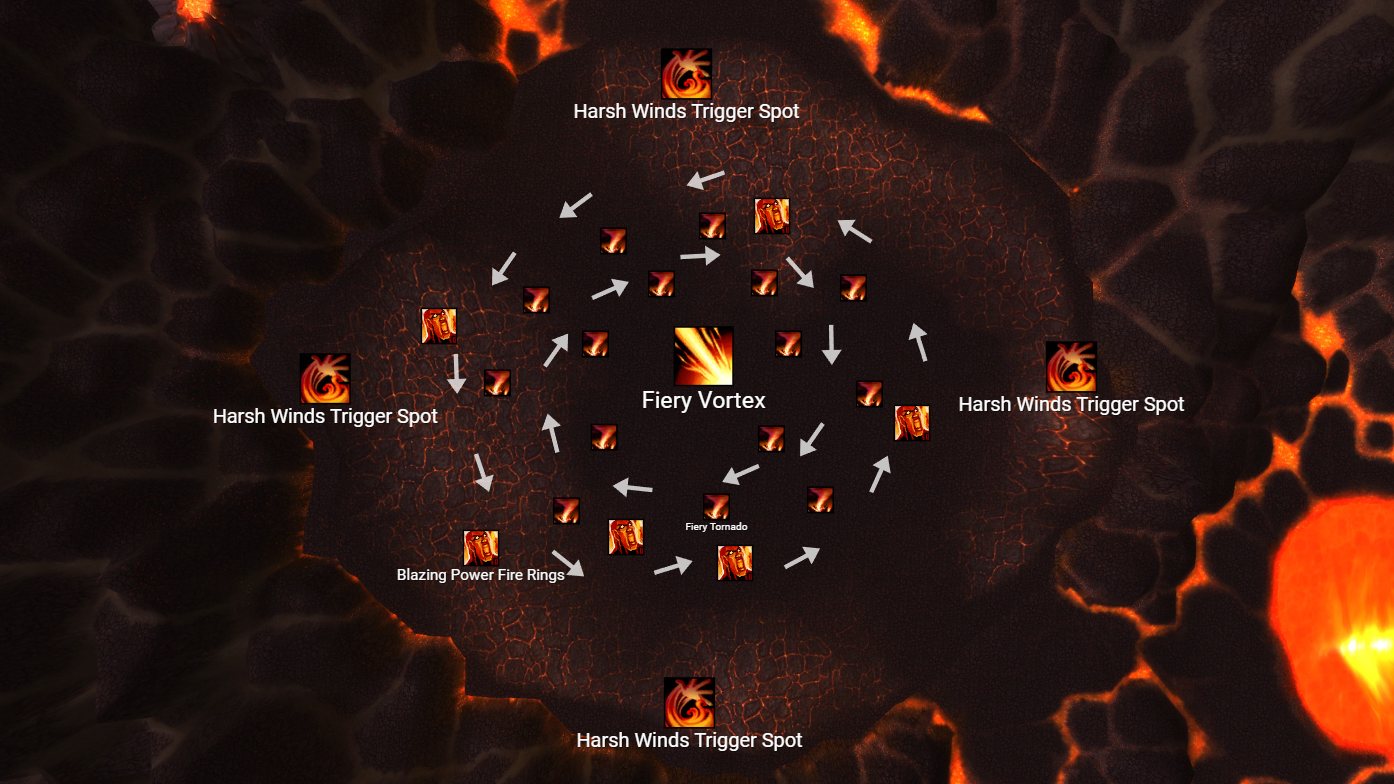
Players must make sure to slip by the Fiery Tornados while making sure that they don’t stay close enough to the Fiery Vortex. Additionally, the fire rings caused by Blazing Power will also be present on the ground, allowing players to pick them up. This is, however, entirely optional as in many cases picking up the Blazing Power fire rings won’t be possible due to Fiery Tornados pathing.
Fiery Tornados have a circular pathing, rotating across the entire arena!
Phase 3
As Phase 2 ends and the Fiery Vortex collapses, Alysrazor overheats and falls out of the sky, and gets immediately affected by the Burnout effect! While Alysrazor is afflicted by Burnout, she receives 50% increased damage from all sources. As Alysrazor is immobilized on the ground by the Burnout effect, she will offer players the Essence of the Green effect whenever they use an offensive spell on her. Healers along with any other DPS class that uses Mana as a resource should use Offensive Spells during this period to regenerate their entire Mana Pool!
This precise moment of the encounter is the best moment for Heroism/Bloodlust/Time Warp!
From the very first second in which Alysrazor collapses on the ground and triggers the Burnout effect, Alysrazor will also trigger the Spark effect. Spark will regenerate Alysrazor’s Molten Power gradually, granting her 3 Molten Power every 2 seconds. Shortly after, 2 x Blazing Talon Clawshapers will spawn from the sides of the arena, rushing to aid Alysrazor and cast Ignition. Ignition is a channeled ability and will restore 1 Molten Power per second, but it can be interrupted! Players should rush to interrupt their cast instantly and have the tanks grip or taunt the Blazing Talon Clawshapers, moving them to a position where they can be cleaved by the DPS.
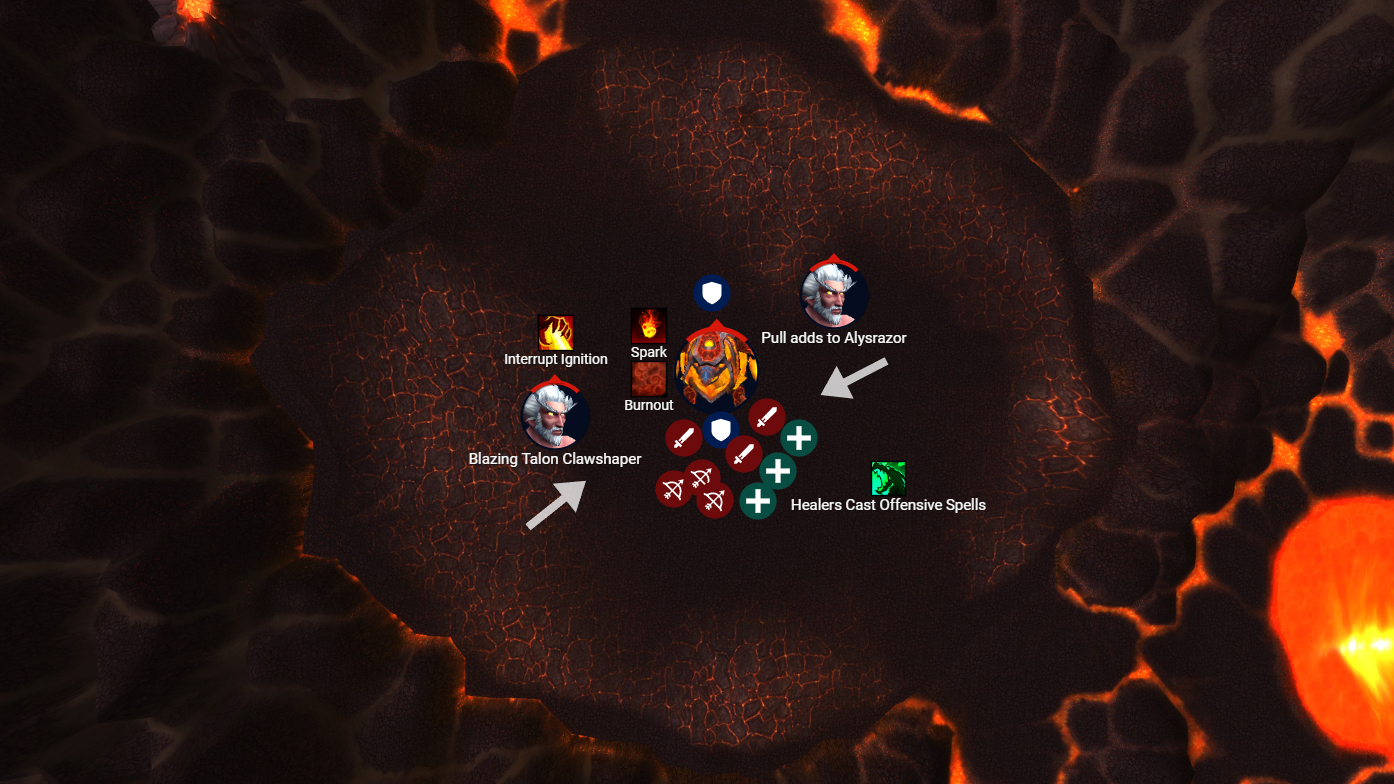
This phase lasts until Alysrazor gains 50 Molten Power!
Phase 4
As Alysrazor gains 50 Molten Power, she transitions into Phase 4, losing the Spark effect and gaining the Ignited effect! Ignited restores 2 Molten Power every 1 second. While Ignited is active, Alysrazor is strong enough to also use Blazing Claw and Blazing Buffet.
Alysrazor will use Blazing Claw from a stationary position, meaning that the tanks must immediately reposition Alysrazor and have her facing away from the raid. Tanks must swap during this part of the encounter as Blazing Claw can become lethal when a tank acquires too many stacks of Blazing Claw. However, the Off-Tank must go to the position of the Main Tank to avoid having Alysrazor cast even a single instance of Blazing Claw on the rest of the players from the raid group.
Blazing Buffet will work as a consistent aura, meaning that it can’t be interrupted or completely mitigated. The only thing that can be done about Blazing Buffet is to have players use AoE Utility abilities such as Aura Mastery or Anti-Magic Zone while also having healers spam AoE Healing Spells.
Once Alysrazor reaches 100 Molten Power she will cast Full Power, blasting away the raid and dealing moderately high Fire Damage. It is advised to use Aura Mastery or Anti-Magic Zone when Alysrazor is near 90-96 Molten Power to make sure that the effect of Full Power is mitigated.
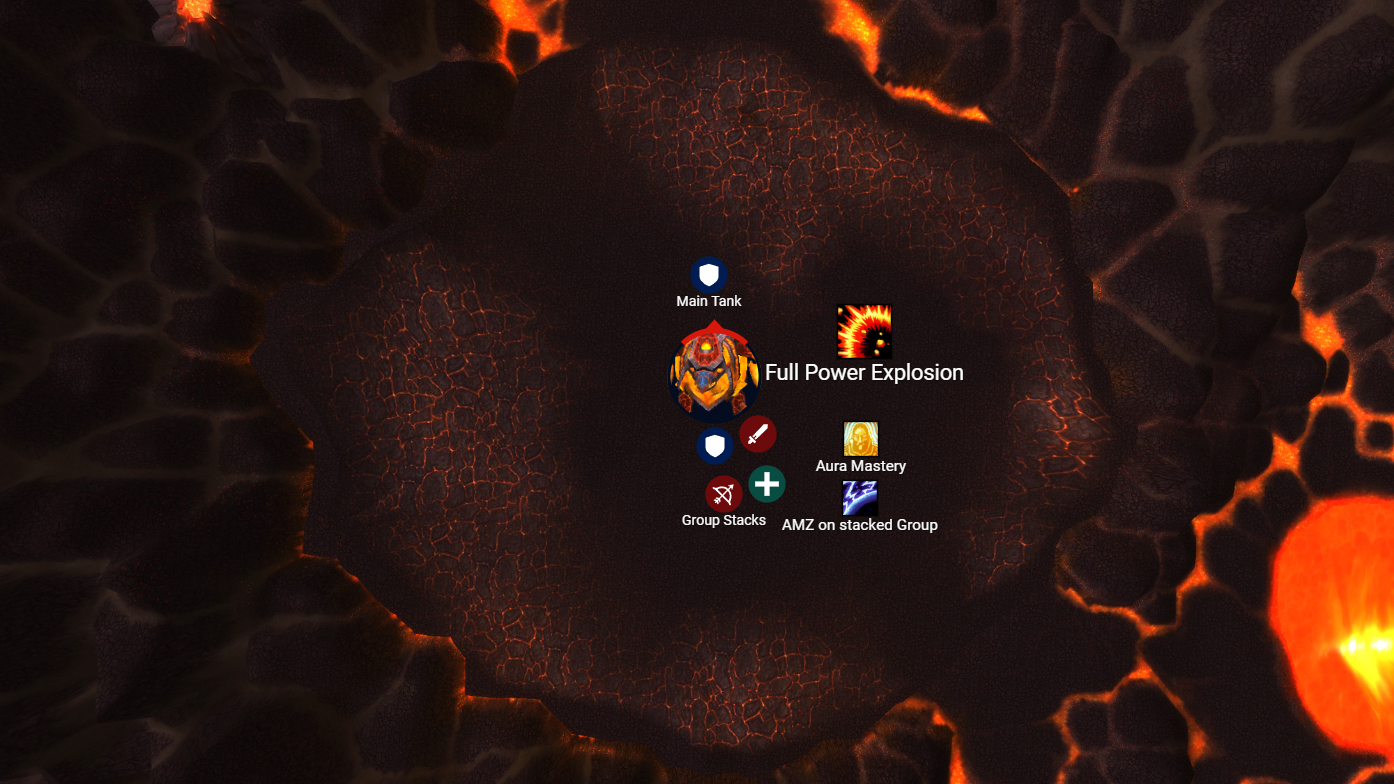
After the animation of Full Power ends, Alysrazor resets the cycle of her phases, immediately repositioning and starting to use the abilities from Phase 1 once again!
The entire encounter can last even 15 minutes for players who don’t have the most optimal gear, meaning that it’s much more of a battle of endurance rather than a race against time!
About the Author