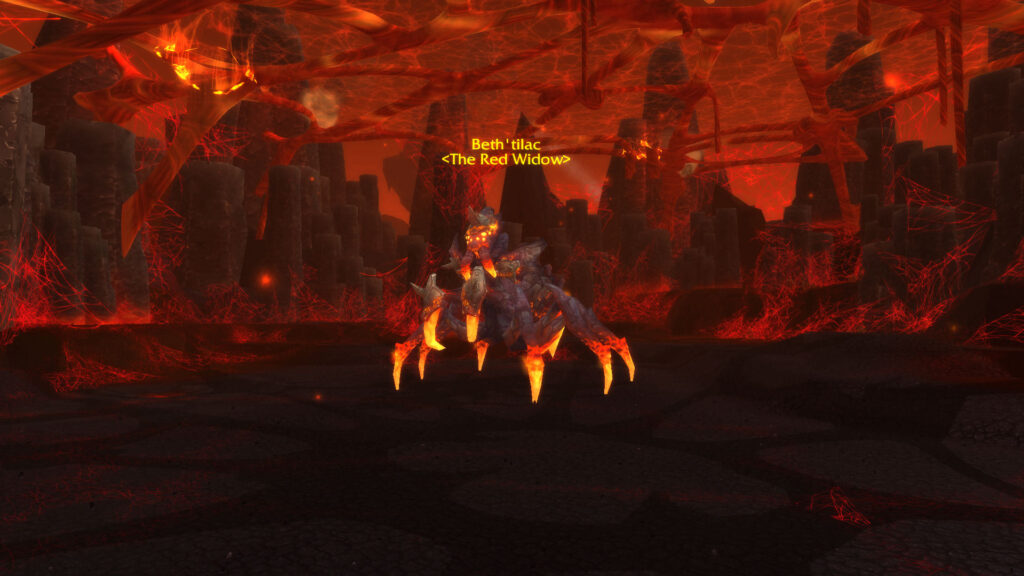
Beth’tilac is one of the first four bosses in the Firelands raid, which players can choose to face in any order. This fiery spider boss can be found in her lair on the west side of the raid map after passing through a maze of webs. Like the other bosses in the Firelands raid, Beth’tilac can be faced on either Normal or Heroic difficulty with both 10 and 25 player raid groups.


The Red Widow as she became known by her prey, Beth’tilac is the queen of the Cinderweb Spiders, acting as their matron. The cinder-blooded spider is a force to be reckoned with, preying on mortals and elementals alike. She rejoicefully joined the Fire Lord’s army, providing it with an unfathomably large brood. In return, the Fire Lord ignores her insatiable hunger, as both Beth’tilac and her brood feast on Fire Elementals, sucking even the magma out of their very physical forms.
She claims a nest in the Fire Lord’s domain, creating an almost impenetrable lair of fire-imbued webs, waiting patiently to feast on anything that encroaches on her territory.
The Beth’tilac Encounter has two main stages. In the first stage, players fight against her brood while she retreats to the safety of her webs. In the second stage, players face her in a frenzied state, consuming her brood frantically to heal herself while periodically empowering herself to finish off her prey faster. The encounter can be considered a time race, with two main phases that require strict coordination from players who attempt to slay her!
(You can reference the Beth’tilac Loot list if you want to see all of the boss drops.)
Role Summaries
- Every class that has a taunt ability should prioritize using it on the Cinderweb Spinners as soon as possible after they spawn.
- Prioritize Killing Cinderweb Spinners as soon as possible in Phase 1.
- Prioritize maintaining high Health Bars to counteract Ember Flare.
- Avoid falling through Beth’tilac‘s web before Smoldering Devastation is used.
- Prioritize killing Cinderweb Drones before they reach 0 Fire Energy.
- Avoid leaving Engorged Broodling to come close to the raid. Avoid misplacing Volatile Burst.
- Prioritize killing Cinderweb Spiderling before they reach either Beth’tilac or Cinderweb Drones.
- Everyone should prioritize ending the encounter as soon as possible due to the massive damage output Beth’tilac can reach through Frenzy.
- Both Tanks should prioritize using taunt abilities on Cinderweb Spinners as soon as they start casting Burning Acid.
- Main Tank should prioritize climbing on top of Beth’tilac’s web as soon as possible during Phase 1.
- Off-Tank should prioritize positioning Cinderweb Drones appropriately during Phase 1.
- Tanks must perform a proper swap to avoid dealing with The Widow’s Kiss during Phase 2.
- Tanks have to prioritize keeping their defensive cooldowns until Frenzy gains a large amount of stacks. Ideally, both tanks should have their big defensive cooldowns available throughout the last part of the encounter.
- Healers have to prioritize maintaining a healthy Mana Pool through the encounter, especially towards the end of the fight where they may need to consistently spam their abilities.
- Healers should top off the raid with AoE Healing after each tick of Ember Flare.
- Healers have to prioritize placing HoTs or absorb effects on players affected by Seeping Venom.
- Healers should immediately focus on healing players affected by Volatile Burst on the Heroic 10-man and 25-man versions of the encounter.
- Healers should ideally save their powerful cooldowns for the end of the encounter when Beth’tilac reaches a large number of Frenzy stacks.
- DPS have to kill the Cinderweb Spinners as soon as they’ve been taunted.
- Prioritize killing Cinderweb Spiderling before they reach either the Cinderweb Drones or Beth’tilac in Phase 1 and at the beginning of Phase 2.
- DPS should prioritize killing Cinderweb Drones as fast as possible to avoid causing Beth’tilac to use Smoldering Devastation too many times.
- DPS must soak the Engorged Broodlings as close as possible to their spawn point or particular designated spot by the Raid Leader.
- DPS must make sure that their offensive cooldowns are used as optimally as possible since the encounter against Beth’tilac is a race.
- Raid Leaders have to call out any incoming Smoldering Devastation in case players fail to notice the alert from Weakauras or DBM.
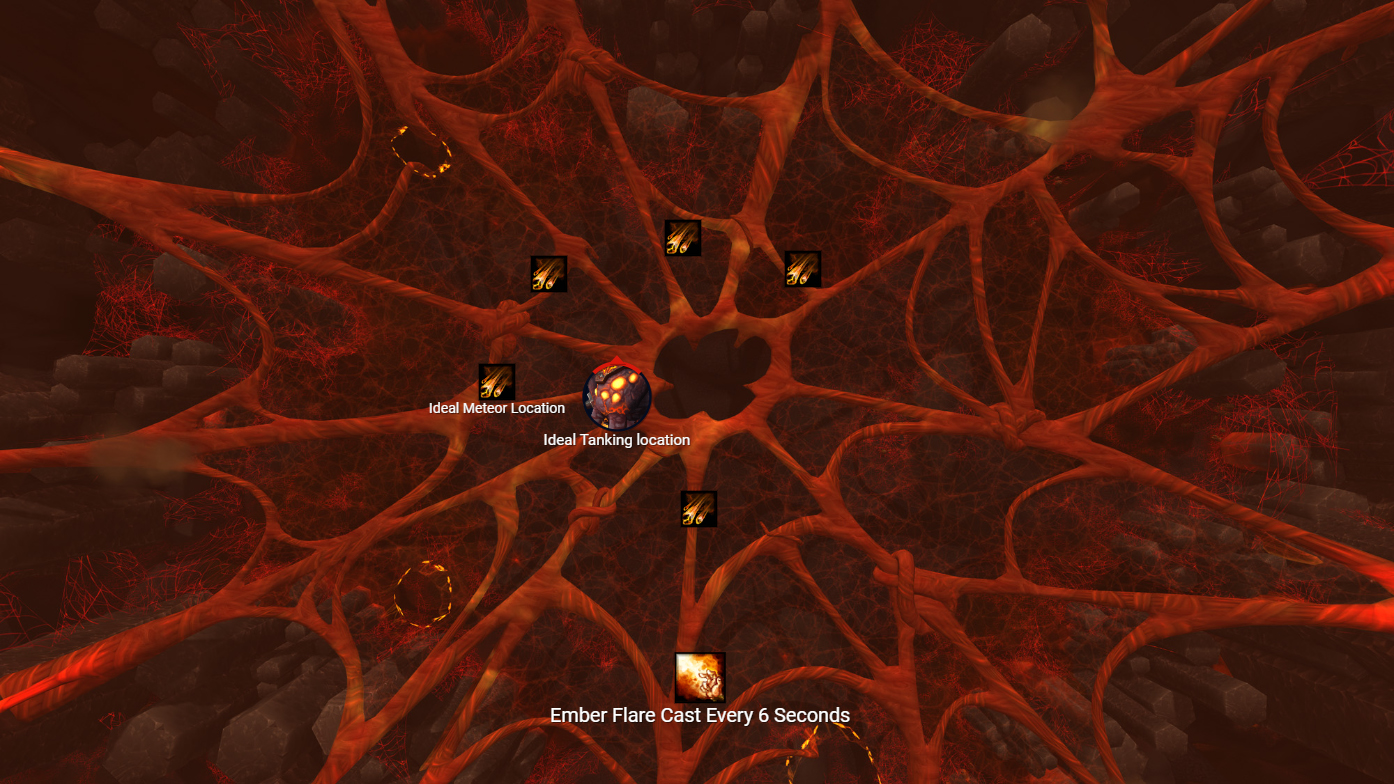
- Raid Leaders should notify the players on top of the web of any incoming Meteor Burn.
- Keep a close watch on Cinderweb Spiderling and make sure to direct the raid to kill them ASAP.
- Make sure to call out incoming swaps whenever The Widow’s Kiss is about to happen in case the tanks are having trouble communicating.
Abilities
Adds
Raid Composition & Preparation
Encounter Mechanics & Strategy
Normal vs Heroic Difficulty
The only real changes to the Beth’tilac Encounter between the Normal Difficulty and Heroic Difficulty are two new additional abilities for Cinderweb Spinners and Cinderweb Drones and the addition of the Engorged Broodlings adds. Besides the addition of those adds which spawn in Phase 1 and must be soaked as soon as possible, Cinderweb Spinners can channel Fiery Web Spin on the Heroic Difficulty while the Cinderweb Drones will use Fixate on random players.
Pull
The Beth’tilac Encounter is structured into two separate Phases, with Beth’tilac quickly climbing on top of her web at the very beginning of the encounter. Due to this unique interaction and a mechanic from Phase 2, players will have to refrain from using any of their long cooldowns or raid-wide abilities such as Heroism/Bloodlust/Time Warp at the beginning of the encounter and keep them for the later stages. While Beth’tilac is alone on her web with no player around, she continuously spams Venom Rain.
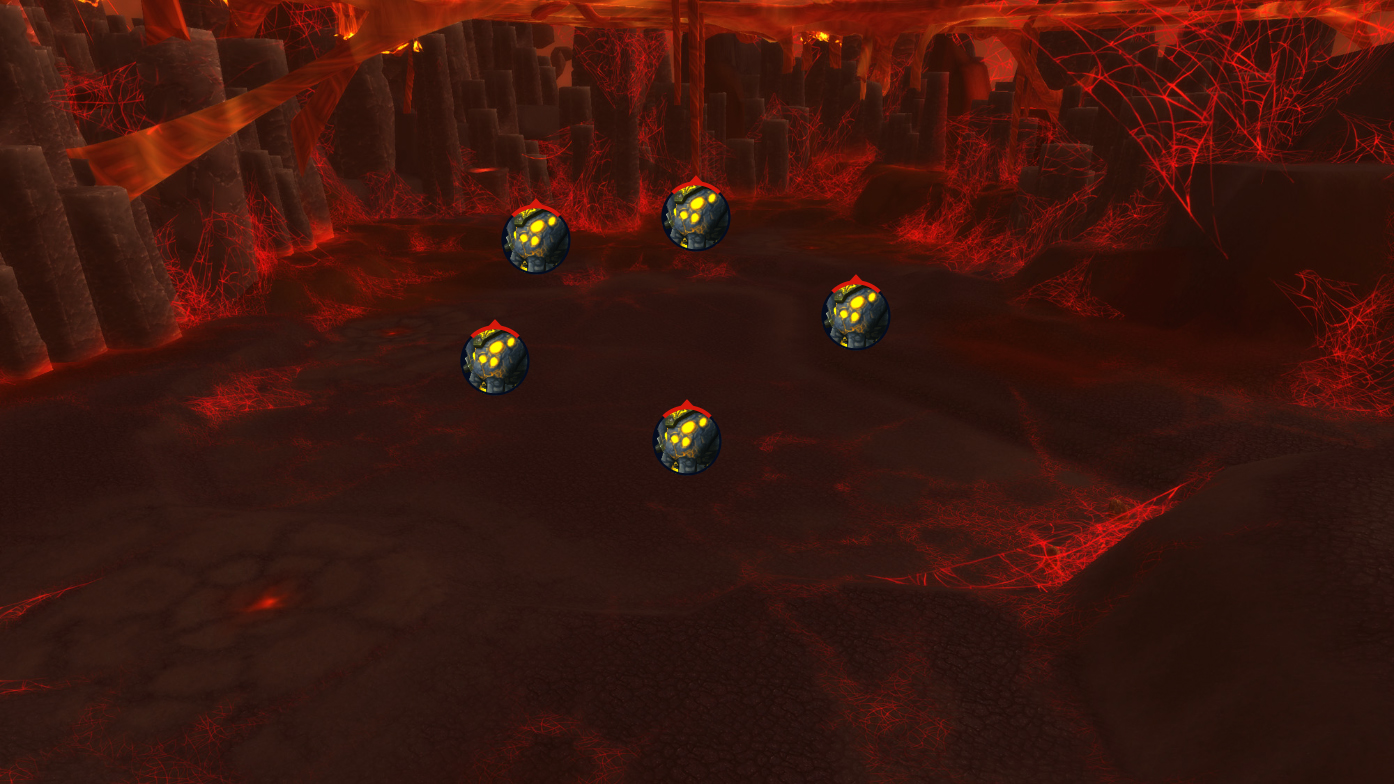
The most important aspect following the Pull is to take care of the incoming Cinderweb Spinners to allow players to climb atop the web! The Cinderweb Spinners spawn in a circle-like pattern from the center of the web, dropping down on web strands. Their specific spawn number is different based on whether the raid is in 10-man or 25-man difficulty.
Additionally, it is important to divide your raid group before the actual pull, assigning who will climb on top of Beth’tilac’s web and who will remain on the ground. Ideally, the Main Tank will climb the web, alongside 1-2 Healers and a few DPS. On the 10-man Difficulty, you will most likely want the Main Tank alongside 1 Healer and 2 DPS to climb on top of the web while on the 25-man difficulty, you will want 2 healers and 4-6 DPS on top of the web.
Phase 1
Phase 1 is split into two separate encounters that happen simultaneously, one below Beth’tilac’s web and one on top of her web. For this interaction, the raid group needs to split into two separate groups that each have to deal with separate mechanics.
As the encounter commences and you pull Beth’tilac, the number one priority for everyone in the raid is to use a Taunt ability on the Cinderweb Spinners, to force them to get down on the ground. While the Cinderweb Spinners remain on their web strings, they will continue to cast Burning Acid until taunted or killed by Ranged Attacks. On Heroic Difficulty, they will also use Fiery Web Spin which must be interrupted as quickly as possible, since it can randomly target a healer.
Once the first objective of killing the initial pack of Cinderweb Spinners is completed, the next objective is to have the Main Tank grab one of the web strings left over by the Cinderweb Spinners and climb on top of the web ASAP. Once the tank climbs up and picks up Beth’tilac‘s aggro, the rest of the players who are assigned to be part of the group that goes up on the web should use the web strings to climb up as soon as possible.
Failing to climb up on the web and stalling to kill the Cinderweb Spinners will cause Beth’tilac to continue her spam of Venom Rain, slowly corroding the raid and guaranteeing a wipe!
The group that is assigned to climb on top of the web will have to repeat the process 3 times. While on top of the web, players will have to deal with 3 main mechanics. The group on top of the web will be forced to soak Ember Flare throughout the entirety of the time they are on the web. Healers will have to make sure that the group remains healthy while this happens. Secondly, players on top will have to dodge the meteors caused by Meteor Burn and avoid falling through the holes they create. The tank should ideally attempt to tank Beth’tilac as close as possible to the center of the web while also trying to make sure that there are safe spots for the other players in case Meteor Burn specifically targets the tank.
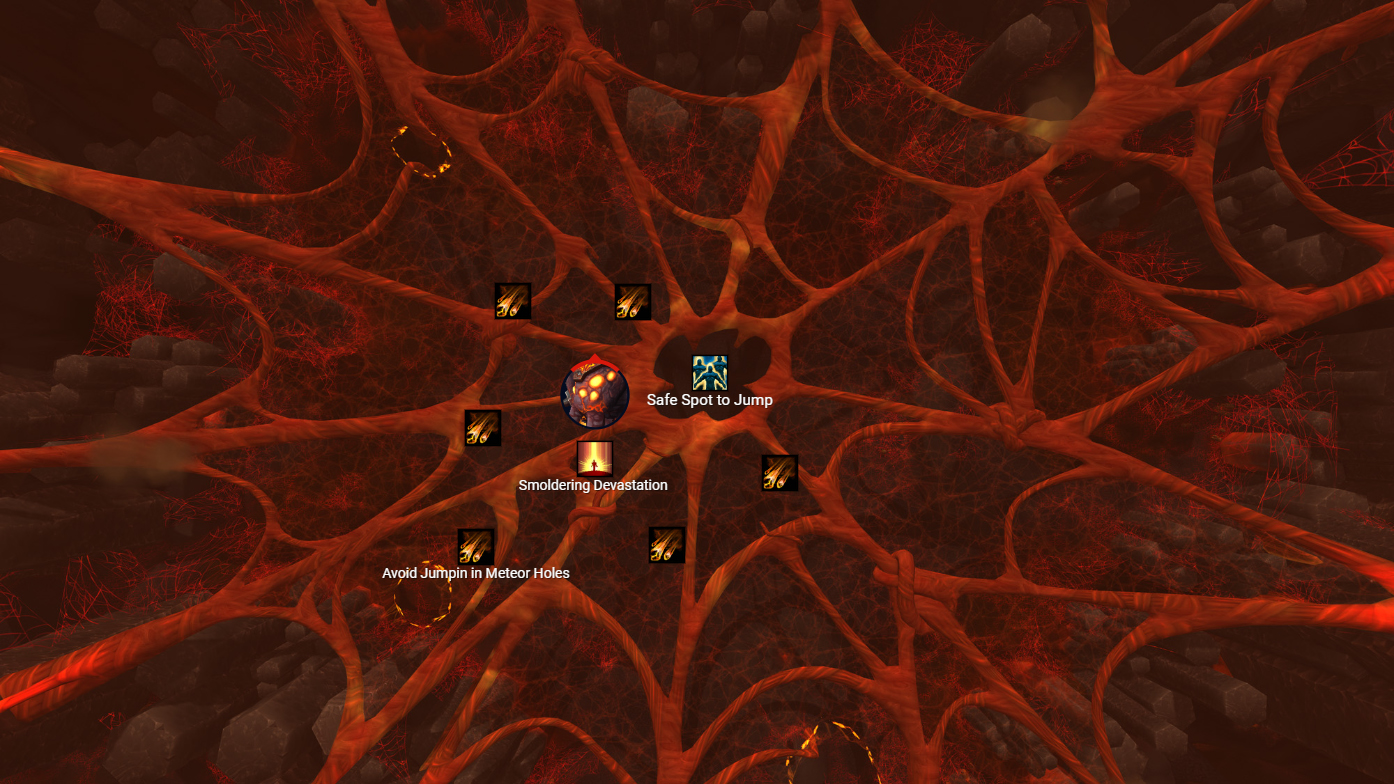
The last mechanic that players have to deal with is Smoldering Devastation. This mechanic represents a one-shot mechanic, forcing all players to abandon Beth’tilac’s web and join the rest of the group on the ground to avoid being burned to ashes. Smoldering Devastation will occur at least 3 times during the encounter, and acts as a small intermission. Smoldering Devastation will only occur when Beth’tilac‘s Fire Energy reaches 0. Smoldering Devastation‘s trigger time can also be forcefully hastened by allowing Cinderweb Drones to climb on top of the web and further drain Beth’tilac‘s energy. You will want to avoid allowing Cinderweb Drones to do that! Players will be able to safely get down from the web by jumping through the middle of it, receiving a fall damage-reduction buff. Jumping through the holes left over by Meteor Burn will not provide the damage reduction buff while falling.
Meanwhile, the group that remains on the ground has to deal with entirely different mechanics while the group that stays on the web deals with the previously mentioned abilities. The group on the ground mainly has to deal with a large number of adds and resource management. On the Normal Difficulty, the group below the web will mostly only have to deal with Cinderweb Spiderlings and Cinderweb Drones.
The Cinderweb Spiderlings and Cinderweb Drones spawn at the same time. Multiple Cinderweb Spiderlings will spawn at the same time while only one Cinderweb Drone will spawn at a time. The spiderlings will choose to follow the drones, randomly casting Seeping Venom while they path toward the drone. The Cinderweb Spiderlings have to be cleaved off as fast as possible by the DPS while the tank repositions the Cinderweb Drone. If the tank fails to position the drone properly and the DPS players don’t manage to kill the spiderlings, the drone will cast Consume on the spiderlings, empowering itself substantially.

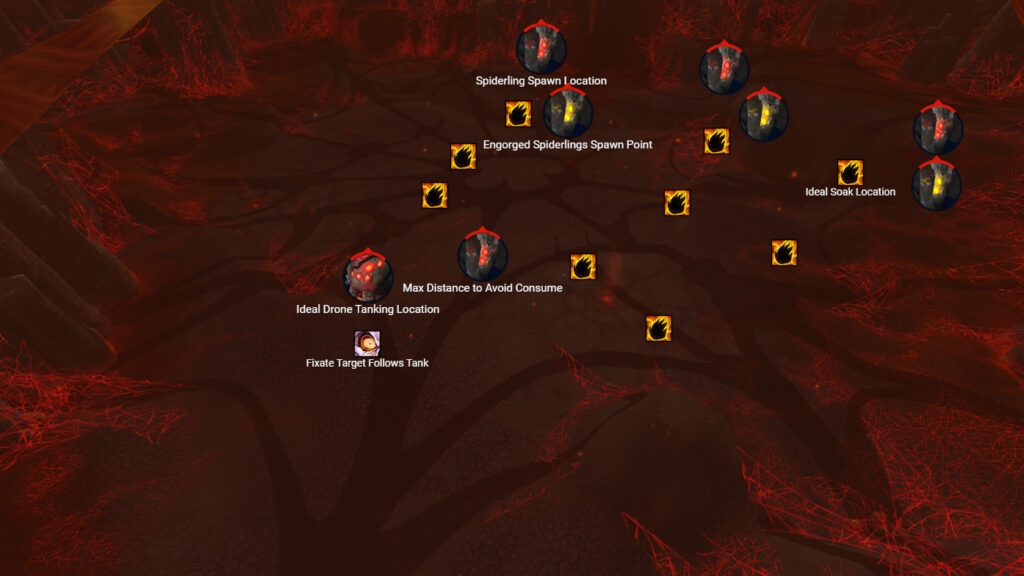
The main goal for the group below the web is to kill the Cinderweb Drones as fast as possible before their Fire Energy reaches 0. Failing to do so will create complications due to faster Smoldering Devastation casts and the potential trigger of Consume in Phase 1. Considering the entire encounter is a time race, that would most likely generate a wipe. Additionally, on the Heroic Difficulty, Engorged Spiderlings will also spawn from the same cavern entrances that Cinderweb Spiderlings spawn from. Those adds pick a random target, causing an AoE explosion through Volatile Burst when they reach the target, dealing heavy damage to any player caught in the explosion radius and leaving a damaging pool on the ground. Because of this, the targeted player must go to the Engorged Spiderling as soon as it spawns to soak the damage and properly position the pool left by the add. Ideally, you should place the pools as close as possible to the initial spawn point, stacking them closely one after another as the Engorged Spiderlings spawn.
Furthermore, the Cinderweb Drones will Fixate a random player on Heroic. This can be dealt with by simply having the player move to the tank, as no kitting is necessary considering the drone will deal 75% reduced damage.
If both groups perform their tasks appropriately, an intermission phase begins after the cast of each Smoldering Devastation, upon which more Cinderweb Spinners spawn. Players will have to repeat the interaction from the beginning of the fight, killing the Cinderweb Spinners to allow the assigned group to climb back on top of the web.
Upon completing this sequence at least 3 times, the encounter transitions to Phase 2.
Phase 2
Phase 2 is a lot simpler than the complicated mess from Phase 1, with just a few mechanics to take into consideration. First and foremost, when Beth’tilac descends, she attempts to Consume any Cinderweb Spiderling that is still alive at that moment. This can potentially result in a wipe since each consumed spiderling will heal her for 10% of her Max HP. Since the entire encounter is a time race, this would spell disaster for the group considering the main mechanic of Phase 2, Frenzy.
Besides the fact that Beth’tilac has a relatively short Enrage Timer, her Frenzy makes the matter worse. At the beginning of Phase 2, Beth’tilac uses Frenzy, with the ability granting her a 5% Physical Damage buff for each concurrent stack. As the ability stacks every 5 seconds, with the potential to infinitely stack, Tanks must make sure that they keep their Defensive Cooldowns for the point at which Beth’tilac reaches 10-17 stacks. The ideal situation is for all the DPS players to have their Offensive Cooldowns available around the point where Beth’tilac reaches 4-5 stacks. This phase is mostly considered a burn phase, meaning that Heroism/Bloodlust/Time Warp is ideally used whenever all the DPS have access to their burst windows.
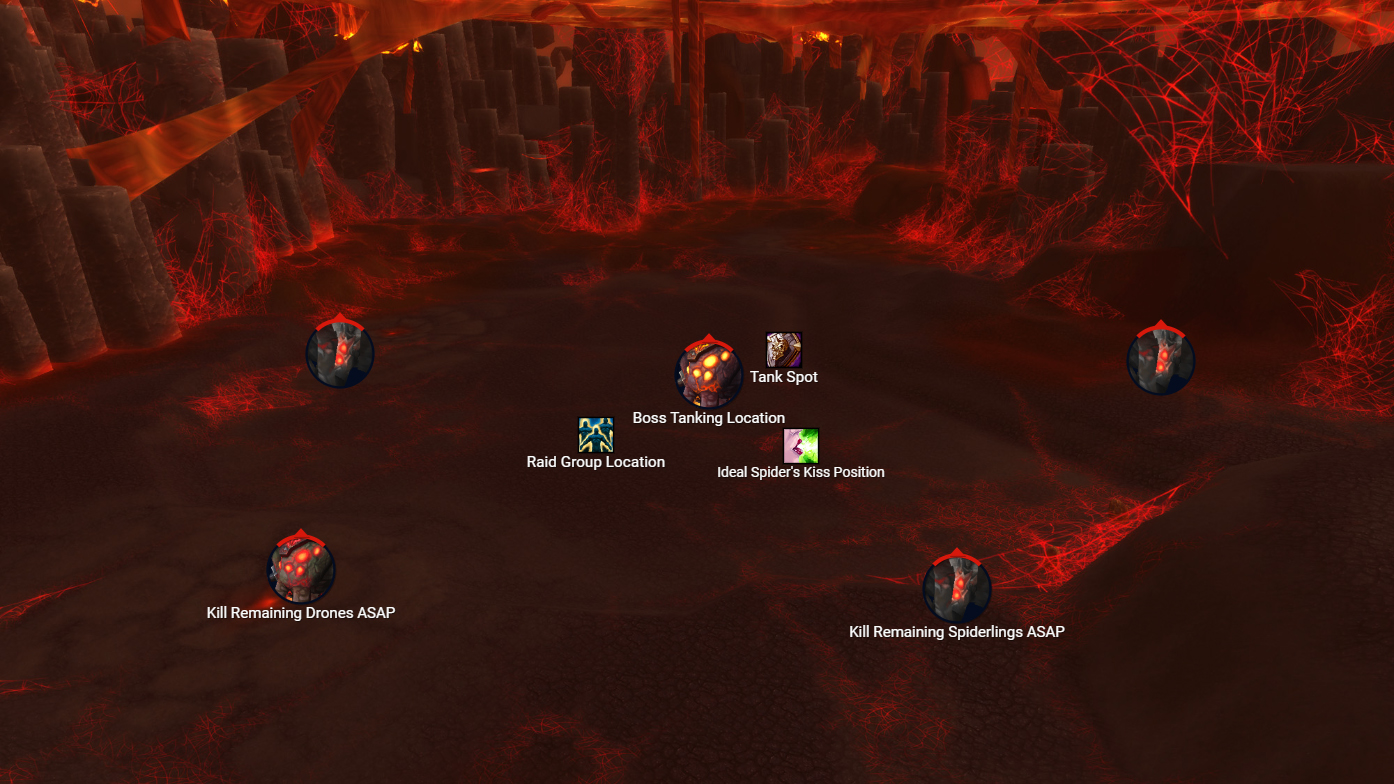
Besides Frenzy, the group also has to deal with two other mechanics. The Ember Flare that only affected the group from the top of the web is back and will now affect everyone, meaning that players should stay as stacked as possible to allow healers to perform AoE healing more easily. Additionally, Beth’tilac will also pressure the tanks with The Widow’s Kiss.
There are two main ways to deal with The Widow’s Kiss. You can perform a normal tank swap and have the group reposition as well to avoid the AoE Fire Damage inflicted by the debuff. This is the safer option out of the two. The second option is to simply have the Off-Tank taunt Beth’tilac before she casts the ability to take over the buff and step out of the group while The Widow’s Kiss, followed up by a direct taunt back performed by the Main-Tank. The second option is riskier as it leaves both tanks without a taunt.
Considering all of those tactics, the rest of the encounter remains a simple race to kill Beth’tilac before she reaches 20-25 stacks of Frenzy. The second phase is much more taxing on the healers than the rest of the group.
About the Author