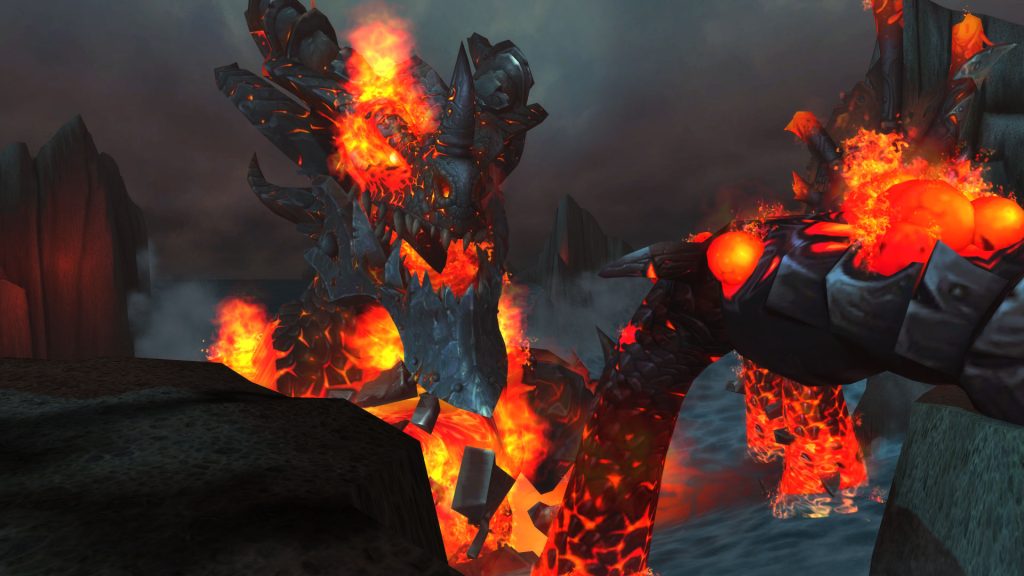
The Madness of Deathwing is the final encounter of the Dragon Soul raid as well as the Catacylsm expansion. It’s the second fight in an epic two-part battle against Deathwing the Destroyer. After his apparent destruction following the Spine of Deathwing encounter, Deathwing emerges from the Maelstrom as a twisted and fully corrupted abomination determined to destroy the world he once served.
This battle begins after the other seven boss encounters have been defeated. After arriving in the Maelstrom, speak with Thrall twice to start the fight. When it’s over, loot the Elementium Fragment on the platform with the NPCs to get your rewards.
“I AM DEATHWING, THE DESTROYER, THE END OF ALL THINGS, INEVITABLE, INDOMITABLE; I AM THE CATACLYSM!”
– Deathwing
Raid Composition
These are our recommendations for your raid composition for this fight. You should first decide how many tanks and healers you need and then fill the other spots with DPS. It’s possible to do this fight with only one tank, but bringing a second tank will be a lot safer. This fight has a 15-minute enrage timer and you will be periodically faced with an ability that requires you to quickly kill an add, so you should ensure that you have enough damage to be successful.
Role | 10 Normal | 10 Heroic | 25 Normal | 25 Heroic |
|---|---|---|---|---|
1-2 | 1-2 | 1-2 | 1-2 | |
3 | 3 | 6-7 | 6-7 | |
5-6 | 5-6 | 16-18 | 16-18 |
Role Summaries
 Everyone
- Stick with the raid – you should never be on a different platform than everyone else.
- On Heroic difficulty, if you get the Corrupting Parasite debuff, try to be inside a Time Zone when it expires. Everyone who doesn’t have the debuff should be at least 10 yards away when it detonates.
- Stand as far away as you can from the yellow swirl when an Elementium Bolt is launched.
 Raid Leader
- Make sure your raiders know the order you will be clearing the platforms and are moving together from one to the next as soon as they destroy each Limb Tentacle.
- Know what cooldowns are available for if an Elementium Bolt is going to hit the raid and call for them. Options include Anti-Magic Zone and Power Word: Barrier.
- Be conscious of the current Limb Tentacle’s health and make sure your group has killed the Mutated Corruption and Elementium Bolt before you push it below 70% health and spawn more adds.
- Likewise in phase two, you may want to hold off on pushing Deathwing past 15/10/5% health if you have adds to deal with, as each threshold increases the incoming damage to the raid.
- Bloodlust either on the final platform in phase one, or to burn Deathwing at the very end of the fight. If you choose to do the latter, you could Bloodlust at the very beginning and have it available again when you need it.
 Tanks
Tanks
- Make use of Ysera’s Dream ability early on to save your cooldowns for when you don’t have it anymore. It’s on a short 30-second CD, so you can use it often.
- Be aware that when Alexstrasza leaves, you will lose Alexstrasza’s Presence, lowering your health back to its normal levels.
- Be ready to use damage reduction cooldowns for Impale. The tank who took the last Impale should not be allowed to take a second one, so taunt swap if necessary.
- Pick up Mutated Corruptions and Regenerative Bloods as soon as they spawn. In phase two, pick up Elementium Terrors immediately. Keep adds inside Time Zones as much as possible to reduce their attack speed.
 Healers
- You may be asked to use any damage reduction cooldowns you have as part of a rotation for helping the tanks survive Impale.
- Try to conserve mana while you have the Ysera’s Presence buff, and be aware that you’ll need to work harder to keep up once it’s gone.
- Be aware that everyone’s health will be buffed by Alexstrasza’s Presence until she leaves, and then healing will feel tighter.
- In general, healing will get more frantic as the fight progresses and your group takes more damage.
- On Heroic difficulty, be ready to heal players who are afflicted with Corrupting Parasite as they take increasing damage over its duration.
 DPS
DPS
- You’ll have the Spellweaving buff for most or all of this fight, which causes your attacks to also deal AoE damage to nearby mobs. Make use of this to cleave adds as much as possible.
- On Heroic difficulty, focus Corrupting Parasites when they spawn.
- Start attacking Elementium Bolts as soon as they launch and kill them as quickly as possible.
- Prioritize Regenerative Bloods when they spawn as well.
- When Alexstrasza leaves, you’ll have to start focusing Blistering Tentacles when they spawn.
- Burn the Limb Tentacle on your current platform before Deathwing finishes casting Cataclysm.
- In phase two, focus down Elementium Fragments immediately to limit damage to the raid.
- On Heroic difficulty, in phase two, burn down Congealing Bloods before they reach the boss.
Mechanics & Strategy
This encounter has two phases and takes place on a set of four platforms overlooking the Maelstrom. You will be assisted in the fight by Thrall and the four Dragon Aspects. Each of the Dragon Aspects will hover near one of the platforms, which you can jump between by walking off the edge, similar to jumping between platforms in Throne of the Four Winds. Left to right facing the Maelstrom are Alexstrasza, Nozdormu, Ysera, and Kalacgos. You’ll start out on Ysera’s platform with Thrall, who will move to a small, inaccessible island of his own when the fight begins.
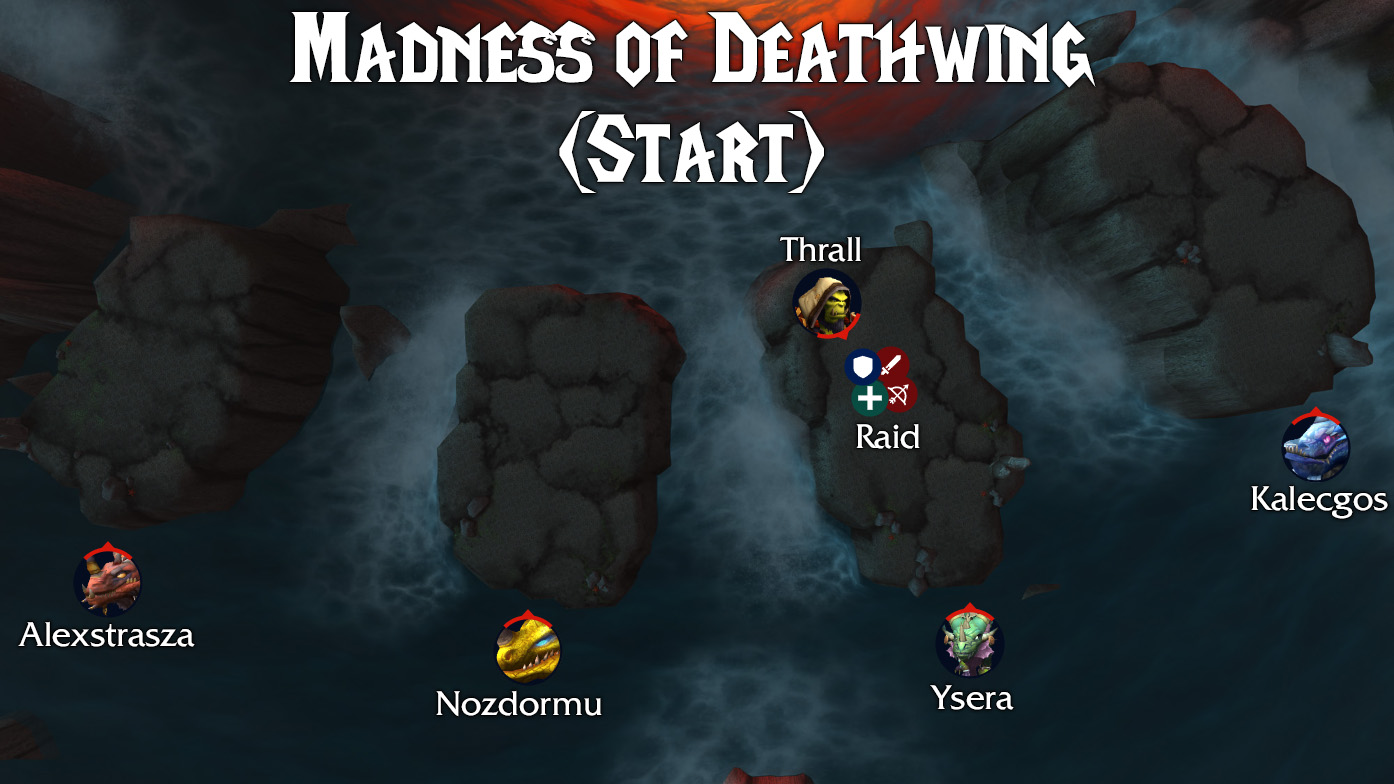
While you can clear the platforms in any order, most groups prefer to do them in the following order to maximize the buffs that are provided by the four Dragon Aspects:
- Ysera’s platform, second from the right, where you start the fight by talking to Thrall
- Alexstrasza’s platform, furthest to the left
- Nozdormu’s platform, second from the left
- Kalecgos’s platform on the far right
Each Dragon Aspect provides buffs to the raid, which disappear when their platform is cleared as they take the fight to Deathwing. The fight will get progressively more challenging over the course of the first phase as you clear each platform with less and less assistance from the Aspects. Then you’ll regain their help for the final push in phase two. We’ll go through the buffs and abilities that are provided by the Aspects first, and then look at each phase’s other mechanics.
Aspect Buffs
Each Aspect provides a different form of assistance to your raid in this fight. When you clear one of the Dragon Aspects’ platforms in phase one, they will fly off to fight Deathwing directly, leaving you without their help for the rest of the phase. When phase two begins, you’ll regain all of their abilities.
Thrall
Thrall provides the Carrying Winds that allow you to jump between the platforms. He doesn’t leave the fight like the other Dragon Aspects, so you’ll have these for the entire encounter. Note that after you jump through these winds, you’ll have a 60% movement speed increase for 10 seconds. You can even gain a second stack of this buff for a 120% increase.
Ysera
Ysera’s Presence increases all healing done by 20%, so your healers will be able to do a lot more with a lot less while she is in the fight, allowing them to conserve mana for later on.
Ysera’s other ability, Enter the Dream, gives you the special ability Dream, which occupies your Extra Action Button in the middle of your screen. You can use this ability to reduce your incoming damage by 50% for 5 seconds, on a 30-second cooldown. Your group should make liberal use of this when it’s available, especially your tanks, and save other cooldowns for when Ysera is out of the picture.
Alexstrasza
Alexstrasza’s Presence increases all players’ maximum health by 20%, so you’re more durable while she is assisting you. Your tanks especially will feel the loss of this buff later on as the damage you take increases.
Alexstrasza will also use Cauterize to destroy Blistering Tentacle adds while she is present, allowing you to ignore them for the first couple of platforms. When she flies off you will have to start focusing them down yourselves.
Nozdormu
Nozdormu’s Presence increases all players’ Haste by 20%, which is a significant buff to both damage and healing. Going by the standard order, you’ll only be missing this buff for the last platform, but you will definitely miss it when that happens.
Time Zone is Nozdormu’s other ability, a very useful bubble that will be placed on the current platform and slows down the attacks of any adds within it.
Kalecgos
Kalecgos’ Presence increases all of the damage that your raid deals by 20%. This buff is very strong, and you’ll want to save Kalecgos’s platform for last so you never have to fight without it.
Kalecgos also gives your raid the Spellweaving buff, which even further increases your damage output by causing all of your attacks to also deal Arcane damage in a 6-yard radius. This AoE combined with his Presence buff will be very much needed to take out all of the adds and make it through both phases before your raid is overwhelmed.
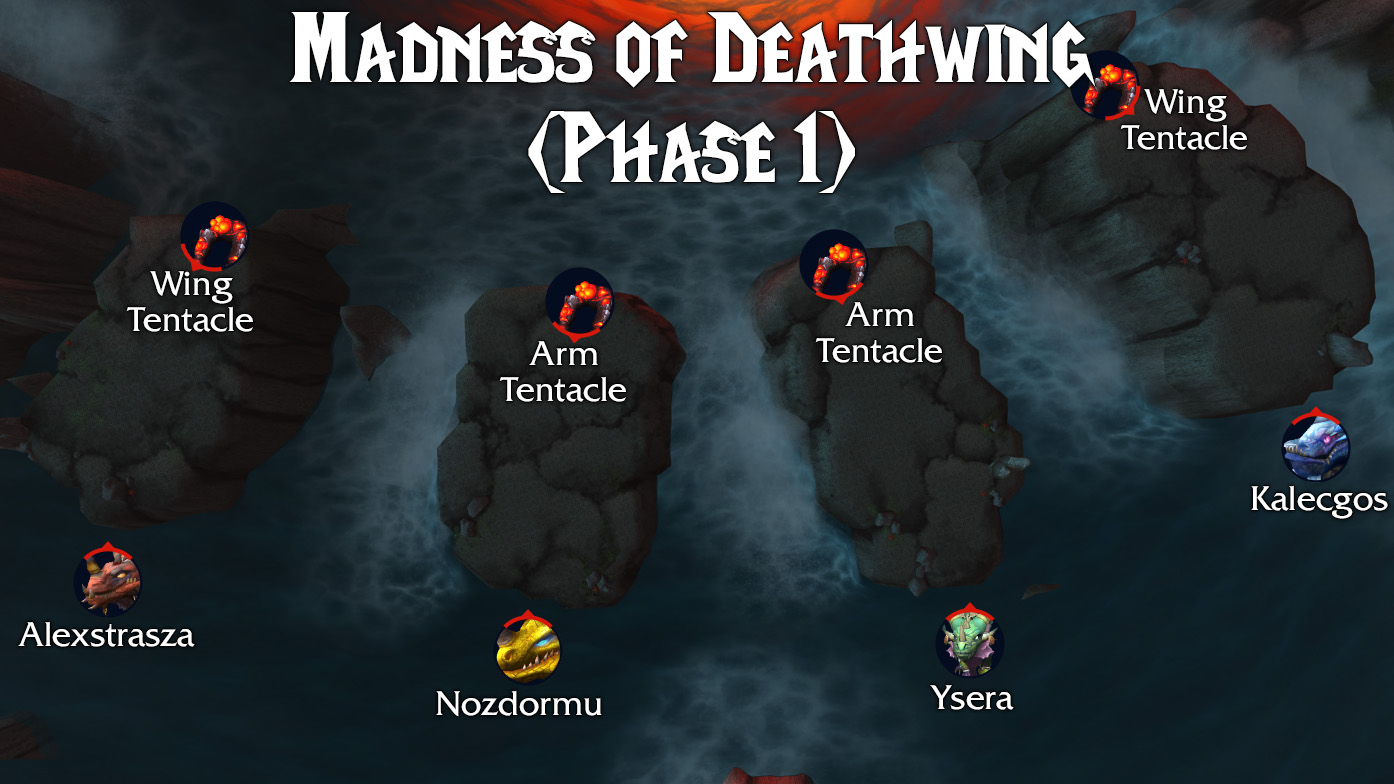
Phase 1: Destroying the Limbs
For the first phase of the fight, you will be dealing with Deathwing’s monstrous limbs. The outer two platforms (Alexstrasza’s and Kalecgos’s) will each be gripped by a Wing Tentacle while the two inner platforms (Nozdormu’s and Ysera’s) will each be gripped by an Arm Tentacle. These adds are effectively the same other than their names and appearance and will be referred to collectively as Limb Tentacles.
As you make your way from platform to platform to destroy the Limb Tentacles, you’ll also be assaulted by three other types of adds while dealing with a couple of Deathwing’s own abilities.
Assault Aspects
Despite the name, this ability is really an assault on your raid. The boss will select the platform with the most players on it (that still has an active Limb Tentacle) to target with his other abilities. About 10 seconds after this is cast, a Mutated Corruption will spawn on the selected platform. After 45 seconds, the platform will be targeted by an Elementium Bolt. After two minutes, he’ll begin to cast Cataclysm.
Corrupting Parasite (Heroic Only)
On Heroic difficulty, Deathwing will cast this twice on each platform: once about 10 seconds after Assault Aspects begins, and again after another 60 seconds have passed. It places a debuff on a random player that deals increasing amounts of Shadow damage over its 10-second duration. When the debuff is removed or expires, it will spawn a Corrupting Parasite add and deal a large amount of Fire damage to any players within 10 yards other than the debuff’s target. The add that spawns does not melee and does not have a threat table, but it does have one ability.
Healers should focus heals on targets of this debuff as they will take more and more damage until it runs out.
Unstable Corruption (Heroic Only)
The Corrupting Parasite mob will begin casting this as soon as it spawns. It has a 10-second cast time, and when it goes off it will deal Fire damage to the raid that is equal to 10% of the mob’s remaining health. If the mob is within Nozdormu’s Time Zone, this cast time will be increased. It can’t be moved, though, so players with the debuff should aim to drop it within the Time Zone. Everyone else should make sure they are outside of the blast radius when it spawns.
Mutated Corruption
One of these tentacle adds will spawn 10 seconds after Deathwing targets a platform with Assault Aspects. They spawn near the back of the platform and should be immediately picked up by a tank.
Impale
Mutated Corruptions will attack the tank with this ability, dealing massive physical damage and increasing the damage they take from the next one by 100% for 45 seconds. This ability is especially brutal on Heroic difficulty. Impale can’t be countered by abilities that allow you to cheat death, such as Guardian Spirit. Additionally, the debuff it leaves can’t be removed with Divine Shield or similar abilities. Only abilities that reduce your damage taken will help here.
Tanks will need to make liberal use of defensive cooldowns for this, including Ysera’s Dream ability if she is still active. Tanks should also taunt off each other to avoid one of them taking a second Impale while they still have the debuff from the last one.
In a pinch, a Shadow Priest with Dispersion can move close to the Mutated Corruption and the tank can move away, causing the Shadow Priest to soak the hit instead. This will only be viable once every 2 minutes due to the cooldown on Dispersion.
Crush
Along with attacking your tank with the ability above, Mutated Corruptions will also use this ability to damage the raid. It deals heavy physical damage in a cone in the direction of a random raid member.
Elementium Bolt
Deathwing will cast this 45 seconds after Assault Aspects, launching an add (also named Elementium Bolt) toward that platform. Its destination will be marked with a yellow swirl on the ground. When it lands, it will hit the raid with Elementium Blast, dealing a massive amount of Fire damage at the point of impact and less as you get further away from it. It will continue to deal heavy Fire damage every 5 seconds until it’s destroyed. It doesn’t melee or have a threat table, so you don’t need to tank it.
Your damage dealers should focus on this bolt as soon as it’s launched with a goal of destroying it before it ever hits the platform. This will be harder to do on the last platform as you will have lost Nozdormu’s Time Zone, which means it will arrive much more quickly. If and when the bolt does land, everyone should be stacked as far away from the impact location as possible, and damage reduction cooldowns such as Anti-Magic Zone or Power Word: Barrier should be used. Then the bolt should be killed as quickly as possible so it doesn’t continue pulsing AoE damage.
Cataclysm
Two minutes after he casts Assault Aspects, Deathwing will begin to cast Cataclysm. This ability has a 60-second cast time, and if it goes off, your raid will wipe. This effectively gives each platform its own 3-minute enrage timer, as the only way to stop this cast is to destroy the platform’s Limb Tentacle before it goes off.
Limb Tentacle
There are two Arm Tentacles and two Wing Tentacles which spawn at the beginning of the fight. They are effectively the same except in name and appearance. One Wing Tentacle will grip each of the outer two platforms while an Arm Tentacle will grip either of the inner platforms. You’ll need to destroy the limb on your current platform before Deathwing can finish casting Cataclysm, about three minutes after he marks the platform with Assault Aspects. These adds don’t melee or have a threat table, so you don’t need to tank them. They do have a few other abilities that you will need to deal with, however.
While you’ll want to start dealing damage to these as soon as you can, you should shift your focus to other adds as they appear and avoid getting the Limb Tentacle below 70% until you have dealt with the Mutated Corruption and Elementium Bolt on that platform. Otherwise you run the risk of being overrun.
Burning Blood
Limb Tentacles will deal Fire damage to the raid every 2 seconds until they are killed via this ability. The damage it does starts out small and gets more intense as the tentacle’s health gets low.
Blistering Tentacles
When a Limb Tentacle reaches 70% health, and again at 40% health, they will spawn multiple Blistering Tentacle adds. These adds deal stacking raid damage with their Blistering Heat while they are left alive.
If Alexstrasza’s platform has not been cleared yet, her Cauterize ability will take care of Blistering Tentacles, allowing you to ignore them. If her platform has been cleared, this ability will no longer be active and your damage dealers will need to focus them down. You will have to use single-target abilities, as these tentacles are immune to AoE damage.
Blistering Heat
Blistering Tentacles stack this debuff on your raid, dealing Fire damage every 2 seconds that increases by 5% for each stack. It lasts for 3 seconds but will keep getting refreshed until the Blistering Tentacles are dead.
Hemorrhage
90 seconds after being engaged in combat, a Limb Tentacle will use this ability to spawn 6 Regenerative Blood adds.
Regenerative Blood
6 of these adds are spawned when a Limb Tentacle casts Hemorrhage. These adds do have melee attacks and threat tables and should be picked up by a tank. That tank will take stacking damage from Degenerative Bite until the Regenerative Bloods are killed. These adds have an energy bar that will start out empty and fill up at a rate of 10 energy per second, maxing out at 100. When they fill up, the add will be healed to full.
These adds should be targeted with heavy AoE damage as soon as they spawn. Kalecgos’s Spellweaver buff will allow your DPS to make quick work of them, which is one of the reasons why his platform should be the last one you clear. Until Nozdormu’s platform has been cleared, you can also make use of his Time Zones to halve the frequency of their casts.
Degenerative Bite
Regenerative Blood mobs place this debuff on their current target, dealing stacking Shadow damage every second. It can’t be dispelled and it has a 10-second duration which is refreshed each time a stack is added. Tanks will need heavy healing and defensives to counter this debuff as it accumulates stacks.
Phase 2: Deathwing the Destroyer
When all 4 Limb Tentacles have been killed (2 Arm Tentacles and 2 Wing Tentacles), Deathwing will collapse onto Ysera’s platform (where you started the fight), and you’ll be able to attack him directly. He’ll use one ability on the raid in this phase and spawn a couple of new types of adds. He does not melee attack or have a threat table, so he does not need to be tanked.
The Dragon Aspects will all return to aid you in this phase, so you’ll have access to all of their buffs and abilities once again.
Corrupted Blood
Other than summoning adds, this is Deathwing’s only ability in this phase. It deals Fire damage to the entire raid every 2 seconds. Deathwing starts this phase at 20% health and the damage dealt by this ability increases each time he loses another 5%. So he will do more damage at 15%, then even more at 10%, and the damage will be heaviest when he drops below 5% health.
It’s a good idea to hold DPS when he gets close to one of these thresholds and finish off any remaining adds before you push past it. Healing will become intense as his health gets low, and your group should be ready to use any cooldowns they can to stay alive for the final 10 and 5%. Once you pass the 5% threshold, you will most likely want to ignore the adds and push to finish off Deathwing before you are overwhelmed by his damage. If you did not need to use Bloodlust to clear the 4th platform, you should use it to burn the boss.
Elementium Fragment
This is one of two types of adds that will spawn throughout this phase. They appear 10 seconds after the phase begins and every 90 seconds after that. They will spawn in groups of 3 for 10-player raids and groups of 8 for 25-player raids. These adds are very weak and don’t have a threat table, and they should be killed quickly to limit the damage they do to your group with their Shrapnel ability.
Shrapnel
Elementium Fragments will cast this on random raid members, dealing heavy physical damage. It has a 6-second cast time, so if you kill the adds quickly enough you should not have to deal with too much of this.
Elementium Terror
Like Elementium Fragments, Deathwing will spawn these adds throughout the phase. They are first spawned 40 seconds after the phase begins and will spawn again every 90 seconds after that. They always spawn in pairs and must be picked up by a tank, to whom they will apply the Tetanus debuff. They should be tanked inside Nozdormu’s Time Zone to reduce the stress on your tanks (and healers by extension).
Tetanus
This debuff is applied to tanks by Elementium Terror adds. It deals Shadow damage every second and stacks. It has a 6-second duration that is refreshed every time a new stack is applied. Paladin tanks have an advantage in this fight as they can clear their stacks through the use of Divine Shield with a cancelaura macro.
Congealing Blood (Heroic Only)
On Heroic difficulty, you’ll have a third type of add to deal with during this phase. Congealing Bloods will spawn in groups of 9 at certain points throughout the phase. They’ll spawn each time Deathwing’s health reaches one of the 5% thresholds, so at 15%, 10%, and 5%. If you take more than a 60 seconds to cross the next threshold, you’ll spawn an additional set. These adds slowly move toward the boss and don’t do anything else. If they are not killed before they reach Deathwing, he will regain 1% of his total health for each one.
It’s vital that your DPS destroy these adds before they reach the boss so you don’t have to burn through all of Deathwing’s health a second time.
Enrage
Deathwing has a 15-minute engage timer, so you will need to defeat him within that window. He also periodically casts Cataclysm during phase one, which gives your group one minute to destroy a designated add, acting as a repeating mini-enrage timer.
About the Author
