Spine of Deathwing Raid Guide
The Spine of Deathwing is the location of the penultimate boss encounter in the Dragon Soul raid. It is the only vulnerable point of Deathwing the Destroyer and marks the first of two battles against him as the final boss of the Cataclysm expansion.
The first six bosses of the raid must be cleared in order to arrive at this point. After defeating Warlord Blackhorn, speak with Sky Captain Swayze on board the Skyfire to begin. You’ll get a cutscene in which a bunch of characters parachute onto Deathwing’s back, and then you’ll be there. When the fight is over, you’ll find your loot inside a Cache of the Aspects near where you end up at the Maelstrom.
“Your tenacity is admirable, but pointless. You ride into the jaws of the apocalypse.”
– Deathwing
Raid Composition
These are our recommendations for your raid composition for this fight. You should decide how many tanks and healers you need and then fill the other spots with DPS. In a Normal 10-player group, 1 tank may be enough to handle the adds, especially if you have a plate DPS who can pick up some of the smaller adds if needed. Other modes will need 2 tanks, and some Heroic 25-player groups opt to bring a 3rd. While there is no enrage timer on this fight, you will need a certain amount of DPS to progress through the fight before your group becomes overwhelmed, especially on Heroic.
| Role | 10 Normal | 10 Heroic | 25 Normal | 25 Heroic |
|---|---|---|---|---|
| 1-2 | 2 | 2 | 2-3 | |
| 2-3 | 3 | 5-6 | 6 | |
| 5-7 | 5 | 17-18 | 16-17 |
Role Summaries
 Everyone
- Be sure to keep an even distribution of players across Deathwing’s back, either by staying in the middle or by balancing the number on each side. If your group is triggering a roll, you should stack in one of the empty pits left by a dead Corruption tentacle until the roll has been completed. Avoid walking through these pits otherwise.
- Quickly get away from Hideous Amalgamations as soon as they start to cast Nuclear Blast.
 Raid Leader
- On Heroic difficulty, assign one or two healers to handle Blood Corruption: Death and Blood Corruption: Earth.
- Divide up your melee and tanks into two groups so they don’t upset the weight balance on Deathwing’s back, especially when they are killing Corruptions.
- Have the raid kill 3 of the 4 Corruption tentacles that spawn at the beginning of the fight, and then stack in one of the pits to trigger a roll and get rid of the Hideous Amalgamations they spawn. From there you should hopefully be able to deal with Corruptions and Hideous Amalgamations one at a time.
- Call for Bloodlust during one of the Burning Tendon windows, and make sure your raiders use personal cooldowns for the others.
 Tanks
Tanks
- Pick up Hideous Amalgamations and Corrupted Bloods when they spawn, keeping them separate if possible. Tank the Corrupted Bloods close to the armored plate at the back of the area. When your group is ready to kill the Hideous Amalgamation, bring it over to the plate to absorb the blood. Make sure it’s close to the plate when it explodes.
- Hideous Amalgamations will do increasingly heavy damage to you as they get closer to blowing up, so be ready to use defensives.
- Tank Hideous Amalgamations on the same side of the plate if it takes you more than one try to destroy the Burning Tendons.
 Healers
- On Heroic difficulty, always dispel Blood Corruption: Death as quickly as possible each time it jumps. Never let it expire.
- On Heroic difficulty, avoid dispelling Blood Corruption: Earth unless the current target already has Blood of Neltharion. You may dispel it once or twice to try to get it to jump to a tank if they still need it.
- Spam heals on players who get Searing Plasma until they become healable again.
- Be ready for heavy raid healing as your group kills Corrupted Bloods, and don’t hesitate to call out if they should slow down so you aren’t overwhelmed by the Burst damage.
- Tanks will take heavy damage as Hideous Amalgamations get closer to blowing up. These adds will also deal damage to the raid right before they explode.
- On Heroic difficulty, your raid will gain a stack of Degradation for every Hideous Amalgamation that dies, making health pools smaller and healing tighter.
- If you can, throw some damage onto the Burning Tendons whenever they are exposed to help your raid burn them down.
 DPS
DPS
- Don’t waste your effort trying to kill adds that don’t need to be killed. Corrupted Bloods respawn, and there will always be at least one Corruption active that will keep respawning as well.
- Quickly focus on Corruptions when they use Fiery Grip on a member of your raid. You don’t need to keep DPSing them once the target is released.
- Be aware that killing too many Corrupted Bloods too quickly can overwhelm your raid with Burst damage, so you may need to hold back on them.
- Burn down Burning Tendons whenever they are exposed, using your DPS cooldowns as needed.
Mechanics & Strategy
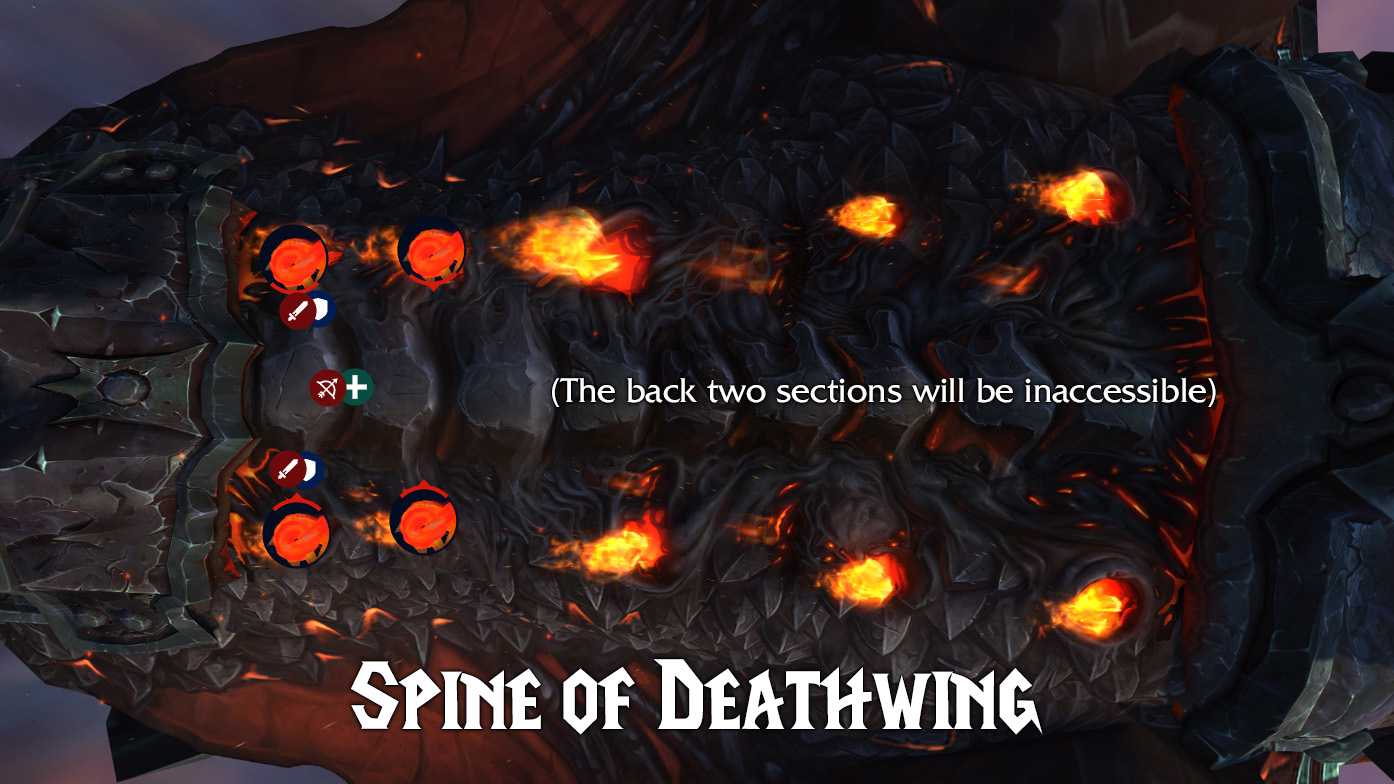
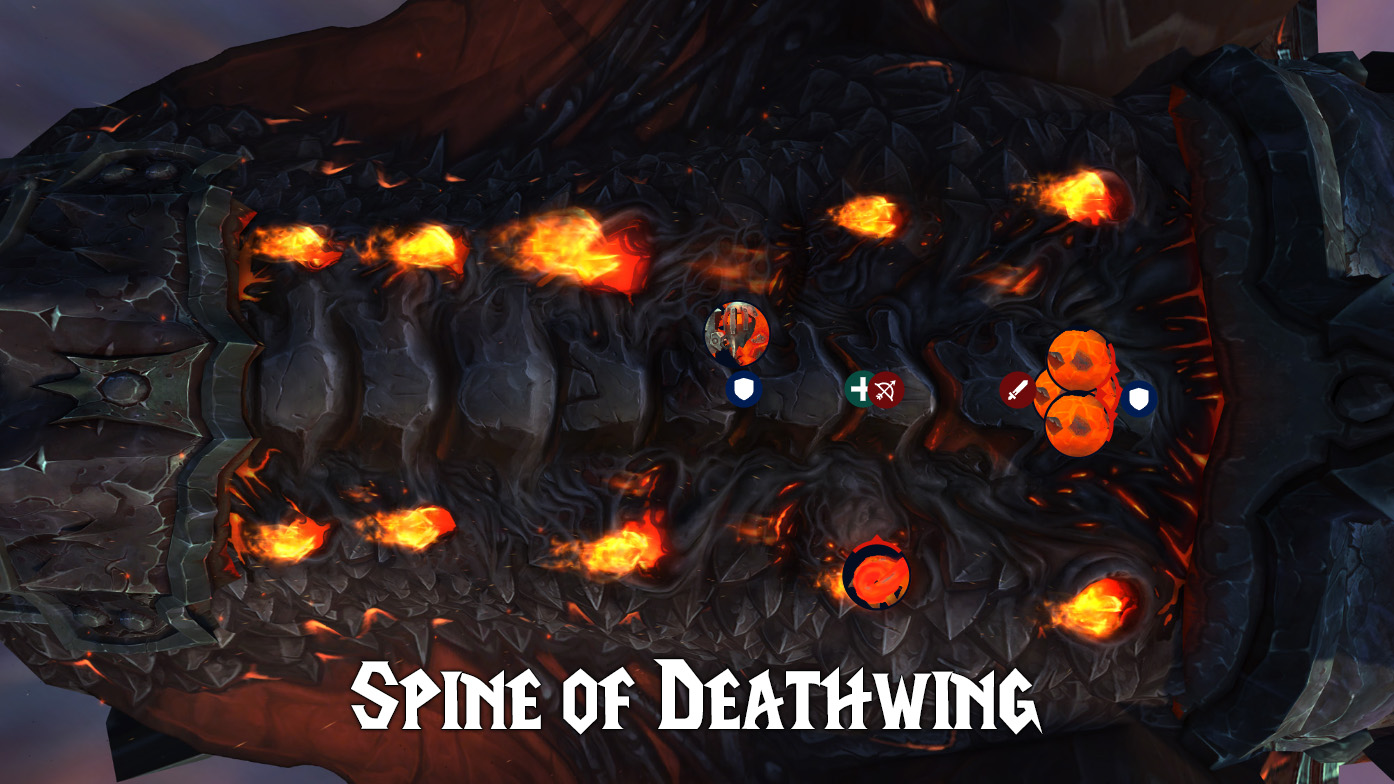
This fight takes place on Deathwing’s back as he flies across the sea toward the Maelstrom. Your goal is to pry open 3 of the large Elementium Reinforced Plates on his back one at a time, exposing the vulnerable area underneath for Thrall to use the Dragon Soul. As you work to do this, Deathwing’s immune system will attack you in the form of adds that include tentacles, elementals, and oozes, and you’ll also have to deal with his attempts to remove you from his back by rolling left and right.
This encounter is more of a gauntlet, with no real boss to be fought. The situation grows more chaotic as you remove each plate and open up a larger area of Deathwing’s back, and thus more places for adds to spawn. So while there is no enrage timer, it will become increasingly hectic and difficult to keep up with the adds as you progress, especially on Heroic difficulty.
You’ll be dealing with 4 different types of adds: Corruption tentacles, Hideous Amalgamation elementals, Corrupted Blood oozes, and Burning Tendons, as well as a few abilities that Deathwing himself will use.
Deathwing
Deathwing has two important abilities that he uses in every version of the fight, plus a couple of debuffs that only appear on Heroic difficulty.
Roll
Any time that Deathwing feels more weight on one side of his body, he will roll to that side. When he does this, anything that is not attached to his back – including players as well as Hideous Amalgamations – will be thrown off and killed. Other adds will not be shaken off by this ability, unfortunately, but it can still be useful if you have spawned too many Amalgamations at once.
Throughout the fight, unless you are trying to trigger a roll to get rid of adds, your raid team will need to spread itself evenly across his back to avoid this happening. If a roll does happen, there are two ways for players to be attached to Deathwing’s back and avoid being thrown off by this ability: Grasping Tendrils and Fiery Grip. We’ll cover Grasping Tendrils next, and Fiery Grip under the Corruption mob that uses it.
Grasping Tendrils
Standing in an empty pit left by a dead Corruption tentacle will give you this debuff. It will reduce your movement speed by 35% on Normal or 50% on Heroic, and it deals a little bit of damage to you every 5 seconds. It will also attach you to Deathwing’s back so you can’t be thrown off if he rolls. Moving out of the pit will remove the debuff.
Players should avoid running through the pits and getting this debuff unless a roll is triggered, in which case everyone who is not in a Corruption’s Fiery Grip will need to stand in the pits in order to avoid certain death. If you’re intentionally triggering a roll, you can do so by having the entire raid stack in the same pit, which will put everyone on one side of Deathwing’s back to make the roll happen while also ensuring that everyone is attached and stacked for healing.
Blood Corruption: Death (Heroic Only)
On Heroic difficulty, this debuff will afflict a random raid member and must be dispelled. It will then jump to another random raid member. After a random number of dispels it will mutate into another debuff, Blood Corruption: Earth, which we’ll go over below. It has a 15 second duration that does not reset when it jumps from target to target. If it expires before it mutates, it will trigger Blood of Deathwing, which will certainly mean a wipe. You must therefore quickly dispel this buff as soon as it appears and keep dispelling it until it mutates.
One or two healers should be assigned specifically to dispelling this debuff to ensure that it is done quickly. It usually takes 3 or 4 dispels for it to mutate, and you ideally want it to mutate with as much time as possible remaining on its duration. This debuff should never be allowed to expire, and there is never any reason not to dispel it.
Blood of Deathwing (Heroic Only)
This ability is triggered when the Blood Corruption: Death debuff expires without mutating into Blood Corruption: Earth. If this goes off, it’s a certain wipe.
Blood Corruption: Earth (Heroic Only)
After Blood Corruption: Death has been dispelled a random number of times, it will mutate into this debuff instead, which will jump to a random player. If this debuff is dispelled, it will jump to another random player, keeping the same duration just like Blood Corruption: Death. If dispelled enough times, it will mutate back into Blood Corruption: Death. If it expires without mutating, it will leave the beneficial Blood of Neltharion debuff on its current target.
It can be a good practice to try to jump this debuff to the tanks first, but you should avoid dispelling it more than once or twice so that it does not mutate back. It should always be dispelled from a target who already has 2 stacks of the Blood of Neltharion on them as they will not benefit from additional stacks. Dispelling it from targets with 1 stack may also be advisable so the 2nd stack isn’t wasted.
Blood of Neltharion (Heroic Only)
This debuff is left on the current target of Blood Corruption: Earth when it expires. It can stack twice, and the target may gain two stacks at once if there was a long duration remaining on Blood Corruption: Death when it mutated into Blood Corruption: Earth. Each stack reduces the target’s damage taken by 20%, which is especially useful as the fight progresses on Heroic difficulty with the added damage and mechanics. This effect does not have a duration, so getting it up on the tanks early will allow them to benefit from it through the end of the encounter.
Corruption
These tentacles spawn in the fiery pits along either side of Deathwing’s back. There are 4 of these pits in the first section and 2 more under each plate that you remove, and each will have a Corruption tentacle in them when they are exposed. When all of the active Corruptions have been killed a new one will spawn, so there will always be at least one alive.
Killing a Corruption causes a Corrupted Blood and a Hideous Amalgamation to spawn from its pit. You’ll need to spawn these in order to progress the fight, but you’ll want to do so strategically. The Corruptions themselves don’t move and don’t have a melee attack, and they don’t have a threat table either. They do have two abilities that they will use on random players, however, so you’ll want to eliminate some of them to limit the chaos. If you kill 3 of the 4 Corruptions at the start of the fight, you can trigger a Roll to get rid of the Hideous Amalgamations they spawn before you deal with the last one.
Searing Plasma
Corruptions will cast this frequently, afflicting random players with a debuff: 1 player at a time in a 10-player group or 3 players in a 25. The debuff absorbs healing that is done to its target and deals physical damage to them every 10 seconds. It lasts until it absorbs its maximum amount of healing (or for 5 minutes, but players will not live that long without healing).
Healers will need to be able to see when players have this debuff, and should spam heals on them until it goes away and they become healable again.
Fiery Grip
This is the Corruption’s other ability, which they channel on a random player for 30 seconds, stunning them and dealing Fire damage every 3 seconds. The Corruption must receive damage equal to 20% of its health to break this and release the target. Like Grasping Tendrils, this ability will attach the player it targets to Deathwing’s back until it is broken.
A Corruption that is channeling this on a player should be focused down until that player is freed, except when a roll is about to happen, as it’s safer for the player to be attached this way than to risk having to run to one of the pits in time. DPS don’t need to keep hitting the Corruption once the target is freed unless your raid is killing it to spawn an add.
Corrupted Blood
These oozes are one of the two adds that spawn when a Corruption tentacle is killed. Once they spawn, they will be a persistent nuisance throughout the fight, even after they are killed. Extra Corrupted Bloods will occasionally spawn from empty pits, adding to the number that you have to deal with.
When a Corrupted Blood is killed, it leaves behind a fiery puddle of blood that will give the Hideous Amalgamation a stack of Absorb Blood when it is dragged through it. The puddle then disappears. These mobs should be picked up by a tank when they spawn and killed close to the armored plate.
Residue
This ability means that a Corrupted Blood can never be removed from the fight once it spawns, as they will return to the nearest Corruption pit when they are defeated and reset, effectively respawning as a new Corrupted Blood.
Burst
When a Corrupted Blood is brought to 0 health it explodes, dealing physical damage to the entire raid. Heavy raid healing will be required to counter this ability, especially if multiple oozes are killed in quick succession. DPS should be careful not to go ham on a large group of Corrupted Bloods, as too many Bursts at once can cause a wipe. There’s also no reason to kill more of them than are needed to buff the Hideous Amalgamation. They will just respawn anyway.
Hideous Amalgamation
This elemental is the other type of add that spawns whenever a Corruption tentacle is destroyed. They are stronger and sturdier than the other adds and must always be tanked. If more than one is spawned at a time, the tanks should separate one from the other(s) so that you only buff one at a time with the following abilities.
Absorb Blood
Hideous Amalgamations gain a stack of this buff each time they touch one of the fiery puddles that are left behind by Corrupted Bloods. It increases their damage by 10% and attack speed by 20%. You’ll need to stack this on each Hideous Amalgamation 9 times in order to activate their next two abilities. The Amalgamation must not be killed before then, but you’ll want to whittle down its health as it gets closer so you can easily kill it when the time comes. The tank who has threat on the add will take escalating damage as it stacks this buff, and will need some extra healing and defensive cooldowns.

Superheated Nucleus
When a Hideous Amalgamation has 9 stacks of Absorb Blood they’ll gain this buff and will begin to deal heavy Fire damage to the entire raid every 3 seconds until killed. When they get this buff, they should quickly focused down to stop their AoE and trigger the next ability.
Nuclear Blast
When a Hideous Amalgamation is killed while they have the Superheated Nucleus buff, it will trigger this AoE explosion which deals massive Fire damage to everyone within 8 yards. Even more significantly, if it happens close enough to the armored plate, it will pry it open and reveal the Burning Tendons underneath. This ability has a 5-second cast time, which should give everyone (including the tank) ample time to escape the blast radius.
Degradation (Heroic Only)
On Heroic difficulty, each Hideous Amalgamation that is killed will give everyone in the raid a stack of this debuff, reducing your health by 5%. It can’t be dispelled and doesn’t expire. This will exacerbate the escalating difficulty of the encounter as the fight goes on. You won’t get this debuff from Hideous Amalgamations who are thrown off by a Roll, so it becomes essential to make use of that ability on Heroic.
Burning Tendons
When a Hideous Amalgamation has gone nuclear near one of Deathwing’s armored plates, the plate will open up, exposing the Burning Tendons underneath. This add must be destroyed to remove the plate completely. If you are successful, the plate will fly off and a new section of Deathwing’s back will be exposed, allowing you to reach the next plate. Burning Tendons don’t attack and can’t be tanked. You’ll only have a brief window in which to destroy them.
All DPS should be focused on these tendons so that you can destroy them before the plate closes again, as failing to do so will force you to go through the whole song and dance with another round of adds. On Heroic, it will almost certainly take you two tries to kill each tendon, and even that may be tight. It’s a good idea to save damage cooldowns for these, including Bloodlust. It’s also important to note that there are technically two Burning Tendons under each plate, and the one that will appear will be on the side that the Nuclear Blast went off. So you will want to ensure that you blow up the same side of the plate on subsequent tries in order to get the tendon that you already damaged.
Seal Armor Breach
Burning Tendons will begin to cast this as soon as they are exposed. This ability has a 23-second cast time, and when it goes off, the armored plate that was just pried loose will close up again. You’ll also have to wait a few seconds before the Burning Tendons can be attacked, shortening the time even further.
Author

I've been playing World of Warcraft on and off since vanilla, usually as a healer or caster and often as a guild leader. I play both retail and classic. I also love RPGs, sandboxes, and sims.