Warlord Zon’ozz is a Faceless One, a monstrous, tentacled servant of N’zoth, one of the Old Gods. He is encountered within the Maw of Go’rath, an eldritch creature that forms a cavern in the instanced version of Dragonblight where the Dragon Soul raid takes place. This boss must be defeated either second or third before you will be able to progress to later bosses in the raid. For many groups, this boss will be the first major roadblock in the raid, especially on Heroic difficulty.
To reach Zon’ozz, players will need to ride Valeera, a green dragon at the base of Wyrmrest Temple. In order to reach the temple, the first boss, Morchok, must be defeated.
“Victory for Deathwing. For the glory of N’Zoth!”
– Warlord Zon’ozz
Raid Composition
These are our recommendations for your raid composition for this fight. You will only need one tank for this boss. You should decide how many healers you need and then fill the other spots with DPS. Keep in mind this boss has a 6-minute enrage timer, so you’ll need to bring enough damage to defeat him within that window. If you’re opting to use solo soakers instead of a ranged stack for the main phase, you will need to bring Mages with Cauterize and/or Shadow Priests with Dispersion – at least 5 altogether.
Role | 10 Normal | 10 Heroic | 25 Normal | 25 Heroic |
|---|---|---|---|---|
1 | 1 | 1 | 1 | |
2-3 | 2-3 | 5-7 | 6-7 | |
6-7 | 6-7 | 17-19 | 18-19 |
Role Summaries
 Everyone
- During the boss’s main phase, stack with your assigned group (melee or ranged) to split the damage of Void Diffusion as the ball gets bounced back and forth. Never let the ball hit the wall, and avoid letting it hit the boss until your raid leader says it’s time.
- Don’t stand in front of the boss unless you’re the tank, except while you are waiting for the ball to spawn.
- On Heroic mode, run out of your stack when you get Disrupting Shadows, unless the ball is about to hit your group.
- When the Black Blood Phase begins, stack on the boss as much as possible to make things easier for your healers.
 Raid Leader
- Make sure everyone in the raid knows which group they should stack with for the main phase – melee or ranged. These groups should be equal in size, so put some healers or ranged DPS in the melee stack.
- An alternative strategy is to have everyone stack in melee except for a few soakers who have powerful defensive cooldowns such as Cauterize or Dispersion. These soakers will need to take turns intercepting the ball.
- Assign one or two healers to handle Disrupting Shadows.
- The most important decision to be made in this fight is when to let the ball hit the boss and trigger the Black Blood Phase. You will want to stack Void Diffusion as much as possible to help you deal more damage to the boss, but you’ll also take escalating damage while the main phase lasts, so you will need to trigger the phase change before things get too messy.
- Assign healing cooldowns to be used in each Black Blood Phase.
- On 25-player Heroic, assign a sturdy DPS to tank the second Claw of Go’rath during the Black Blood Phase. This can be a plate wearer or Feral Druid, for example. You could also use a second tank, but it isn’t necessary.
- Use Bloodlust to burn the boss during the last Black Blood Phase.
 Tanks
Tanks
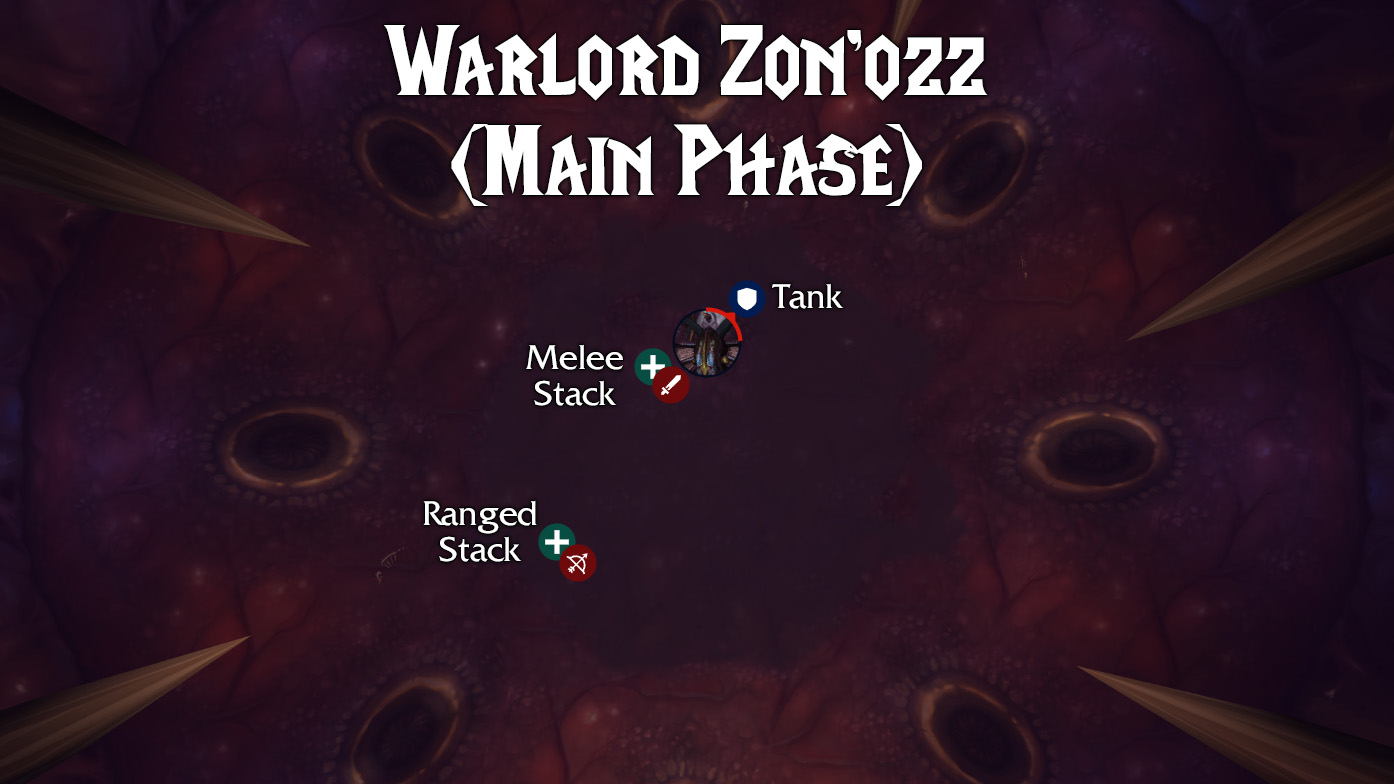
- Position the boss so that he is facing just a little away from the ranged group at the start of each main phase. As soon as the ball spawns, face him away from everyone so no one but you is hit by his Psychic Drain cone attack.
- You’ll take increasing damage during the main phase from Focused Anger, so you may want to use a defensive cooldown as you near the end of each main phase.
- During the Black Blood Phase, move the boss to a Claw of Go’rath so you can tank it and your melee can cleave.
 Healers
- During his main phase, the damage your raid is taking will gradually escalate as the boss gains stacks of Focused Anger, so prepare to heal more as the phase progresses.
- Priests can put a Power Word: Shield on the tank right before the boss casts Psychic Drain to reduce some of the damage it deals, thereby also reducing how much the boss gets healed.
- Do not mindlessly dispel Disrupting Shadows. Your raid leader should assign specific healers to watch for this debuff and dispel people when it’s safe. Before it is dispelled, the player must be healed up, and in Heroic mode they need to be away from their stack. In Heroic 25, it may be better to simply heal through the debuff and not dispel it at all.
- Save your healing cooldowns for the Black Blood Phase. Your raid leader will probably establish a rotation in which they should be used. On Heroic, your raid will take the heaviest damage at the beginning of this phase, and less as adds are eliminated.
 DPS
DPS
- Healing reduction debuffs such as Mortal Strike can be used on the boss to reduce how much healing he gets from Psychic Drain.
- On Heroic, melee DPS should focus on the Claw of Go’rath during the Black Blood Phase while ranged takes out the other adds. Flail of Go’rath should be killed quickly since it has low health and will spare you some damage from Black Blood of Go’rath.
- Save long DPS cooldowns for the last Black Blood Phase, when you will be able to do the most damage to the boss.
Mechanics & Strategy
The Warlord Zon’ozz encounter is divided into two phases: the main phase, which makes up most of the fight, and the Black Blood phase, which will be triggered 3-4 times in between main phases.
Main Phase
The main phase is also known as the “ping pong phase,” since a core mechanic of the fight involves intercepting a ball. Outside of that, the boss has a few abilities of his own that you will need to deal with during this phase.
Focused Anger
The boss will gain a stack of this buff about every 6 seconds, increasing his attack speed as well as the damage he deals. This means that your raid group will be taking more damage as the phase progresses. His stacks will reset when the Black Blood Phase is triggered. Your goal is to hold on for as long as possible before you trigger his reset, but not so long that this ability kills you.
Psychic Drain
This attack deals heavy damage to anyone in a 30-degree cone in front of the boss. It also heals the boss for 10 times the damage it deals.
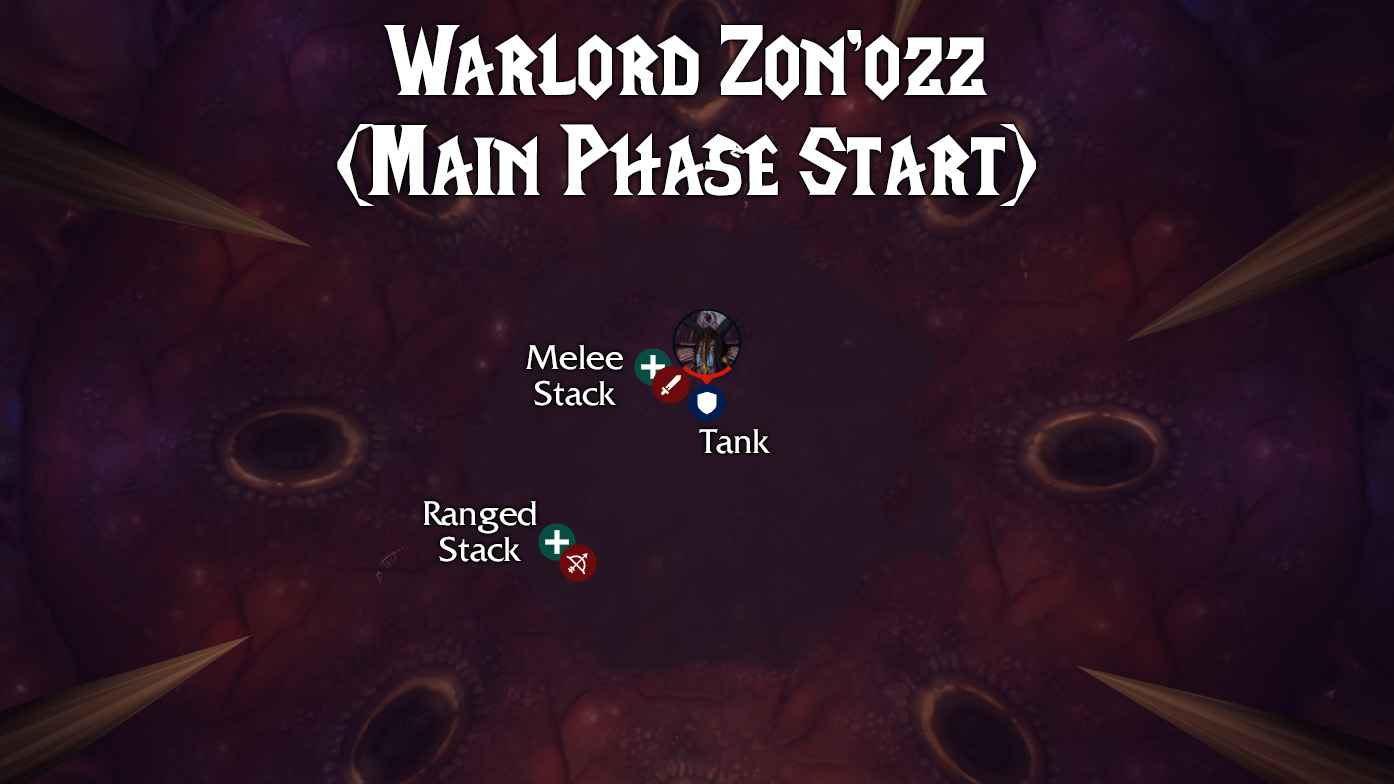
The tank will need to face the boss away from the rest of the raid so that no one else is hit by this ability. The exception is at the start of the main phase before the ball has spawned – the boss should be facing only slightly away from the ranged group so that the ball will bounce in their general direction, but not directly in case this ability happens first.
Healing reduction debuffs such as Mortal Strike should be used on Warlord Zon’ozz to minimize the healing he receives. Damage reduction and absorption effects on the tank can also help, including Power Word: Shield. But the most important thing is to ensure that only the tank is hit.
Disrupting Shadows
Warlord Zon’ozz will place this DoT on a group of random players about every 20 seconds. In a 10-player raid he’ll target 1-3 players while in a 25 he’ll target 6-10 at a time. The effect deals Shadow damage every 2 seconds for 20 seconds total. The debuff can be dispelled, but doing so will cause the target to take heavy Shadow damage and be knocked back. On Heroic difficulty, everyone within 10 yards of the affected player will also take damage and be knocked back.
Healers will need to be careful not to mindlessly dispel this debuff. Targets must be healed first so they don’t die when it detonates. On Heroic, targets will also need to run out of the group and away from other affected players so they don’t blow up everyone else – but they can’t be outside the stack when the ball hits. They should also not be standing somewhere where they will be knocked into the ball when it detonates. It’s best to assign one or two healers to handle dispels to minimize confusion. In 25-player Heroic mode, it may be difficult or impossible to safely dispel this, so you may just have to heal through it. It will not detonate if allowed to expire on its own.
Void of the Unmaking
At the beginning of the encounter and every time he returns to his main phase, Warlord Zon’ozz will summon a purple ball called Void of the Unmaking that slowly travels across the room. After the initial spawn, he will always wait at least 90 seconds before summoning a new ball, and he won’t summon it during the Black Blood Phase.
Void Diffusion
When the Void of the Unmaking hits a player, it will bounce off of them and start moving in the opposite direction. It will also trigger Void Diffusion, which deals a large amount of Shadow damage that is divided evenly between the target and anyone standing within a small radius. At the same time, the Void of the Unmaking will gain a stack of the Void Diffusion buff, increasing the damage that will be done by the next Void Diffusion by 20% per stack. Each stack of this buff also increases the damage that Warlord Zon’ozz takes by 5% after the ball hits him. This will last from the next Black Blood Phase through the end of the fight, unless the stacks are allowed to fall off, which takes about 2 minutes. You should avoid spending 90 seconds or more in the main phase so these stacks don’t disappear, since the Black Blood Phase lasts for 30 seconds.
Your raid will need to split into two equally sized teams to handle this ability. The Void of the Unmaking must be kept from touching the wall (see Black Blood Eruption below for why), and it must not be allowed to touch the boss until you are ready to trigger the Black Blood Phase. This means you will need a melee stack and a ranged stack, with the ranged stack standing as far away as they can while still being able to attack the boss and heal the tank. Void Diffusion will kill a player who touches the ball without a group to split the damage.
An alternative strategy is to have everyone stack in melee and have designated soakers who will run out to intercept the ball solo. You will need at least 5 players who have powerful defensive cooldowns such as Cauterize or Dispersion to protect them from its massive damage. You should also have a soaker rotation set up so they can anticipate when they will need to run out and use their cooldown.
Black Blood Eruption
This ability is triggered if the Void of the Unmaking is allowed to touch the wall. It deals a high amount of damage to the raid and knocks everyone into the air.
Zon’ozz Diffused
If the Void of the Unmaking hits the boss, the Black Blood Phase begins. This will reset his stacks of Focused Anger and stop the stacking damage from Void Diffusion, so you will need to trigger this before your raid starts taking too much damage. It will also cause him to start taking 5% additional damage per stack of Void Diffusion that the ball had when it hit him, so you want to delay as long as you can in order to get as many stacks as possible.
When it’s time to let the ball hit the boss, melee players should move perpendicular to get out of its way.
Black Blood Phase
This phase begins when the ball (Void of the Unmaking) hits the boss. It lasts for about 30 seconds. He won’t perform melee attacks for the first 15 seconds of the phase, giving your tank a bit of a break.
When you get to the last Black Blood Phase, you should use Bloodlust to ensure a kill. This will also help your healers deal with the damage.
Black Blood of Go’rath
Everyone in the raid will get this debuff at the start of the Black Blood Phase, and it last for 30 seconds, dealing Shadow damage every second. On Heroic difficulty, this debuff will have a number of stacks equal to each add that is alive, plus one for the boss.
The best approach is to stack as much as possible during this phase so you can heal through this constant ticking damage. You may want to assign healers to each use their raid healing cooldowns during a specific Black Blood Phase (first, second, third, and fourth).
Eye of Go’rath
Several of these mobs will spawn around he room during this phase. They are stationary and can’t be tanked. They cast Shadow Gaze on random players, adding to the damage that the raid will be taking during this phase. This ability can be interrupted, but it doesn’t have a cast bar, so you’ll have to watch the Eye to see when it’s bending over to cast.
There will be 5 Eye of Go’rath per Black Blood Phase in a 10-player raid and 8 in a 25. On Normal mode, this is the only type of add that he will spawn, and it can be ignored. On Heroic mode, he will summon two others, and they all should be killed to reduce the damage the raid takes from Black Blood of Go’rath. Eyes should be killed Flails, ideally by ranged DPS to allow melee to stay in the middle and cleave the boss. When you get to the last Black Blood Phase, some Eyes should be left alive in order to focus down the boss.
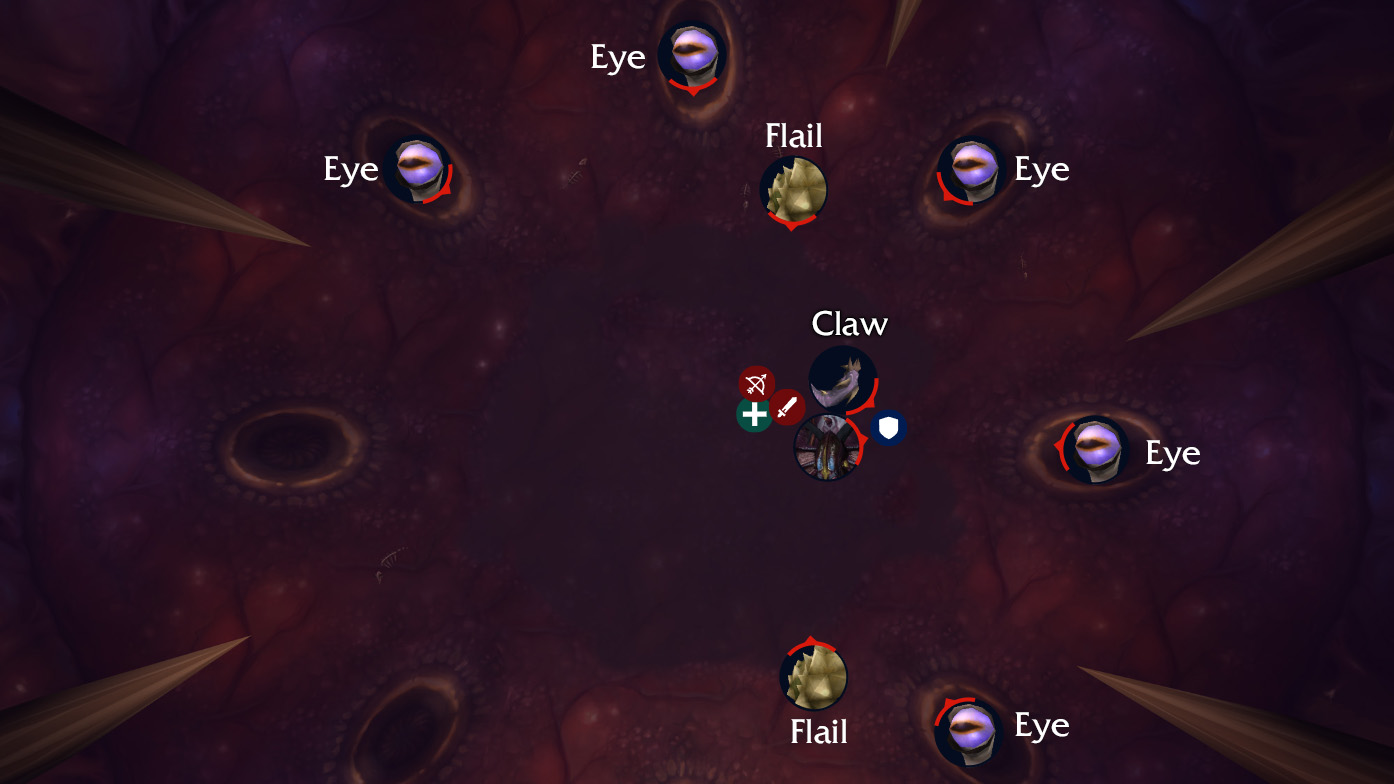
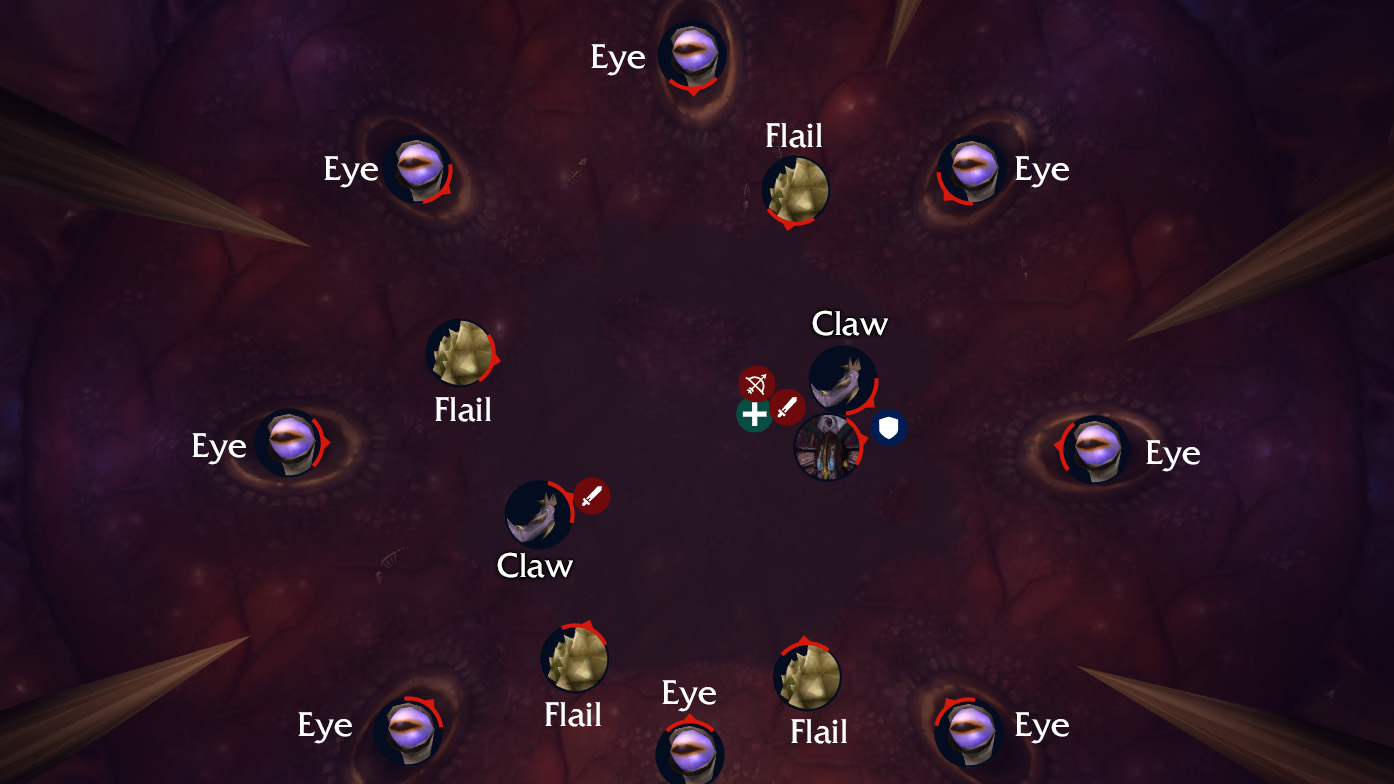
Claw of Go’rath (Heroic Only)
On Heroic difficulty, you’ll also be dealing with a tentacle add called Claw of Go’rath. Only 1 will spawn per Black Blood Phase in a 10-player raid while 2 will appear in 25-player. This mob will cast Ooze Spit if there is no one in its melee range. It doesn’t hit very hard, so any sturdy DPS can tank it, such as a Feral Druid or plate wearer. Your tank should be able to tank one in addition to the boss, which will also allow your DPS to get some cleave damage on the boss. These adds should be killed last after Eyes and Flails as they have the highest health.
Flail of Go’rath (Heroic Only)
There’s one more add you’ll be dealing with on Heroic difficulty: Flail of Go’rath. Each Black Blood Phase, 2 of these mobs will spawn in a 10-player raid while 4 will spawn in 25. They cast Sludge Spew on random players and use Wild Flail on anyone within 15 yards of them, which deals damage and knocks them back. Melee should avoid these mobs while ranged DPS take them out from a distance. They should be killed first to reduce the damage from Black Blood of Go’rath, as they have the lowest health.
Enrage
The boss enrages 6 minutes after the encounter begins, so you have a tight window in which to kill him before he wipes the raid. As long as the boss keeps getting stacks of Void Diffusion he will take increasing damage over the course of the fight, allowing you to burn through more and more of his health as the fight goes on.
About the Author
