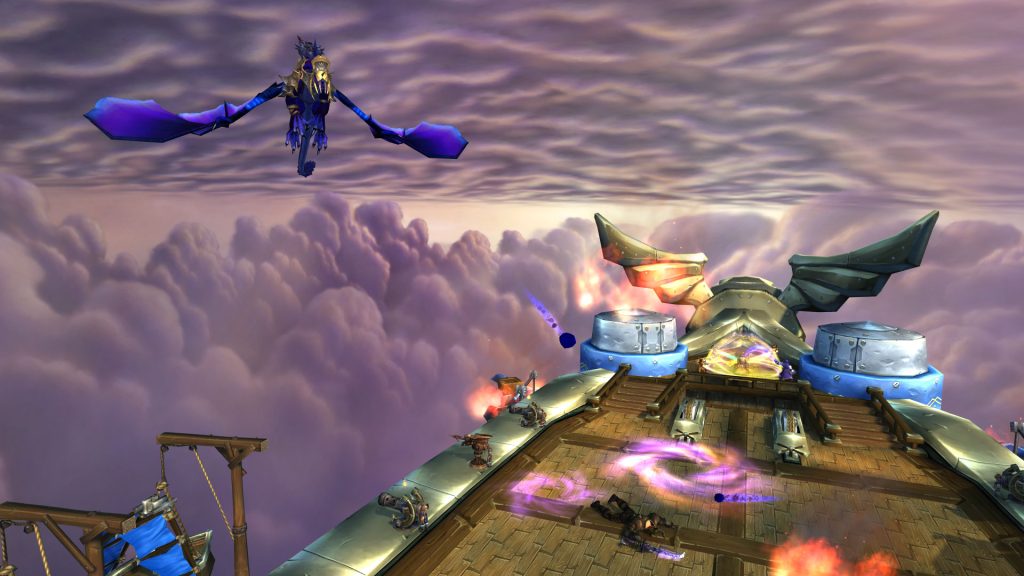
Warmaster Blackhorn is the sixth encounter in the Dragon Soul raid. The boss himself is one of Deathwing’s elite drake riders, a Tauren who flies on the back of the powerful Twilight dragon Goriona. The fight is similar to the Gunship Battle in Icecrown Citadel, with players fighting waves of enemies aboard the Skyfire before facing the boss himself.
The first five bosses of the raid must be defeated before you’ll be able to face Warmaster Blackhorn. After Ultraxion is killed you’ll witness a cutscene in which Deathwing destroys the Horde airship, and then all of the NPCs will board the Alliance ship. Talk to Sky Captain Swayze (he’s standing right next to his Horde counterpart, Ka’anu Reevs) and you’ll depart to pursue Deathwing across the Frozen Sea. Once there, speak with the Sky Captain again to begin the encounter.
“Hah! I was hoping you’d make it this far. You’d best be ready for a real fight.”
– Warmaster Blackhorn
Raid Composition
These are our recommendations for your raid composition for this fight. You will need 2 tanks for this fight regardless of your raid size or difficulty. You should decide healers you need and then fill the other spots with DPS. Keep in mind this fight has a 4-minute enrage timer and you will need to bring enough damage to defeat it in that time. Bringing more ranged will be advantageous on this fight whereas melee-heavy groups will have a difficult time.
Role | 10 Normal | 10 Heroic | 25 Normal | 25 Heroic |
|---|---|---|---|---|
2 | 2 | 2 | 2 | |
2-3 | 2-3 | 5-6 | 5-6 | |
5-6 | 5-6 | 17-18 | 17-18 |
Role Summaries
 Everyone
- On Heroic difficulty, avoid standing in the orange Deck Fires during Phase 1.
- Everyone should stack inside the purple swirl when Twilight Onslaught is incoming in order to spread out the damage.
- A couple of players will also need to soak every Twilight Barrage. You’ll need to rotate with other players on Heroic.
- When a mob uses Blade Rush, be sure you are not between them and their target when they charge.
- In Phase 2, avoid standing in Twilight Flames.
- On Heroic, stack while Goriona is on the deck to maximize AoE healing for Consuming Shroud.
- In Phase 2, ranged DPS and healers should stay at least 10 yards away from the boss to avoid being hit by Disrupting Roar.
 Raid Leader
- Designate some sturdy, mobile ranged players to act as primary soakers for Twilight Barrage.
- Mark either the Twilight Elite Dreadblade or the Twilight Elite Slayer to be killed first whenever they appear.
- Bloodlust late in Phase 2 as the raid starts taking more damage from Vengeance.
 Tanks
Tanks
- Pick up the Twilight Elite Dreadblade and Twilight Elite Slayer as soon as they land. You should alternate which tank takes which so you can drop the debuffs they leave on you. Face them away from the raid and try to position them near the harpoon cannons.
- Tank Warmaster Blackhorn near the center of the ship to minimize the area that can be covered by his Shockwave.
- In Phase 2, taunt swap at every 2nd stack of Devastate. On Heroic, you’ll also need to swap between the boss and Goriona.
- On Heroic difficulty, Goriona must be picked up when she lands by the tank who is not currently tanking the boss. She should be faced away from the raid, toward the nearest edge of the ship.
- Be prepared to use cooldowns as Phase 2 progresses due to the increasing damage from Vengeance.
 Healers
- Be ready to AoE heal any time a Twilight Onslaught goes out, and focus heals on soakers for Twilight Barrage.
- On Heroic, be aware that Consuming Shroud will require a large amount of AoE healing while Goriona is on the deck in Phase 2.
- Damage will get more intense as Phase 2 progresses due to Vengeance, so save your big cooldowns for late in the fight.
 DPS
DPS
- Focus down Twilight Assault Drakes whenever they are in range for attack.
- Prioritize Twilight Sappers when they’re visible. Utilize slows and stuns to keep them from reaching the other end of the ship.
- When Phase 2 begins, ranged should immediately focus on Goriona. On Heroic, melee should also focus her as soon as she lands.
Mechanics & Strategy
The Warmaster Blackhorn encounter consists of two phases, with the first phase requiring you to defeat multiple waves of Twilight attackers who board the airship, and the second phase being a fairly straightforward fight against the boss himself.
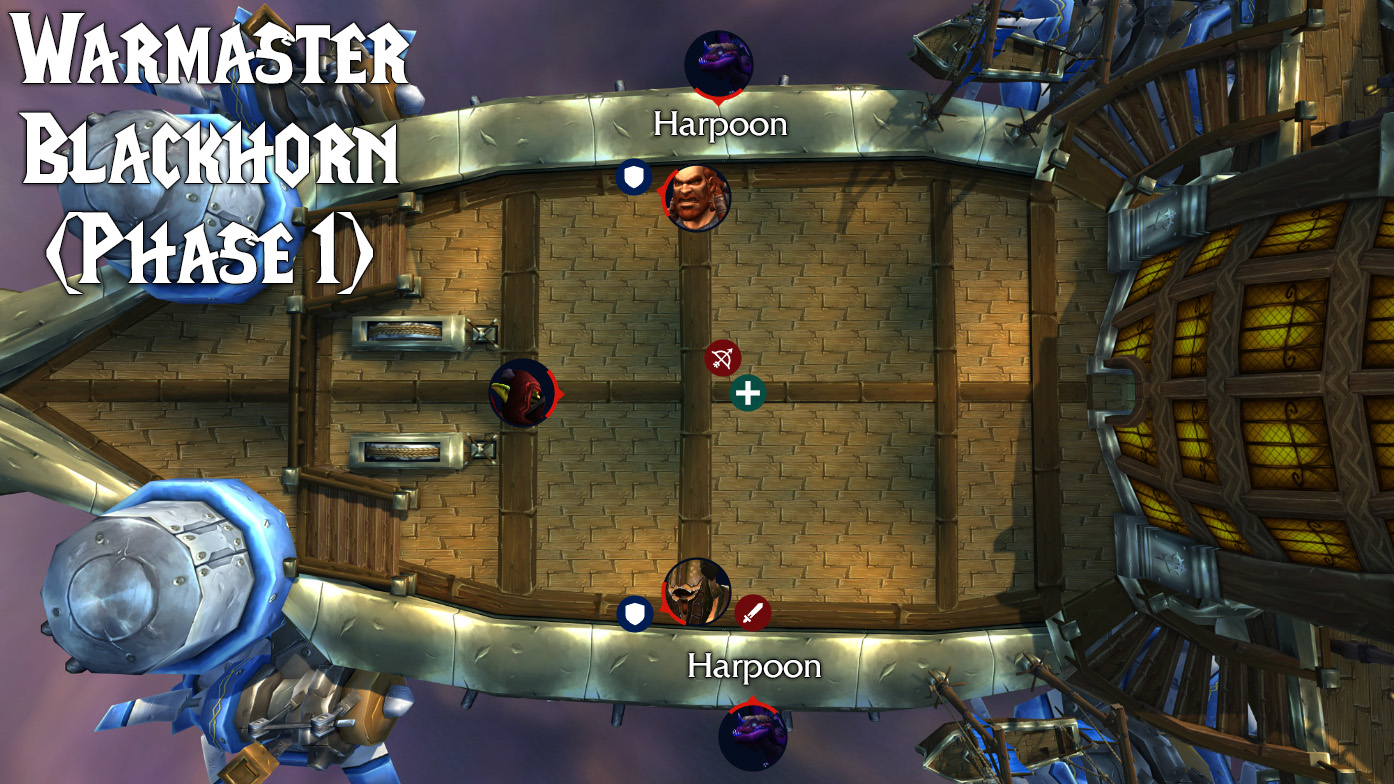
Phase 1
For the first half of the fight, Warmaster Blackhorn will hover above the airship on his dragon, Goriona, who will bombard the Skyfire from the air while you deal with four different types of adds, who will come in waves. You will not only need to defeat the adds, but also ensure that the airship does not take too much damage in the process.
Every wave of adds will contain 2 Twilight Assault Drakes, 1 Twilight Elite Dreadblade, and 1 Twilight Elite Slayer. You’ll also have Twilight Sappers who spawn separately. Phase 2 begins when you have killed all 6 Twilight Assault Drakes without the Skyfire suffering catastrophic damage.
Deck Fire (Heroic Only)
On Heroic difficulty, there will be random patches of fire on the deck that will deal damage to anyone who stands in them. They’ll spawn randomly and be put out every so often by the ship’s crew. You can’t do anything about these other than to avoid standing in them. The more damage the ship takes, the more fires will spawn.
Twilight Onslaught
Throughout this phase, Warmaster Blackhorn’s dragon Goriona will fly above the ship and launch this AoE attack at the deck about every 30 seconds. You’ll see the location marked with a purple swirl. When the attack lands, it will deal massive damage to the ship. This damage can be divided among players who stand in it, preventing the ship from taking all of it.
Your raid should stack inside these purple swirls whenever they appear. This will allow you to spread the damage out and heal through it while also preventing the ship from taking too much damage.
Twilight Assault Drake
Two of these adds will spawn with each wave. After they drop the other mobs on the deck of the ship, they’ll fly overhead and attack the ship with Twilight Barrage. This is essentially a smaller version of Twilight Onslaught. The damage from it is low enough that a player with a decent health pool could soak it alone, but it will be safer to have more than one player stack inside it. On Heroic, taking damage from Twilight Barrage will also give the player a stacking debuff that increases their Shadow damage taken for 15 seconds.
The Drakes will be periodically reeled in by the Skyfire’s harpoon guns. When this happens, damage dealers should immediately swap and focus DPS on them, as they will break free after a short period of time. You must kill all of the drakes in order to trigger the second phase of the fight. Killing them will also reduce the amount of Twilight Barrages you have to soak and the amount of damage that your raid (or the ship) is taking from them.
Twilight Elite Dreadblade & Twilight Elite Slayer
These two Vrykul warrior mobs are dropped onto the deck together and have similar abilities. Both have the Blade Rush ability and will use it to charge toward random raid members, dealing damage to anyone in their path. Dreadblades have Degeneration, a cone attack that deals Shadow damage and leaves a stacking DoT on anyone it hits. Slayers have Brutal Strike, which deals physical damage to their target and also leaves a stacking DoT.
These two mobs must be picked up quickly by the tanks and faced away from the raid so they do not hit anyone else with their attacks. They will need to be moved carefully if the tanks are stacking with the raid inside purple swirls. Otherwise it’s best to tank them near the harpoon cannons on the side of the ship so that melee can cleave the drakes when they are reeled in. Tanks should also alternate which mob they tank in each phase in order to drop their stacks of the other mob’s DoT.
When one of the mobs uses Blade Rush, everyone who is between the mob and their target should move out of the way to avoid taking damage. You should also mark one and focus it down first to halve the number of DoTs and Blade Rushes you have to deal with.
Twilight Sapper
These goblin mobs are dropped onto the ship separately from the pair above. They’ll go invisible when they land and reappear a few seconds later, running across the ship. If they reach the other side, they’ll Detonate, damaging the ship for 20% of its maximum health and also dealing damage to players within 8 yards of them.
Sappers must be focused and killed quickly when they appear, so DPS should always prioritize them. They can be slowed and stunned. Death Grip also works on them and can be used to yank them back to the front of the ship and buy more time. You’ll most likely have to deal with 5 or 6 Sappers over the course of the fight.
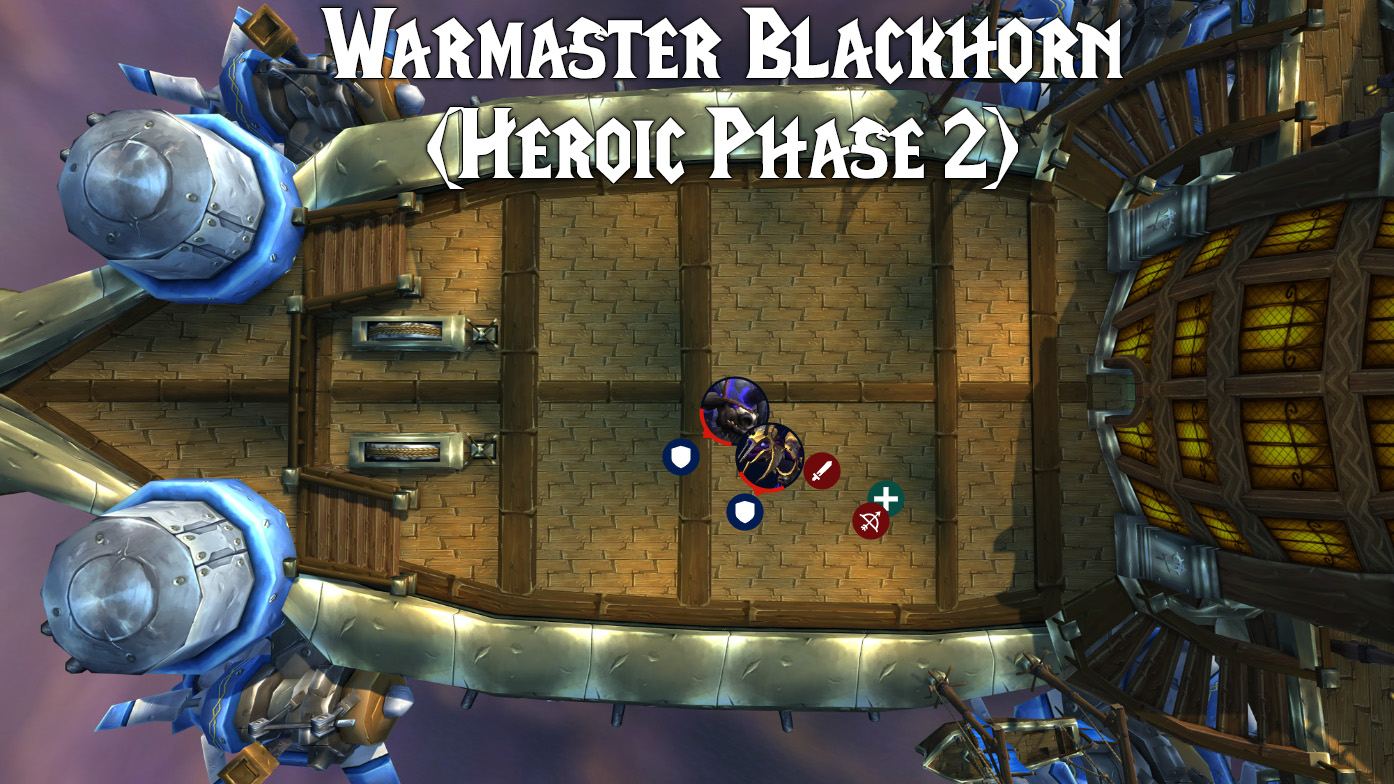
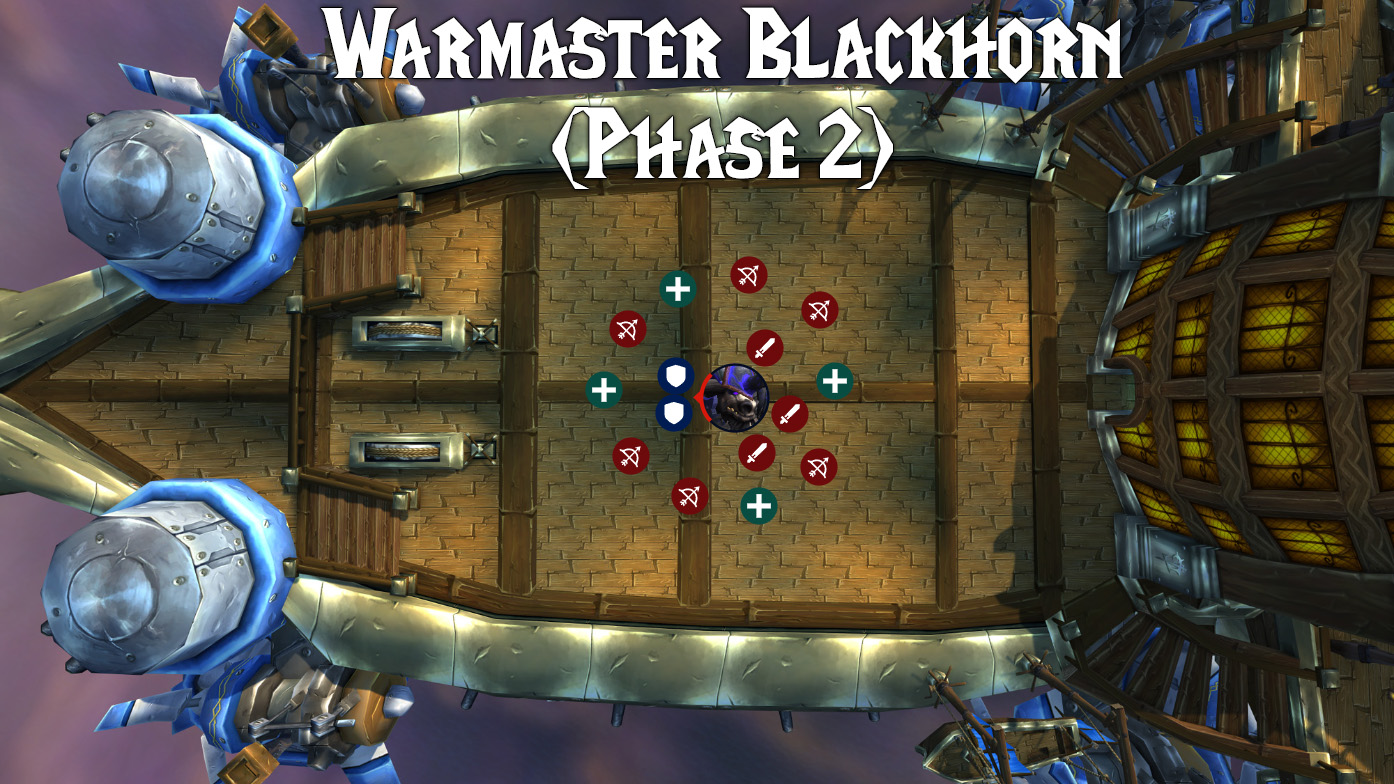
Phase 2
When all of the Twilight Assault Drakes have been killed, which should be after 3 pairs of vrykul adds have landed, adds will stop spawning and Warmaster Blackhorn will take matters into his own hands.
Goriona
Warmaster Blackhorn’s twilight dragon mount, Goriona, continues to fly around the ship after dropping him on the deck. She will attack the raid with Twilight Flames as long as she is in the air. On Normal she will stay in the air as long as she is in the fight, but on Heroic she will land on the deck when she reaches 80% health and must be tanked. In either mode she will fly away when she reaches 25% health, leaving Warmaster Blackhorn to fight alone.
Ranged DPS should prioritize attacking Goriona when she is in the air, either to remove her from the fight (Normal) or to bring her down (Heroic). On Heroic it becomes even more essential to take her out of the fight as quickly as possible due to several Heroic-specific mechanics that we’ll cover below.
Twilight Flames
Goriona targets random players with this ability as long as she flies around the ship. It deals a lot of damage to anyone within 8 yards when it lands and leave a purple circle on the ground that deals damage every second to anyone who stands in it. Players will need to move out of the way and avoid the area until it fades.
Siphon Vitality (Heroic Only)
On Heroic difficulty, if Warmaster Blackhorn reaches 20% health while Goriona is still in the fight, he will use this ability to heal himself by stealing health from her. When he uses this he’ll also deal damage to the raid that is equal to the health he gains.
This isn’t something your group will be able to come back from, so Goriona needs to be eliminated before Warmaster Blackhorn’s health gets low. All DPS should be focused on her as soon as she lands. You’ll want to do this anyway to remove her from the fight as the damage from the boss escalates.
Twilight Breath (Heroic Only)
This is one of two abilities that Goriona gains after she lands on Heroic difficulty. It’s a cone attack that deals Shadow damage to anyone standing in front of her. The tank who picks up Goriona should face her away from the rest of the raid, toward the edge of the ship, so that no one else has to worry about this hitting them.
Consuming Shroud (Heroic Only)
This is the other ability that Goriona gains when she lands on Heroic difficulty. This debuff will be cast on random raid members other than the tanks. It doesn’t do any damage on its own, but every time the target is healed, it will be absorbed and they will damage everyone else in the raid for that amount. It does not have a duration and only goes away when it has absorbed its maximum amount of healing. If the target dies, they will explode, dealing any remaining absorption amount to the raid.
To handle this, your raid should stack while Goriona is on the deck so your healers can use their AoE heals to counter the raid-wide damage that will go out as they work to remove the debuff from targeted players.
Devastate
Warmaster Blackhorn will apply a stacking Sunder Armor effect to his target, reducing their armor by 20% per stack. Your tanks will need to swap back and forth to drop their stacks, which take 30 seconds to fall off. Tanks should taunt off each other at every 2nd stack. On Heroic difficulty, this means swapping Warmaster Blackhorn for Goriona and vice-versa.
Disrupting Roar
The boss will cast this about every 20 seconds, dealing physical damage to anyone within 10 yards and also interrupting and silencing them for 8 seconds. Your ranged DPS and healers should absolutely not be within range of this ability during this phase.
Shockwave
This is a cone attack with a massive 80-yard range that stuns for 4 seconds as well as dealing physical damage to anyone who stands in its path. He will face a random raid member before he uses this, so the raid will need to be ready to move out of the way. He uses it about every 20-30 seconds.
Since this is a cone attack, it will be easier to move out of the way if you’re closer to the boss, as the attack gets wider the further out it gets. Ranged players will therefore want to stay just outside the range of his Disrupting Roar ability, which has a 10 yard radius. They should also spread out in a ring around the boss so that whichever direction he faces, only a few people will need to move – except while Goriona is active in Heroic difficulty, in which case the raid needs to be stacked for healing.
Tanking the boss closer to the center will also help your group avoid this ability, since he will only be able to hit a relatively small slice of the ship in any direction he faces. Having to dodge a large Shockwave cone when there are several Twilight Flames on the deck can be tricky otherwise.
Vengeance
The more damage that Warmaster Blackhorn takes, the more damage he will deal. His damage will escalate as the phase progresses, making it all the more important to eliminate Goriona early on. Healers should be prepared for this and should save cooldowns for late in the fight when the damage is highest. Bloodlust should be used near the end of the fight as well. Tanks will also need to rotate through defensives.
Enrage
This fight has a 4-minute enrage timer, so you will need to kill Warmaster Blackhorn within that window.
About the Author
