
Yor’sahj the Unsleeping is a Faceless One, a monstrous, tentacled servant of the Old Gods. He resides within the Maw of Shu’ma, a cavernous eldritch entity that has risen to the surface in the instanced version of Dragonblight where the Dragon Soul raid takes place. This boss must be defeated either second or third before you will be able to progress to later bosses in the raid.
To reach Yor’sahj, players will need to ride Eiendormi, a bronze dragon at the base of Wyrmrest Temple. In order to reach the temple, the first boss, Morchok, must be defeated.
“You will drown in the blood of the Old Gods! ALL OF YOU!”
– Yor’sahj the Unsleeping
Raid Composition
These are our recommendations for your raid composition for this fight. You should decide how many tanks and healers you want to use and then fill the other spots with damage dealers. Keep in mind that this boss has a 10-minute enrage timer, so you will need to bring enough DPS to kill it within that window.
Role | 10 Normal | 10 Heroic | 25 Normal | 25 Heroic |
|---|---|---|---|---|
1 | 1 | 1-2 | 1-2 | |
2-3 | 2-3 | 5-6 | 5-7 | |
6-7 | 6-7 | 17-19 | 16-19 |
Role Summaries
 Everyone
- It’s generally a good idea to stay stacked on the boss unless there’s a reason not to (primarily Digestive Acid).
- If the boss gets the green ability (Digestive Acid), stay at least 4 yards away from other players, but try not to spread too far out from the boss.
 Raid Leader
- The most important aspect of this fight is choosing which globule to kill each time they spawn. You’ll need to know ahead of time which colors you plan to prioritize and ensure that your team is focusing down the correct one. You will almost always want to prioritize killing the green, yellow, or purple globule.
- Give the healers specific assignments for when the purple ability (Deep Corruption) is active and remind them not to stray from their targets. A Holy Paladin is ideal for the tank(s) and you’ll want a healer assigned to each party.
 Tanks
Tanks
- In the 25-player version of the raid, the tanks will need to taunt off each other for every 2-4 stacks of Void Bolt so you can drop its stacking DoT.
- When the boss has the purple ability (Deep Corruption), be ready to use your defensive cooldowns, as your healers will be limited in their ability to heal you.
 Healers
- Try to save your mana cooldowns for after a Mana Void goes out.
- If the boss gains the yellow ability (Glowing Blood of Shu’ma), be prepared to use some healing cooldowns as the damage will be heavy.
- When the purple ability (Deep Corruption) is active, you will need to focus on your assigned target(s) and be aware of how many stacks of the debuff they have. It’s better to let someone die than to have them reach 5 stacks and detonate the raid.
 DPS
DPS
- Every time the boss summons globules, you’ll need to quickly swap to the one that your raid leader has designated as the kill target and DPS it down before it reaches the middle. Don’t waste your time trying to damage any other globules.
- Whenever a Mana Void or Faceless Ones spawn, you’ll need to quickly swap to them and kill them before switching back to the boss.
Mechanics & Strategy
Yor’sahj only has one ability of his own. Most of this encounter is about dealing with the globules he summons and the abilities they can give him.
Yor’sahj the Unsleeping
Void Bolt
This is Yor’sahj’s only base ability along with his melee attack. It deals a high amount of Shadow damage to the tank and leaves a stacking DoT that deals additional Shadow damage every 2 seconds.
In a 25-player raid the tanks will need to swap in order to avoid stacking the debuff too high. Generally this means taunting off at every 2 to 4 stacks. He casts this ability frequently, so the tanks will be constantly swapping back and forth throughout the fight. In the 10-player version you should be able to heal through the debuff, but you can also opt to tank swap to make things easier for your healers.
Call Blood of Shu’ma
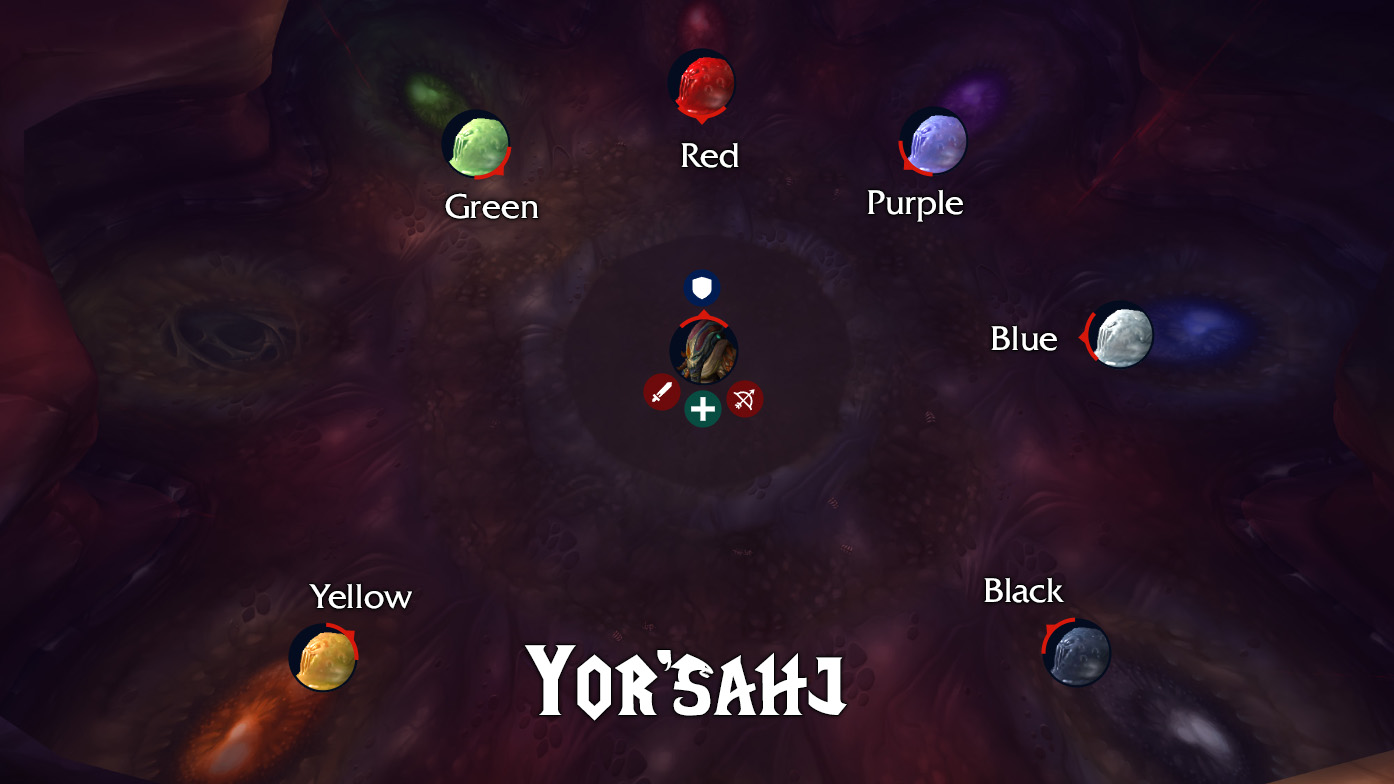
Starting about 20-30 seconds into the fight, and every 75 seconds thereafter, Yor’sahj will summon globules around the outer portion of the cavern. He will summon 3 random globules on Normal and 4 on Heroic. There are six different types, and he will only summon one of any type at a time. These globules will slowly move toward the boss and each give him a new temporary ability when they reach him.
You will only be able to kill one globule during each call – the others will become Immune after the first one is killed. They can’t be stunned or slowed (or bargained with or reasoned with). Your raid will want to designate one globule to kill each time so you don’t have to deal with its boss ability. Generally, most groups will want to eliminate green, purple, or yellow from each call. Your raid leader should set the priority. We’ll cover what each color does in detail below.
Each color globule has a set spawn location that is easily spotted in the room – just look for the spots on the ground that are the same color. World markers can also be placed around the room before the fight begins to make these locations more visible. This should make it easy for DPS to run to the designated globule and kill it quickly. Although other color combinations are mathematically possible, there are only six that have ever been seen in the game for either difficulty:
Normal:
- Black, blue, yellow
- Black, green, red
- Black, purple, red
- Blue, green, purple
- Blue, purple, yellow
- Green, red, yellow
Heroic:
- Black, blue, green, purple
- Black, blue, green, red
- Black, blue, purple, yellow
- Black, green, red, yellow
- Black, purple, red, yellow
- Blue, green, purple, yellow
Yor’sahj will not do anything until the globules reach him, so healers should take advantage of this window to get everyone topped off.
Enrage
Yor’sahj the Unsleeping will enrage 10 minutes after the fight begins, so you’ll need to kill him in that time in order to avoid a wipe.
Globules
Below we’ll cover the abilities that each of the globules adds to the fight if allowed to reach the boss. But first, there is one ability that is shared by all of the globules.
All Globules: Fusing Vapors
This ability is why you can only kill one globule per call. Damaging one globule below 50% heals the others, and killing one causes the rest to become immune to all damage. Don’t waste your time attacking any globule other than the one your group has decided to eliminate.
Acidic Globule (Green): Digestive Acid
The green globule gives Yor’sahj the Digestive Acid ability, which deals damage to a random member of the raid as well as anyone within 4 yards of them. (This ability does not deal splash damage in the Raid Finder version of the raid, but LFR is not currently available in Cataclysm Classic).
Your raid will need to spread out to avoid having multiple people take damage each time he casts this ability. Although the distance is only 4 yards, this can complicate things given that some of the other globule abilities require the raid to stack. For this reason, green is frequently chosen as the top priority to eliminate.
Cobalt Globule (Blue): Mana Void
The blue globule gives Yor’sahj the ability to summon a Mana Void, which will spawn near him and drain all of the raid’s mana when it appears. It then sits dormant until it is destroyed. When it dies, it releases a Mana Diffusion, redistributing all of the mana it stole evenly across the raid group.
Although mana users will be alarmed at the thought of having an empty mana bar for any period of time, this ability is easily dealt with as long as all DPS is directed to the Mana Void as soon as it spawns. The blue globule is usually ignored for this reason and because it does not do any damage to the raid, while taking up a slot that could otherwise be filled with a more dangerous ability. The Mana Void can be Death Gripped by a Death Knight to bring it to the boss’s location and make it easy for melee to switch with no downtime. The mana drain only happens once each time it spawns, so players will be able to regenerate and restore mana afterwards without fear of immediately losing it again.
Crimson Globule (Red): Searing Blood
The red globule gives Yor’sahj the Searing Blood ability, which deals damage to the most distant players and scales based on how far they are from the boss. This ability will target about a third of your raid each time, hitting 3 players in a 10-player group and 8 players in a 25.
Ideally, your group will stack directly on top of the boss if he has this ability. If you are also dealing with the green globule’s Digestive Acid ability, however, everyone will need to be at least 4 yards apart. In that case, spreading out in a tight radius around the boss will be the goal. The red globule is never worth killing since its ability is easily negated by stacking except in the case of the red+green combo, where it would make more sense to eliminate green instead.
Dark Globule (Black): Forgotten Ones
The black globule gives Yor’sahj the ability to summon Forgotten Ones, untauntable adds which fixate on random members of the raid. They frequently cast Psychic Slice, which deals Shadow damage to their target.
This is another ability that is best handled by stacking on top of the boss. Stacking will allow the raid to use AoE to take down the adds quickly. Meanwhile healers will be able to keep everyone alive with their AoE heals. The exception again is if you are also dealing with the green globule’s Digestive Acid ability, in which case the Forgotten Ones will need to be individually targeted and taken down. Black globules are not worth prioritizing; their ability should only pose a problem when combined with green, in which case it makes more sense to take out green instead.
Glowing Globule (Yellow): Glowing Blood of Shu’ma
The yellow globule gives the boss the Glowing Blood of Shu’ma ability, which speeds up his attacks and adds an AoE component to Void Bolt. It also doubles the effects of the abilities he gains from other globules: Digestive Acid (green) and Searing Blood (red) will be cast twice as fast, blue will summon two Mana Voids instead of one, and black will summon two waves of Forgotten Ones.
The fact that this ability amplifies all of the others makes it a good one to prioritize for elimination. If your group chooses to eliminate green or purple instead, your healers will probably need to use some cooldowns to deal with the heavy damage that the raid will be taking. If the raid is stacking to deal with other abilities, you may want to have your tanks outside the stack to minimize the damage of the empowered Void Bolts. They will need dedicated heals of their own, however.
Shadowed Globule (Purple): Deep Corruption
The purple globule causes every heal or absorption effect that is cast to add a stack of the Deep Corruption debuff to the target. If a target reaches 5 stacks of this debuff, they will detonate and deal a high amount of Shadow damage to the entire raid, likely causing a wipe. The debuff is reset after 25 seconds and is not extended by adding stacks. After the second 25-second period passes, the debuff will disappear.
Some groups choose to eliminate this ability to allow their healers to heal freely. On Heroic difficulty, it’s usually better to take out green or yellow to reduce incoming damage. It comes down to whether it’s easier for your team to spam heals through heavy damage or to perform triage through more manageable damage. Your raid composition should also be considered, as this mechanic favors healers who can cast fewer, bigger heals.
If you don’t elect to kill the purple globule, you should ensure that each healer is assigned to specific targets when Deep Corruption is active. The last thing you want is for multiple healers to cast on the same target at the same time and add multiple stacks of the debuff. Every heal cast should be deliberate and strategic. Have one healer on the tank (preferably a Holy Paladin) and one healer assigned to each party. Healers will need to be able to keep track of how many stacks of the debuff each of their targets has. If it comes down to it, it’s almost always better to let someone die than to let them reach 5 stacks and detonate.
Here is how different kinds of heals work with Deep Corruption:
- Direct single-target heals and absorbs will add a stack to the target each time they are cast (e.g. Holy Light, Power Word: Shield)
- AoE heals that are placed on the ground will add a stack each time the target enters the area of effect (e.g. Healing Rain)
- Other AoE heals will add a stack to each target they heal (e.g. Prayer of Healing)
- HoTs will add a stack when they are applied and will not add another if they are refreshed before they expire (e.g. Rejuvenation)
- Channeled AoE heals that heal many targets many times will add a stack to someone each time they tick, which will likely wipe the raid (e.g. Divine Hymn)
- Lightwell adds a stack each time it is used and Atonement adds stacks every time it heals (Atonement can wipe the raid if used with Holy Fire)
These abilities do not add stacks of Deep Corruption and are safe to use:
- Classes that do not have a healing specialization are safe to use all of their abilities
- Consumables do not add stacks when used (e.g. Mythical Healing Potion, Dense Embersilk Bandage)
- Immunity abilities are safe, although they do not remove stacks or prevent them from accumulating (e.g. Divine Shield, Anti-Magic Shell)
- Tank cooldowns do not add stacks (e.g. Enraged Regeneration, Death Pact)
- Secondary effects from damaging abilities do not add stacks (e.g. Divine Storm, Vampiric Embrace)
- Passive healing from procs, talents, and Mastery effects do not add stacks (e.g. Illuminated Healing, Maw of the Dragonlord)
- Damage reduction abilities are safe to use (e.g. Power Word: Barrier)
- Paladin: Lay on Hands and Word of Glory, plus the duplicate effects of Beacon of Light and Guardian of Ancient Kings
- Priest: Desperate Prayer, Guardian Spirit, and Prayer of Mending
- Shaman: Earth Shield, Healing Stream Totem, and Spirit Link Totem
Pets can’t get the debuff, so one option for bypassing the mechanic is to cast heals on a pet as a way of triggering other healing effects that don’t add stacks, such as through Beacon of Light.
About the Author
