- Author: Luxrah
- Date: April 8, 2025
- Updated: April 8, 2025
- Expansion: Mists of Pandaria
The Mists of Pandaria expansion overhauled the talent options for every class and removed Prime Glyphs, leaving a more streamlined system for building out your character. For Mistweaver Monks, your choices will have a subtle, but still meaningful impact on your gameplay and performance.
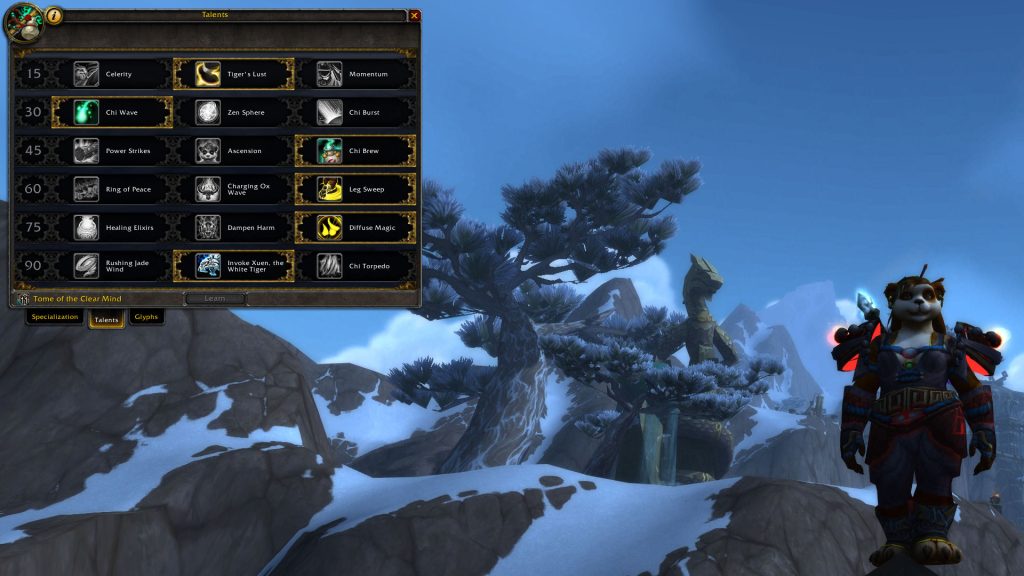
Talents
Talents can now be changed out of combat as long as you have some Tome of the Clear Mind on hand. That means you can easily swap out talents on a fight-by-fight basis. This gives you greater flexibility to take advantage of niche talents when the situation calls for it instead of relying on a one-size-fits-all talent build.
Here is our recommended default talent build for the majority of content. Read on to find out about individual talents and what situations might call for different talent selections.
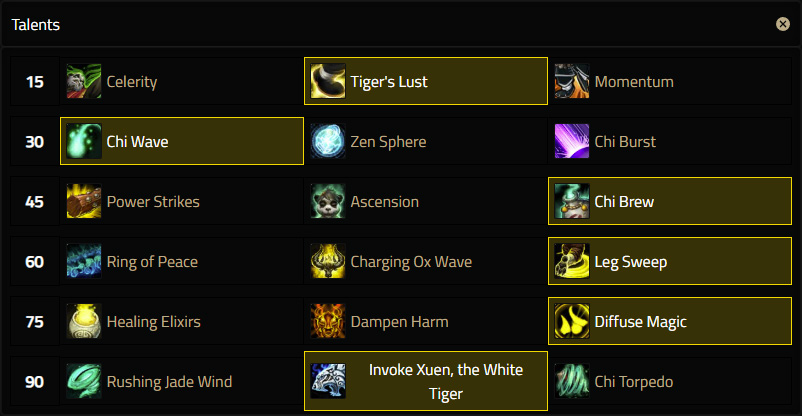
Level 15 Talents (Tier 1)
 Celerity
This talent allows you to use your Roll and Chi Torpedo abilities more often by increasing their number of charges and reducing their cooldown. This is primarily useful if you have taken the Chi Torpedo talent and expect to be using it a lot. If you’re only looking to improve your movement, the other two options are better.- Tiger’s Lust
Where your other two options in this tier offer buffs for your existing movement abilities, this one offers you a new option instead, and a very useful one. This ability allows you (or your target) to sprint and control the direction of your movement as you go, whereas Roll and Chi Torpedo both lock you into a specific direction for the duration of their animation. This is also castable on others and clears immobilizing effects, giving it very broad usefulness. It’s the recommended option in most situations. - Momentum
Like Celerity, this talent buffs your Roll and Chi Torpedo abilities, this time by giving you a 10-second movement speed buff after using them. This talent provides the most movement for situations where you are moving a lot, such as in the open world or in dungeons. It’s not going to be as valuable for encounters where you are sidestepping effects rather than running longer distances, as the initial movement of your Roll or Chi Torpedo should be all you need.
Level 30 Talents (Tier 2)
- Chi Wave
This is a combination AoE damage and healing ability on a short cooldown. The heal is a smart heal that selects the most wounded targets in range, which makes it very effective even if its total output is lower than the other two options. This will be your default option when you can’t make optimal use of Chi Burst, either because the group is too spread out or because you don’t have a lot of targets to heal with it (such as in dungeons).  Zen Sphere
A short-cooldown HoT/DoT that can be detonated for a big lump heal/attack. It can do comparable healing to Chi Burst, but you would have to use it more often, costing you more global cooldowns that could be spent on other spells. It’s also just a little unnecessarily complicated compared to the other two options.- Chi Burst
This is the best option of the three for healing a stacked group through heavy AoE damage spikes. It has the longest cooldown, which is still relatively short, and on a large group it can do a lot of healing and/or damage. You’ll want to take this for most raid content unless your group is too spread out to make use of it.
Level 45 Talents (Tier 3)
- Power Strikes
This talent provides a straightforward and consistent boost to your Chi generation, and over the course of a fight you will get more out of this than the other two options. On the other hand, it requires a bit more micromanagement, and the other options give you more flexibility and control to maximize your resources when you need them most. - Ascension
Increasing the amount of Chi you can store as well as your maximum mana means that you will be able to have more resources stored for when you need them most. This talent will be especially nice to have if you’re generating a lot of Chi that you want to save for spike damage. - Chi Brew
Where the other two options passively increase your available resources, this one lets you get them back on demand. It also offers the greatest mana regeneration when used on cooldown. This talent gives you the greatest control over your resources of the three options and is recommended as the default choice for most endgame content.
Level 60 Talents (Tier 4)
- Ring of Peace
Provides 8 seconds of AoE silence and disarm on a 45-second cooldown. Very nice for helping your tank handle large groups of trash or adds. - Charging Ox Wave
Awkward to use since you need to aim it. You may sometimes find a good use for its ranged stun, but the other two options will be more useful in the majority of situations. - Leg Sweep
A short-range AoE knockdown. Just as useful as Ring of Peace, but without the ability to use it from range. Where Ring of Peace silences and disarms, this talent completely takes the targets out of commission for 5 seconds.
Level 75 Talents (Tier 5)
- Healing Elixirs
Normally, the benefit of a passive ability is that you don’t have to do anything to activate it. That’s not the case for this ability. Unless you are dropping below 35% health every 18 seconds, you’ll need to use a Brew or Tea to activate this, which really isn’t optimal. One of the two active alternatives will be better in the vast majority of situations. - Dampen Harm
A strong defensive cooldown, allowing you to reduce the damage of 3 attacks on your character every 90 seconds. Diffuse Magic will be better for spell damage, but this is a great option for mitigating physical damage. - Diffuse Magic
This is an incredibly powerful defensive cooldown as long as the damage that you’re taking is spell damage and not physical. It not only massively reduces the damage you take for six seconds, it also clears all debuffs and sends them back to their casters. The majority of damage you’ll take as a non-tank will be spell damage, so you can default to this talent for most endgame content.
Level 90 Talents (Tier 6)
- Rushing Jade Wind
This ability replaces Spinning Crane Kick and does the same healing, but less damage per tick. It lasts for a longer duration, so you get more damage and healing out of it for the same mana cost. It also doesn’t slow your movement speed and doesn’t need to be channeled. You can cast it, and then continue to use other abilities while it does its thing. - Invoke Xuen, the White Tiger
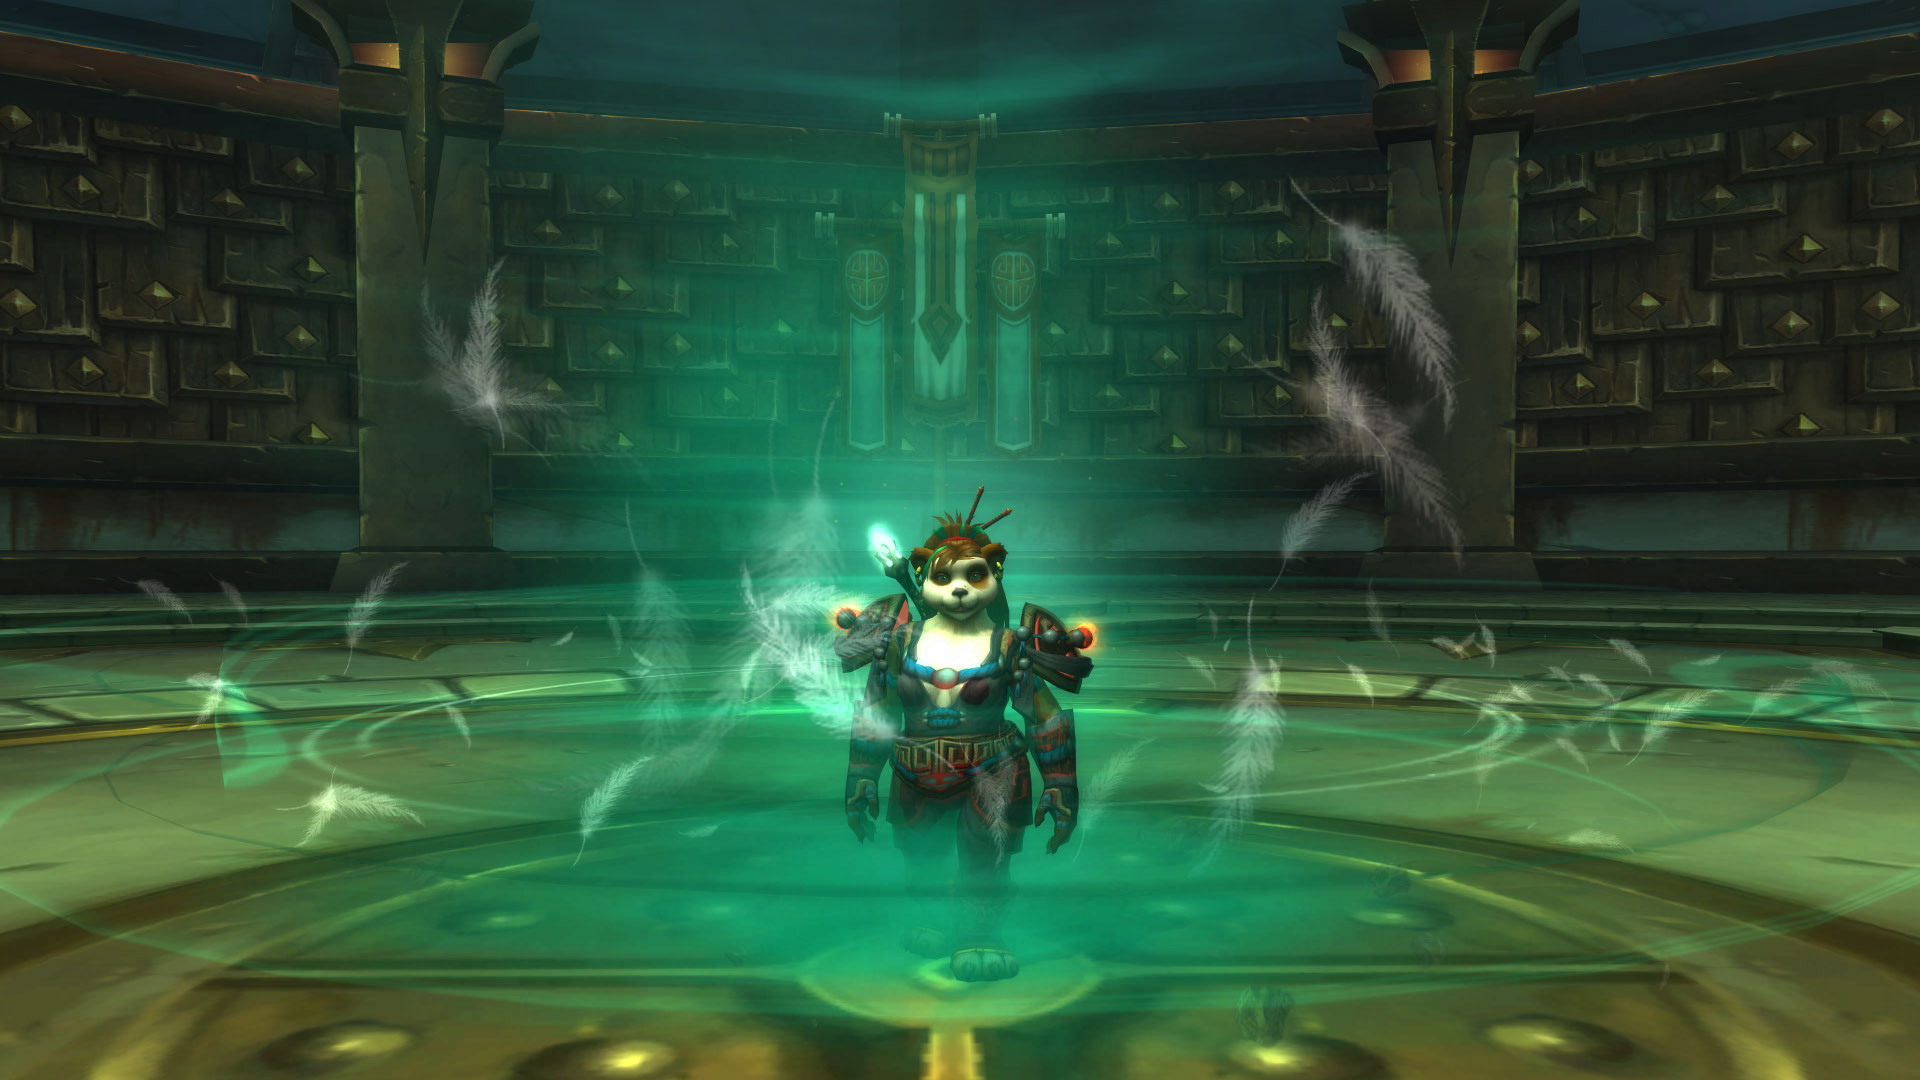
This is a solid damage buff on a long 3-minute cooldown, but with quite a long duration at 45 seconds. Thanks to your Stance of the Wise Serpent it also acts as an AoE smart heal. This talent is good for contributing damage as well as healing during a burn phase. Xuen benefits from buffs, so you can get a lot out of this if you use it alongside other cooldowns and procs. - Chi Torpedo
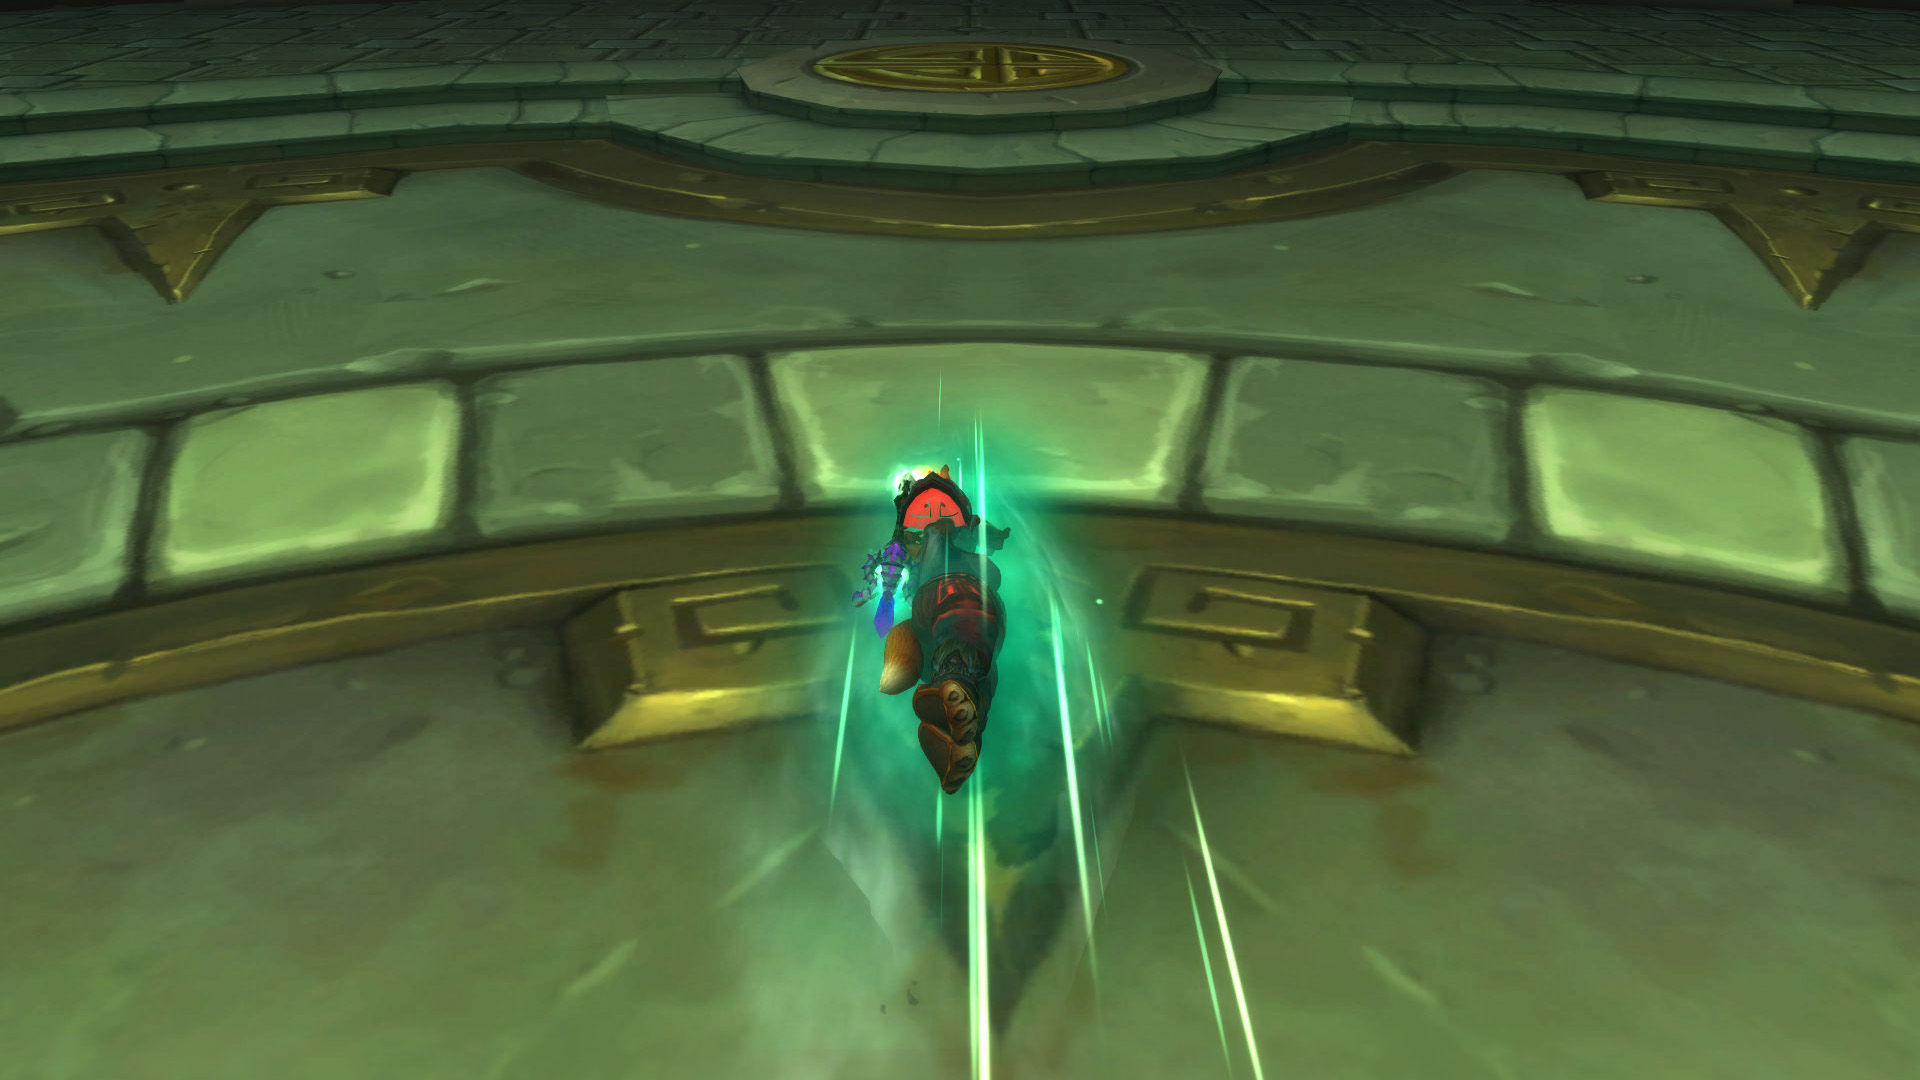
This ability replaces Roll. Instead of rolling on the ground, you torpedo forward, traveling a bit further and dealing out damage and healing in your path. This ability can give you the most damage and healing over the course of an encounter, but it can be a little trickier to use since you must point your character in a direction where they will hit enough targets (generally, at least 6 players to maximize its healing) and where you won’t wind up in a bad spot on the other side. This is best used in stacked fights and alongside the Celerity talent in tier 1.

Glyphs
Prime Glyphs are gone in Mists of Pandaria. You will still choose 3 Major Glyphs and 3 Minor Glyphs.
Major Glyphs
There are a few Major Glyphs for Mistweaver Monks that will be useful in the majority of content, and several alternatives that can be even more useful in the right circumstances.
Default Options
If you’re just looking to grab the 3 most straightforward glyphs for a Mistweaver Monk, here are your picks depending on the type of content you’re tackling.
- Glyph of Renewing Mist
This causes your Renewing Mist to spread much further out, making it an ideal glyph for any fight where your raid is spread apart. However, if you are attempting to focus on a clumped group, such as melee, using this can actually be detrimental to your efforts. On any fight where the raid is tightly stacked, it’s probably a wasted glyph slot. - Glyph of Targeted Expulsion
Lets you use Expel Harm on other players, albeit at half effectiveness. A cheap spot heal that generates Chi is a handy ability to add to your toolkit. - Glyph of Zen Meditation
Being able to move while channeling Zen Meditation makes it much more useful since it won’t lock you down for 8 seconds, especially since you’ll typically be using it in the midst of a chaotic phase of an encounter.
Situational Options
These can offer strong alternatives to the glyphs above depending on the content and your approach.
- Glyph of Detox
Adds a small heal to your Detox. Usually when there is a debuff on a target they will be missing health too, so adding a small heal to your dispel makes sense. This may be worth using on any encounter where you will be dispelling a lot, though there will probably still be better options. - Glyph of Enduring Healing Sphere
Extends the time on your Healing Spheres, allowing you to place them well in advance of damage and giving your teammates more opportunity to take advantage of their full healing. The potential downside is that you won’t get the reduced healing from their expiration for a lot longer, so if no one is going to be picking them up either way, you may be better off not using this glyph. - Glyph of Fortifying Brew
Trades some of Fortifying Brew‘s increased health for more damage reduction. Most of the time the damage reduction will be more helpful for you, unless you are using the ability to try to survive a really big hit, in which case you’d want to skip this. - Glyph of Fortuitous Spheres
You can get a free Healing Sphere up to once every 30 seconds with this glyph, but only if your health drops below 25%. You don’t want to be letting your health get low just for the sake of proccing this glyph, but it could theoretically do a lot of extra healing on any encounter where you’re taking a lot of damage. - Glyph of Life Cocoon
Allows you to cast Life Cocoon while stunned. This is primarily for PvP, but it can also be useful in any content where you may be hit with a stun. - Glyph of Rapid Rolling
Whenever you use Roll or Chi Torpedo twice in a row with this glyph, the second cast will take you 30% farther. This is great if you have a long distance to run, but most fights don’t require you to move that far in one go. - Glyph of Spinning Crane Kick
This glyph simply removes the movement speed reduction from Spinning Crane Kick. Note that if you have the Rushing Jade Wind talent, you don’t need this. Otherwise it can be useful if you’re using the ability often, especially on movement-heavy fights with plenty of raid damage going out.
Options to Avoid
These may seem like strong options for Mistweaver Monks at first glance, but they’re generally not as good and will only have limited or niche usefulness.
- Glyph of Mana Tea
Changes your Mana Tea to be instant instead of requiring you to channel it, using two stacks per cast and adding a 10 second cooldown to the ability. This isn’t really that helpful since the ability already channels at a rate of .5 seconds per stack and you can cancel it without wasting stacks. You’d be adding a cooldown to the ability just to avoid standing still to channel it for 1 second at a time. - Glyph of Nimble Brew
Adds a small self-heal to Nimble Brew. Useful in PvP or solo content, but you won’t get much value out of it in instances. - Glyph of Paralysis
Ensures that your Paralysis targets don’t get knocked out of it by DoT damage. This might have some niche use inside dungeons, but otherwise you won’t be using Paralysis enough for this to be needed. - Glyph of Surging Mist
With this, your Surging Mist becomes a smart heal that automatically targets the teammate with the lowest health. That might sound like it would simplify things for you, but in actual practice it gives you less control over where your heals are going, which is not desirable. Smart heals are great for AoE healing, but single-target emergency heals are usually targeted for a reason. With this, you might accidentally heal a DPS who is safe for the moment while your tank takes a big hit and dies. - Glyph of Transcendence
Reduces the cooldown on your Transcendence: Transfer spell. You shouldn’t need to use this ability that often in instances.
Minor Glyphs
Minor Glyphs are mostly cosmetic. There are a few that can offer useful utility at endgame, although they won’t generally be needed inside instances.
- Glyph of Spirit Roll
Allows you to use Roll and Chi Torpedo while dead, letting you get back to the instance more quickly after a wipe. - Glyph of Water Roll
Allows you to use Roll and Chi Torpedo to cross water. - Glyph of Zen Flight
Allows you to fly instantly without having to summon a mount, which helps you get around more quickly anywhere you can fly.
About the Author
