![tbc classic alliance leveling guide terokkar forest [level 63 65]](https://www.warcrafttavern.com/wp-content/uploads/2021/11/TBC-Classic-Alliance-Leveling-Guide-Terokkar-Forest-Level-63-65-1024x400.jpg)
- Author: DanielD
- Date: November 17, 2021
- Updated: November 18, 2021
- Expansion: TBC Classic


Welcome to the jungle forest! While in Terokkar forest, you can still try to get an instance going for the Slave Pens and/or The Underbog. Make sure you grab the requisite quests (see the Extra XP section in Part 2: Zangarmarsh).

- Take another gryphon, this time to Shattrath.
- Speak with the Haggard War Veteran (59.6, 41.4) and accept
 A’dal. Then head to the center of the city and talk to A’dal to turn in
  A’dal.
 - Speak with Archmage Khadgar, who is the old guy telling you to leave A’dal alone. Speak to him and accept City of Light to get a nice brief tour of the city — just follow Khagdar’s servant around until you get the quest complete message, then return to Khadgar to turn in City of Light.
- Speak with the Haggard War Veteran (59.6, 41.4) and accept
- For the following part, the player must decide which faction to side with (Aldor or Scryer). Aside from the risk of ruining a friendship, your main consideration should probably be the rewards. It’s also worth noting that the drops you turn in to each faction for rep tend to be easier to collect for the Scryers, so if your goal is just to hit exalted ASAP, Scryers might be somewhat easier to do so with. Once you’ve decided, speak with Archmage Khadgar and accept either quest Allegiance to the Aldor or quest Allegiance to the Scryers.
[WIP: Guide].- [ALDOR] Accept Ishanah from Archmage Khadgar. Then go to the western part of the city, to Aldor’s Rise. Talk to Adyen the Lightwarden to accept Marks of Kil’jaeden (the guide may not specify turning these in, but you should do so once you have some and are in Shattrath), then head up into the main building and speak with Ishanah to turn in Ishanah and accept Restoring the Light. Hit up the inn (28, 49) and make Shattrath your new home. Use a portal in the Terrace of Light to reach a main city and restock, sell, repair, and train new skills. Then hearthstone or teleport back to Shattrath City.
- [SCRYER] Accept Voren’thal the Seer from Archmage Khadgar. Then go to the southern part of the city, to Scryer’s Tier. Talk to Magistrix Fyalenn ( 45.6 82.2) to accept Firewing Signets, then go up to the main building and inside head up the ramp and talk to Voren’thal the Seer to turn in Voren’thal the Seer. Go to the inn at (55, 81) and make Shattrath your new home. Use a portal in the Terrace of Light to reach a main city and restock, sell, repair, and train new skills. Then hearthstone or teleport back to Shattrath City.
- [ALDOR] Accept
- Go to the Lower City in the north of Shattrath. Go into the Inn at (64, 16) and speak with Seth to accept Rather be Fishin’.
- Go west to the Skettis section of Shattrath, in between Aldor’s Rise and the Lower City. Head up into the the tree houses and find Vekax to accept The Outcast’s Plight.
- Across the street at (53, 21) speak with Rilak the Redeemed to accept The Eyes of Skettis.
- Head east and leave Shattrath heading northeast via the Lower City tunnel. Continue northeast until you hit Silmyr Lake (37, 12). If you still have a way to breathe underwater, activate it, then kill Shimmerscale Eels until you have 8 Pristine Shimmerscale Eel.
- Take the road south until it hits the road heading east, then head east towards Cenarion Thicket and find Earthbinder Tavgren at (44, 26). Talk to him to turn in What’s Wrong at Cenarion Thicket? and accept Strange Energy and Clues in the Thicket.
- Now go into the thicket, take the path and then take your first left to find Warden Treelos. Speak with him and accept It’s Watching You!
- Continue on the path and then fight your way to the top of the tower, and make sure you’re healthy with all your important CDs ready before you fight Naphthal’ar. Keep your back to a pillar to avoid him knocking you off the tower.
- Exit the tower, and follow the path down, and then take your first left and enter the building. Find the Strange Object in front of the counter in the building and right click it to examine it.
- Return to Warden Treelos and turn in It’s Watching You!, and try not to let him weird you out too much.
- Now kill Vicious Teromoth until you’ve collected 4 Vicious Teromoth Samples. Then cross the road and kill regular boring Teramoths until you have 4 Teramoth Samples.
- Go back to the entrance to the thicket and speak again with Earthbinder Tavgren to turn in Strange Energy and Clues In the Thicket, accept By Any Means Necessary.
- Now you’ve got to go strong arm a Broken merchant named Empoor who travels the road between Shattrath and Tuurem. Take the road south to the east-west road that runs between Shattrath and Tuurem, and find Empoor. Note that once you speak with him he and his bodyguard will attack you, so make sure you’re ready. Once you get him to low HP he’ll spill the beans and let you turn in By Any Means Necessary and accept Wind Trader Lathrai.
- Now head southeast to the Allerian Stronghold at (56, 51). Careful, you’ll have to either fight your way through Tuurem or else go south around it, as it’s not a very hospitable place anymore.
- Once you reach Allerian Stronghold:
- Find the wanted poster outside of the main building to accept Wanted: Bonelashers Dead!
- Enter the main building and talk to Ros’eleth to accept Olemba Seeds. From now on, keep an eye out for Olemba Seed, which can be found in any forested area of Terokkar Forest. Note that you’ll need to find Olemba Cones, which contain the seeds.
- Go further into the building and speak with Lieutenant Gravelhammer to accept Thin the Flock and Speak with Private Weeks.
- Leave the main building and find Thander behind a ballista to accept Stymying the Arakkoa.
- Keep heading east to talk to Bertelm and accept Unruly Neighbors and Timber Worg Tails.
- Now head north and head inside the nearby building to talk to Andarl and turn in The Fate of Tuurem and accept Magical Disturbances to help Andarl deal with his magical impotence problem.
- Speak with the flightmaster to get the new flight path.
- Find the wanted poster outside of the main building to accept
- You’ll now want to gather Olemba Seeds (you need 30) and kill any Timber Worgs (until you collect 12 Timber Worg Tails) and Warp Stalkers (until you’ve slain 10) you run across.
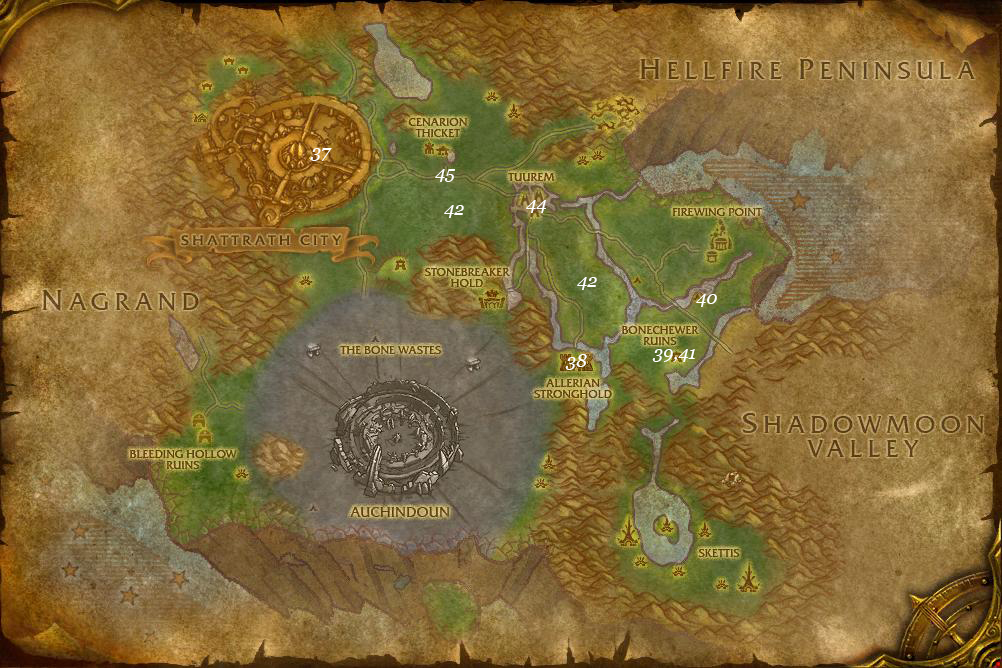
- Leave the Allerian Stronghold and head north and slightly east, kill the abovementioned critters and collect seeds until you reach Veil Sheinor (59, 27), which is just northeast of Tuurem.
- Enter Veil Sheinor, and fight your way to the eastern tree’s entrance (59.7, 25.1). Head up and over the bridge to the next tree where you’ll grab the Eye of Veil Sheinor.
- Return the way you came and go to the large hut between the two trees at (59.4, 23.5). Find Ayit inside and slay him.
- Leave this veil and head northwest to another one, Veil Reskk at (49.1, 16.9). Battle to the wooden bridge (50, 16.5) that leads up to the tree house. Find Ashkaz there and kill him — if he isn’t there it means someone killed him, you’ll have to wait for Ashkaz to respawn (shouldn’t take more than a couple minutes).
- Cross the bridge to the next tree house and grab the Eye of Veil Reskk.
- [ALDOR} Now find the three altars for Restoring the Light and right click all of them. They are located at (49, 20), (48, 14) and (51, 17).
- If you still need to complete Thin the Flock, kill Shienor Talonites and Shienor Sorcers until you’ve done so. It’s also worth staying here until you have at least 20 Arakkoa Feathers.

- Hearthstone to Shattrath, take care of any business you need to, and then:
- [ALDOR]Go to Aldor’s Rise in the western part of the city and speak to Ishanah to turn in Restoring the Light.
- [SCRYER] (Note that this quest requires level 64, so don’t bother with this step yet if you aren’t there). Go to the Scryer’s Tier in the south of the city and speak with Voren’thal in the main building to acceptSynthesis of Power. It’s possible to purchase or trade for the Arcane Tome you need, and you may find them as a drop later in the Netherstorm as well. Simply come back when convenient and turn this in once you have the tome.
- Go speak with Rilak the Redeemed in the northwestern part of the Lower City to turn in The Eyes of Skettis and accept Seek Out Kirrik.
- Head to the nearby Inn at (64, 16) and speak with Seth to turn in Rather be Fishin’.
- Walk southeast through the Lower City to the tavern around (72, 31) to talk to Wind Trader Lathrai out front to turn in Wind Trader Lathrai and accept A Personal Favor.
- [ALDOR]Go to Aldor’s Rise in the western part of the city and speak to Ishanah to turn in
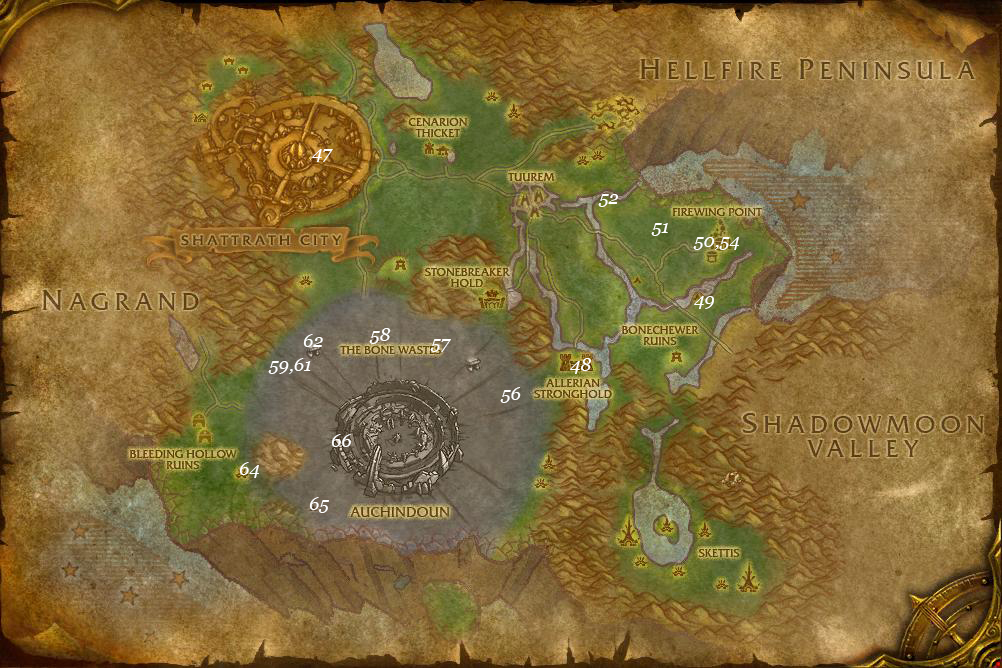
- Leave Shattrath via the southeast tunnel, then head southmeast to Private Weeks (40.45, 36.11) by Grangol’var Village. Speak with him to turn in Speak with Private Weeks and accept Who Are They?
- You’re now in a disguise, so don’t attack anything unless you want to go back to Private Weeks and get a new disguise. Just past Weeks on your left (his right) is the entrance to Grangol’var Village. Avoid the shadowy hunters as, like Weeks warns, they’ll see through your disguise. Turning on NPC nameplates helps here, as the guys you want to avoid will be red instead of green. You need to talk to three enemy types:
- Shadowy Initiate – You should be able to find one by the lake
- Shadowy Advisor – Find one in the main building
- Shadowy Laborer – Wanders the village, just keep an eye out as you travers the place
- Once you’ve spoken with all 3 Shadowy folk, head back to Private Weeks to turn in Who Are They? and accept Kill the Shadow Council!
- Go right back into the village, but this time you don’t need to sneak around, you just need to kill everybody (or at least 10 Shadowy Executioners, 10 Shadowy Summoners, and Shadowmaster Grieve, who you can find in the main building).
- Once you finished killing the Shadow Council, leave the village heading west to hit the road, then follow it south to reach the Refugee Caravan near (37, 51). Once there:
- Speak with Kirrik the Awakened (37.6, 51.5) to turn in Seek Out Kirrik and accept Veil Skith: Darkstone of Terokk.
- Talk to Mekeda (37.8, 51.8) to accept Before Darkness Falls.
- Speak to Lakotae (37.9, 51.7) to accept The Infested Protectors.
- Talk to poor lonely Ethan (37.7, 51.3) and accept Missing Friends.
- Speak with Kirrik the Awakened (37.6, 51.5) to turn in
- Leave the caravan and head northwest to Veil Skith (31, 42) Note that there are Timber Worgs around, if you still need 12 Timber Worg Tail you can grab some while you’re here:
- In the middle of the Veil, find the Darkstone of Terokk. Walk up to it, then right click the Rod of Purification in your inventory to destroy the stone.
- West of the stone is a wooden bridge that leads up to the tree houses. Fight your way to the last tree house and slay Urdak.
- Continue killing birdmen, they’ll drop Veil Skith Prison Keys, Lathrai’s Stolen Goods, Arakkoa Feathers. Use the keys to free the children in the Prison Cages — note that some cages might be empty, so make sure there’s children needing rescuing before you use a key!
- You can leave the Veil once you:
- Free 12 children
- Collect 30 Arakkoa Feather (for The Outcast’s Plight).
- Find all 5 of Lathrai’s Stolen Goods
- Slay Urdak
- Return to the Refugee Caravan, killing any treants (and the mites they drop) you see on the way, then:
- Speak with Kirrik the Awakened (37.6, 51.5) to turn in Veil Skith: Darkstone of Terrok and accept Veil Rhaze: Unliving Evil.
- Talk to Ethan (37.7, 51.3) to turn in Missing Friends, and accept his generous gift of a steam tonk.
- Talk to High Priest Orglum (37.5, 50.8) to accept The Tomb of Lights and The Vengeful Harbinger.
- Speak with Kirrik the Awakened (37.6, 51.5) to turn in
- Head southeast to the Shadow Stair near (38, 55), the entrance to Auchindoun. Kill any orcs you find until you’ve slain 8 Cabal Skirmishers, 4 Cabal Spell-weavers, and 2 Cabal Initiates. You’ll also need one of them to drop Cabal Orders — right click the orders to accept Cabal Orders.
- Now go east, killing Bonelashers as you encounter them, and find the Tomb of Lights (47, 55):
- Continue killing Bonelashers and Ethereals while asking for help with The Vengeful Harbinger in chat.
- Once you find a friend, or if you get sick of waiting and want to risk it, you can enter the tomb, go east, and clear the room. Find the circle at the end of the room and right click the Draenei Tomb Relic in your inventory once you’re ready. You’ll fight 4 waves of enemies, and if you succeed, a shade will appear that you can right click to turn in The Vengeful Harbinger. Make sure to keep your Draenei Tomb Guardian alive in order to complete the quest.
- Kill 10 Ethereal Nethermancers and 10 Ethereal Plunderers to complete The Tomb of Lights before you leave the tomb. The exit is via the western passage.
- Continue killing Bonelashers and Ethereals while asking for help with
- Return to the Refugee Caravan (37, 51), but don’t forget to kill Bonelashers while you go. Once there:
- Talk to High Priest Orglum (37.5, 50.8) to turn in The Tomb of Lights.
- Speak with Mekeda (37.8, 51.8) to turn in Before Darkness Falls and Cabal Orders and accept The Shadow Tomb.
- Find Soolaveen (37.0, 49.5) and talk to him to accept Recover the Bones. From now on, collect Restless Bones that you find in and around the Bone Wastes, until you’ve got 10.
- Talk to High Priest Orglum (37.5, 50.8) to turn in
- Southwest and further west of the caravan you can find plenty of Bonelashers; kill them until you’ve slain the 20 required for Wanted: Bonelashers Dead!
- Hearthstone to Shattrath, take care of junk/repair/resupplying, then:
- Head to the northern part of the Lower City and talk to Vekax (48, 18) in the treehouse to turn in The Outcast’s Plight.
- Head southeast to Wind Trader Lathrai (72.2, 30.8) to turn in A Personal Favor and accept Investigate Tuurem.
- Head to the northern part of the Lower City and talk to Vekax (48, 18) in the treehouse to turn in
- Take a gryphon flight to Allerian Stronghold, and:
- Talk to Thander to turn in Stymying the Arakkoa.
- Find Lieutenant Gravelhammer in the main building and turn in Thin the Flock and Kill the Shadow Council!
- Speak with Taela Everstride (58.1, 53.4) and turn in Wanted: Bonelasher’s Dead!, accept Torgos!
- Talk to Thander to turn in
- Now exit Allerian Stronghold heading east, kill any Warp Stalkers or Worgs you find, and picking up Olemba Seeds until you find the orc fortress Bonechewer Ruins (65, 50). Kill all the Timber Worg Alphas, then slay 12 Warped Peons, then kill the Alpha Worgs again once they respawn if you still need Timber Worg Tails.
- Head northeast to Allerian Post, which sits on the southern bank of the river just northeast of BOnechewer Ruins, and speak with Theloria Shadecloak (69.7, 44.2) to turn in Unruly Neighbors and accept The Firewing Liaison and Thinning the Ranks.
- Return to the Bonechewer Ruins (65, 50) and clear your way into the main building. Find Lisaile Fireweaver there and slay her, then find Fel Orc Plans on the ground near her. Right click them in your inventory to accept Fel Orc Plans. Then fight your way back out and keep killing orcs until you’ve slain 10 Bonechewer Devastators and 6 Bonechewer Backbreakers for Thinning the Ranks.
- Now you need to complete Magical Disturbances by killing Warp Stalkers (until you’ve slain 10). You also need to kill Worgs (you need 12 tails for Timber Worg Tails), and gathering seeds until you have 30. You can do this around the fortress and in the nearby forest.
- Return to Allerian Stronghold:
- Talk with Andarl to turn in Magical Disturbances.
- Speak with Bertelm to turn in Fel Orc Plans and Timber Worg Tails, accept The Elusive Ironjaw.
- Talk to Ros’eleth to turn in Olemba Seeds and accept Vessels of Power.
- Talk with Andarl to turn in
- Exit the stronghold and go north on the road to Tuurem (53, 29). Kill mobs while searching for Draenei Vessels — you need 8 for Vessels of Power. Head northeast to the island there, and find a hut with a Firewing Courier inside around (54, 30). Kill the Courier, grab the Sealed Box. Head west and leave once you have the 8 vessels you need. Note that many are in the huts that have ramps leading up to them.
- Leave Tuurem heading west on the road and find Earthbinder Tavgren (44.3, 26.3) in front of Cenarion Thicket to turn in Investgate Tuurem and accept What are These Things?
- If you’re close to 65, farm to 65. Good spots are the Shadow Tomb (31.1, 52.7) or the Shadow Stair (58, 35). If you don’t plan on doing any instances you can skip this part and not worry about 65 (see step 47.1).
- Continue on the road to Shattrath:
- Go to the northern section of the Lower City and speak with Oloraak (58, 15.2) to accept Can’t Stay Away. Note that you have to be level 65 for this quest, but it’s for the Sethekk Halls instance, so if you can’t take it you can always do it later or ignore it.
- [ALDOR] Head east a bit to find Sha’Nir (64.6, 15.2) and accept A Cure for Zahlia.
- Go to the northern section of the Lower City and speak with Oloraak (58, 15.2) to accept
- Take a gryphon to Allerian Stronghold (57, 55), and:
- Talk to Jenai Starwhisper (57, 53.5) to turn in What Are These Things? and accept Report to the Allerian Post.
- Find Ros’eleth (57.4, 55.4) to turn in Vessels of Power.
- Talk to Jenai Starwhisper (57, 53.5) to turn in
- Head northeast from the Stronghold to the Allerian Post (69, 44):
- Talk with Lieutenant Meridian (69.7, 44.1) to turn in Report to the Allerian Post and accept Attack on Firewing Point.
- Speak to Theloria Shadecloak (69.7, 44.2) to turn in The Firewing Liaison and Thinning the Ranks.
- [ALDOR] Start asking in chat for help with A Cure for Zahlia — a quest in which you’ll need to kill the basilisk Stonegazer.
- Talk with Lieutenant Meridian (69.7, 44.1) to turn in
- Leave the post and go north to Firewing Point (70, 35). Once there, you’ll need to kill blood elves for the quest Attack on Firewing Point:
- Continue northwest and try to find the wolf Ironjaw, who should be moving around in the area near (65, 35). He doesn’t stay in one place, so farm the area while looking for him. Once you find him, naturally, you’re gonna want to kill him and loot Ironjaw’s Pelt from him.
- [ALDOR] Even further northwest around (60, 29) is where you can find Stonegazer, the target of A Cure for Zahlia. If you haven’t found help for this quest yet, you can try to solo it, but this elite basilisk is immune to fear, blind, snares, and roots, so ask yourself if your build can handle him. Whether or not you find help, make sure you clear the area around him before you try to take him on. You can always do this quest later, and depending on where you are at level wise, you might not even need the XP.
- Return to the Allerian Post (69, 44) and speak with Lieutenant Meridian (69.7, 44.1) to turn in Attack on Firewing Point and accept the epic conclusion to this questline — The Final Code.
- Head back to Firewing Point (70, 35):
- Fight your way to the main building with the tall tower. Use the translocation orb at (73, 35) to teleport to the top of the tower and kill Sharth Voldoun; grab The Final Code from his corpse.
- Next, use the translocation orb at the highest point to get back down the tower, then go back inside the main building where you’ll want to talk to Isla Starmane to accept her quest Escape from Firewing Point! Protect her as she makes her way out of the village.
- Kill bloodelves to make a path to the Mana Bomb at (71.3, 37.4) and right click it to set it off.
- Return to the Allerian Stronghold (57, 55):
- See Jenai Starwhisper to turn in The Final Code and accept Letting Earthbinder Tavgren Know.
- Speak with Captain Auric Sunchaser in thne main building to turn in Escape from Firewing Point!
- Talk to Bertelm to turn in The Elusive Ironjaw.
- See Jenai Starwhisper to turn in
- Leave the Allerian Stronghold heading southwest, keeping an eye out for Restless Bones. Leave the woods to find some treants — kill them and the mites that spawn once the trees are dead — you need to kill 25 Wood Mites for The Infested Protectors, so keep killing Infested Root-Walkers and Rotting Forest-Ragers until you do so.
- Now head northwest to find the vulture Trachela (43.2, 51.6) on Carrion Hill, which is a small hill (duh) covered in bones. Slay her and loot Trachela’s Carcass (so I guess you really just pick up her dead body).
- Now head a bit further west to return once more to the Refugee Caravan. Talk to Lakotae and turn in The Infested Protectors.
- Head southwest to Veil Rhaze (28, 55). On the way, you can start asking in chat to see if there’s anyone who wants to do Torgos! with you. Once you get to the Veil, you’ll want to work on Veil Rhaze: Unliving Evil — you need to kill the following:
- While you wait for help with Torgos!, you can search for Restless Bones and grind the Shadowtomb (30, 51) to the northeast of Veil Rhaze.
- Once you find a friend or two, go to the scarecrow Torgo’s Bane (26.9, 55.6)near Veil Rhaze and right click Trachela’s Carcass in your inventory while near the scarecrow. Once you defeat Torgos, and get over feeling bad about luring him to his death with the dead body of his girlfriend, you can loot the Tail Feather of Torgos from his corpse. As usual, you can always skip this quest and do it later if you can’t find help.
- Now go northwest and enter the Shadowtomb (30, 51):
- Head to the eastern room and kill everything inside, then loot the cabal chest to get the Drape of Arunen.
- Cross the tomb to the western room, kill stuff, find the cabal chest to get the Gavel of K’alen.
- Now do the same thing in the northern room to get the Scroll of Atalor.
- You should now find Akuno at the entrance of the room you got the scroll in. Get full mana and hp and then talk to Akuno to accept Escaping the Tomb.
- Follow Akuno, letting him take aggro from mobs. After 2 ambushes Akuno will sprint to the Refugee Caravan to the east.
- Head to the Refugee Caravan, and:
- Speak with Mekeda to turn in Escaping the Tomb and The Shadow Tomb.
- Talk to Kirrik the Awakened to turn in Veil Rhaze: Unliving Evil and accept Veil Lithic: Preemptive Strike — it’s time to crack some evil eggs.
- Speak with Mekeda to turn in
- Leave the caravan heading southwest towards Veil Lithic to (23, 74). This veil lies west of the small mountain west of Auchindoun. Keep collecting bones if you haven’t yet got the 20 you need for Recover the Bones. Once you make it to the Veil, keep an eye out for the wandering ogre and avoid him if you can. Right click all the eggs you find. Some eggs will spawn a Redeemed Hatchling, while others will spawn Malevolent Hatchlings. You need to find 3 Redeemed Hatchlings and slay 3 Malevolent Hatchlings — what spawns from the eggs seems to be random, so if you get unlucky you might need to do something else and come back while waiting for the eggs to respawn.
- Once you’ve completed the objectives for Veil Lithic: Preemptive Strike, try to forget about your 3rd bird-related crime of the day and head southeast to the Sha’tari Base Camp (31, 76). Once there:
- Speak with Oakun (31.1, 76.5) to accept The Dread Relic.
- Talk to Commander Ra’vaj (31, 76.1) and accept An Improper Burial.
- Find Scout Navrin (31.4, 75.7) and accept Taken in the Night.
- Last, find Chief Archaeologist Letoll to accept Digging Through Bones, which starts an escort quest.
- Follow the dwarven expedition and protect them, then return to the base camp and talk to (yes his name really is) Dwarfowitz (31, 76.2) to turn in Digging Through Bones and accept Fumping.
- Follow the dwarven expedition and protect them, then return to the base camp and talk to (yes his name really is) Dwarfowitz (31, 76.2) to turn in
- Speak with Oakun (31.1, 76.5) to accept
- Head north and slightly east to Auchindoun, once you’re there:
- Enter through the west gate at (33, 66), and walk to the edge of the upper terrace. Drop down to the closest level, and eat before you drop again (repeat this to reach the ground floor). If you get lost here, just head to the western side of Auchindoun.Enter the area marked by two glowing pink fires. Speak with Ha’lei (35, 65.2) to accept I See Dead Draenei (here — just in case you didn’t get the joke).
- A few steps south you’ll find Ramdor the Mad; speak with him to turn in I See Dead Draenei and Recover the Bones (all that bone-hunting finally pays off!) and accept Ezekiel and Helping the Lost Find Their Way. From now on, you’ll want to kill Lost Spirits and Broken Skeletons you find in the Bone Wastes until you’ve slain 10 of each for this quest.
- If you accepted Can’t Stay Away earlier, go east to the other lower gate to speak with Isfar to turn in Can’t Stay Away and accept Brother Against Brother. If you didn’t, don’t worry about it.
- Enter through the west gate at (33, 66), and walk to the edge of the upper terrace. Drop down to the closest level, and eat before you drop again (repeat this to reach the ground floor). If you get lost here, just head to the western side of Auchindoun.Enter the area marked by two glowing pink fires. Speak with Ha’lei (35, 65.2) to accept

- Hearhstone to Shattrath and:
- [ALDOR] Head to the northern portion of the Lower City to talk with Sha’Nir (64.6, 15.2) and turn in A Cure for Zahlia.
- Find the NPC Ezekiel by going to the outer terrace of the city and walking counter-clockwise (he patrols clockwise). Speak with him to turn in Ezekiel and accept What Book? I Don’t See Any Book. Note that this quest requires level 65, so do it at the end of the Terokkar Forest section if you can’t do it yet.
- You’re going to need to ask in chat for help with What Book? I Don’t See Any Book. If you can’t finish this quest now, that’s OK, but complete it before you go to Nagrand. Repair/sell/shop while you wait. Once you’ve formed a party, go talk to Dirty Larry (43.6 29.6); he’s in the western section of the Lower City, as far west as you can go, hanging out with a couple of friends. Once you speak with him you’ll be able to attack him — take out his friends first mand then focus down Larry, but carefully as he’s elite and can be threatening if you can’t kite him. That being said, make sure you’re standing close to him when he’s approaching 1% HP, as you can miss out on completing this quest if he gets to 1% while you aren’t nearby.
- Once Larry’s defeated, talk to him to turn in What Book? I Don’t See Any Book and accept The Master’s Grand Design?
- You’re going to need to ask in chat for help with
- [ALDOR] Head to the northern portion of the Lower City to talk with Sha’Nir (64.6, 15.2) and turn in
- Exit Shattrath heading east towards Cenarion Thicket. Talk to Earthbinder Tavgren (44.3, 26.3) to turn in Letting Earthbinder Tavgren Know.
- Head southwest to visit the Refugee Caravan (37, 51) that apparently isn’t ever going to move again, and:
- Talk to Kirrik the Awakened (37.6, 51.5) to turn in Veil Lithic: Preemptive Strike and accept Veil Shalas: Signal Fires.
- Now head to the edge of the camp and find a spot near the guards, and once you’re in The Bone Wastes, use your Fumper the dwarves gave you. Either a worm or a gnome will spawn. If it’s a gnome, just lead it to the guards. If it’s one of the Bone Sifters, you can still let the guards help you but you’ll need to do more damage to it than them in order to loot it’s carcass. Once you have 8 Mature Bone Sifter Carcass, you’re all done drumming.
- Talk to Kirrik the Awakened (37.6, 51.5) to turn in
- Leave the caravan and head south and slightly west past Auchindoun to the Sha’tari Base Camp (31, 76). Speak with Dwarfowitz to turn in Fumping and accept The Big Bone Worm, and try not to think too hard about the name of your new quest.
- Leave the Base Camp and go east. You’ll find the corpses of Slain Sha’tar Vindicators and Slain Auchenai Warriors as you continue east — burn them with the Sha’tari Torch in your inventory until you’ve burned 8 of each and completed An Improper Burial.
- Return to the Sha’tari Base Camp (31, 76) and talk to Commander Ra’vaj (31, 76.1) and turn in An Improper Burial and accept A Hero Is Needed. From now on, you’ll want to kill any Auchenai Initiates or Auchenai Doomsayers you encounter (until you’ve slain 12 Initiates and 5 Doomsayers and completed this quest).
- Leave the camp heading east again, and this time head all the way to the Derelict Caravan (42, 75). Don’t loot the massive chest until you’ve cleared the area of all the hidden ghosts, since once you loot the Massive Treasure Chest, a bunch of zombies will spawn. You can always run from them if you don’t want to fight them, so long as you grabbed the Dread Relic from the chest.
- Continue heading east and look for Decrepit Clefthoofs.
- Look for a Decrepit Clefthoof. Kill it, and use the Fumper in your inventory on it.
- Keep using your Fumper on dead Clefthooves until Hai’shulud shows up for the lunch you’ve offered him.
- Hai’shulud is an Elite monster, so prepare for a fight! Although, there is a way to defeat it fairly easily.
- After Hai’shulud spawns, use the /sw command to start a timer and run out of combat. After 90 seconds, aggro him and stay alive for 30 seconds. The giant worm will die after 30 seconds regardless of his current HP. Don’t forget to grab his Organs!
- Go east to (49.7, 76.2) and talk to Vindicator Haylen to accept For the Fallen.
- Head east to Netherweb Ridge — can you guess what kind of enemies we’ll find? Kill 20 Dreadfang Widows as you free 6 Sha’tar Warriors by attacking Netherweb Victims (for the quest Taken in the Night). If you have a pet, make sure your pet doesn’t attack the webbed folk, as it won’t count and they won’t spawn the freed warriors. If you need to wait for respawns, head west and kill Lost Spirits and Broken Skeletons for Helping the Lost Find Their Way while you wait. Also note that there are some spiders north of the forest where you wouldn’t expect them.
- Once you’ve completed the requirements for both spider-related quests, return to Vindicator Haylen to turn in For the Fallen and accept Terokkarantula. You’ll want to ask in chat for help with this quest, as if you’re a class that relies on movement impairing effects or fear for CC, you won’t be able to use them on the big spider we want to kill. If you can’t find help and don’t feel like you can solo the Terokkarantula, you can skip this quest and do it later.
- If you you get help or want to try soloing, head to (52.8, 79.4) — due east from Vindicator Haylen — to find the Terokkarantula. . If you manage to kill her, return to Vindicator Haylen to turn in Terokkarantula and accept Return to Sha’tari Base Camp.
- Head northeast to Skywing (53.9, 72.4), talk to him and accept his quest Skywing when you’re ready — it’s an escort quest, so get full mana/hp before you talk to him. You can duo this if you want, but it’s soloable if you’re careful:
- Let Skywing tank at the start of the quest, and make sure you don’t fight near edges when you’re up the treehouse.
- You’ll pass 4 signal fires for the quest Veil Shalas: Signal Fires, make sure you put them out as you pass them. You should see them in this order as you follow Skywing: Bloodstone Signal Fire (56.1, 72.5), Violet Signal Fire (56.6, 69.2).
- Skywing will jump down and you’ll need to follow him to find the final enemy for this quest, an elite named Luanga the Imprisoner. He’s immune to movement impairing effects and fear, interrupt Piercing Armor if you can.
- Once he’s dead, you can find the Emerald Fire nearby (55.5, 69.8). From that fire, look north to find a rock you can jump down to. Then go up the path to your right to go under the treehouse and find the bridge. Fight your way up and cross the bridge, then go down a floor to the Sapphire Signal Fire (55.1, 67.2).
- Exit Veil Shalas and go southwest, then west past the southern side of Auchindoun to the Sha’tar Base Camp at (32, 76). If you haven’t completed the objectives for A Hero is Needed and Helping the Lost Find Their Way, you can kill the mobs needed for both of these quests south of Auchinduon, pretty much the whole way from the Veil to the Sha’tar Base Camp. Finish them before you head to the Base Camp.
- Once in Sha’tar Base Camp:
- Speak with Scout Navrin (31.4, 75.7) to turn in Taken in the Night. If you killed the elite spider, you can also turn in Return to Sha’tari Base Camp.
- Talk to Commander Ra’vaj (31, 76.1) to turn in A Hero is Needed and accept The Fallen Exarch.
- Talk to Dwarfowitz (31, 76.2) to turn in The Big Bone Worm.
- Speak to Oakun to turn in The Dread Relic — now you can accept Evil Draws Near and try to find a party for this encounter if you want.
- Speak with Scout Navrin (31.4, 75.7) to turn in
- Head northeast to enter Auchindoun via the west gate (33, 66). Go up the stairs and find a chest named Auchenai Coffin — kill the mobs around it and click the coffin. It will spawn a Reanimated Exarch, kill that too.
- Return to the Sha’tari base Camp, and speak with Commander Ra’vaj to turn in The Fallen Exarch.
- We get to visit our friends at the never-moving Refugee Caravan (37, 51), by leaving the Base Camp heading north and then bearing a bit east once you pass Auchindoun. Once there:
- Talk to Kirrik the Awakened (37.6, 51.5) to turn in Veil Shalas: Signal Fires and accept Return to Shattrath.
- Speak with Soolaveen (37, 49.5) to turn in Helping the Lost Find Their Way.
- Talk to Kirrik the Awakened (37.6, 51.5) to turn in
- If you completed Torgos!, go east to the Allerian Stronghold and speak with Taela Everstride (58.1, 53.4) to turn in Torgos!
- Hearthstone to Shattrath City, and:
- Go to the northern section of the Lower City to speak with Rilak the Redeemed (52.5, 21) to turn in Return to Shattrath and Skywing.
- Nearby, turn to Defender Grashna to accept The Skettis Offensive and see if you can solo it. If you can’t, you can always ask for help in chat. Once you’re done, speak with Rilak again to turn in The Skettis Offensive.
- If you didn’t do What Book? I Don’t See Any Book, go back to step 48.2 and do it now, you should be level 65. If you aren’t level 65, you’ll want to do some instances back in Zangarmarsh or here in Terokkar, or do something else from the Extra XP section, then return and do this step. You can also continue to Nagrand if you want, but in that case we recommend doing this quest once you’re level 65 — just do it next time you’re heading to a capital city.
- Stock up on supplies if you’re low, repair armor and free up some bag space. Then leave Shattrath heading southwest towards Nagrand (20, 56). You’ll enter Nagrand via the path just north of the Bleeding Hollow Ruins.
- Go to the northern section of the Lower City to speak with Rilak the Redeemed (52.5, 21) to turn in
That wraps up our time in Terokkar Forest… next stlop, the floating isles of Nagrand!
Extra XP In Terokkar Forest
Grinding Mobs
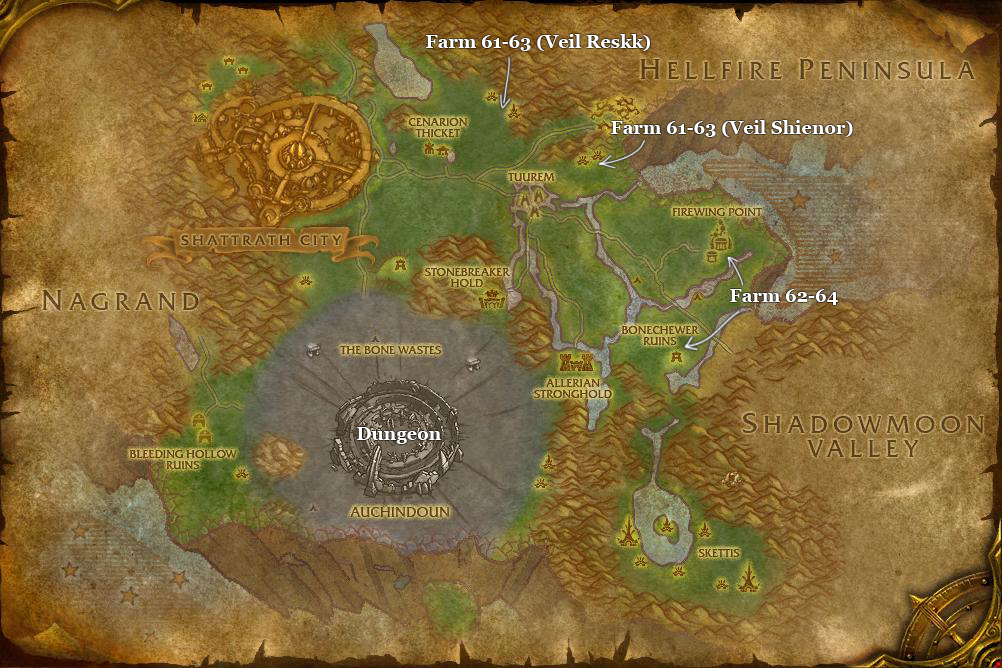
Terokkar Forest has several farming spots. The first two are located nearby: Veil Reskk and Veil Shienor. These are suitable spots for farming at levels 61 – 63. Veil Reskk and Veil Shienor are densely populated spots with level 62 – 63 mobs dropping Netherweave Cloth, which you can sell for extra gold or use to level up First Aid.
Starting from level 62, you can also try Firewing Point and Bonechewer Ruins. The mobs are level 63 – 64, but there’s a difference between these spots. Firewing Point has more casters, which may be an issue for certain classes. Also, mobs at Firewing Point drop Firewing Signets, which can be used to gain reputation with the Scryers. Both locations drop Netherweave Cloth as well, which can be sold.
Aldor players can grind the Shadow Tomb (31, 53); the cabal agents there will drop Marks of Kil’Jaeden which you can turn in for Aldor rep.
Terokkar Forest Dungeons: Auchindoun
Hard to miss on the map, Auchindoun lies in the middle of the Bone Wastes, a former draenei holy site now destroyed and overrun by various factions. Auchindoun has only 5-man instances. At this level, you’ll be able to do the Mana Tombs and Auchenai Crypts.
- Mana-Tombs (Recommended Level 62-66)
- Entrance is in the northern section of Auchindoun (39.5, 61.9)
- Quests: Safety is Job One, Someone Else’s Hard Work Pays Off, Undercutting the Competition.
This is all in all a challenging instance, and level 62 is a serious minimum — you should be higher level by the time you get to Terokkar forest. The mobs are ranging from 64 to 66, and the bosses are level 66, so it’s better to wait till level 65 to enter. Overall, it’s best to skip this dungeon if you can’t find a good party. If leveling is a priority, it’s better to farm in the above mentioned spots if you need the extra XP.
- Auchenai Crypts (Recommended Level 63-67)
- Entrance is in the western section of Auchindoun (37.4,65.4)
- Quests: Everything Will be Alright
Same as with Mana-Tombs, a difficult instance if you don’t have good gear and a coordinated group. Mobs are levels 65-67, with bosses being level 67.


About the Author
