- Author: DanielD
- Date: November 17, 2021
- Updated: November 18, 2021
- Expansion: TBC Classic
One of the most unique settings in Outland, the Netherstorm’s Eco-Domes, haunted towns and Manaforges contain all the XP you need to make it to 70.
Netherstorm [Level 68-70]
Part 1
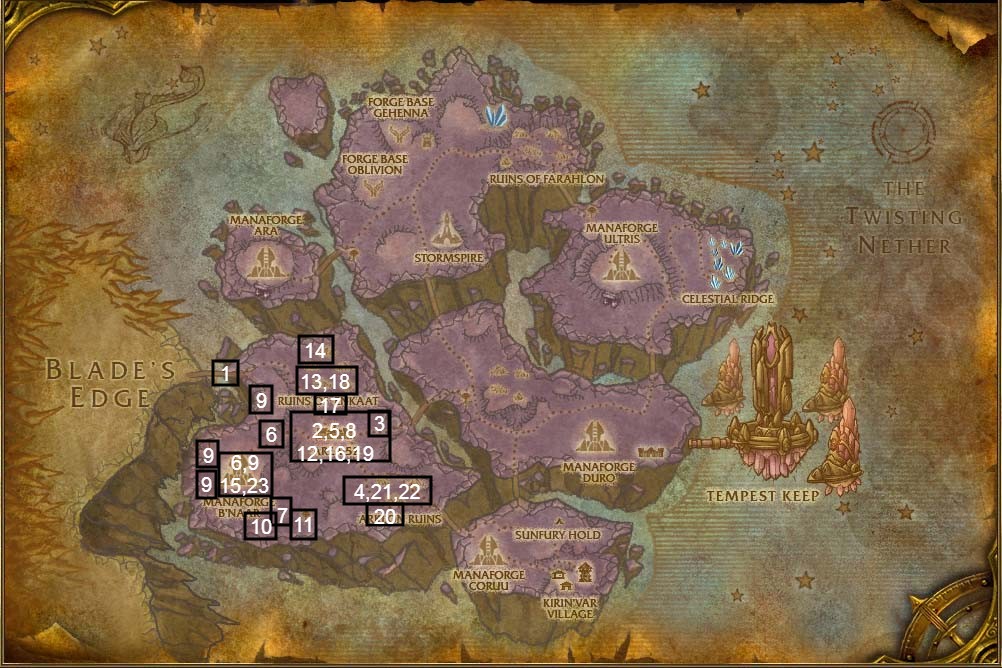
- As soon as you enter the Netherstorm, you’ll be faced with a big goblin bridge. Cross it, and while you’re on it speak with Netherologist Coppernickels to accept
 Off To Area 52.
 - Continue on the road, take a right at the fork to continue southeast, and you’ll soon reach Area 52 (32, 66):
- Talk to Boots to accept
 Securing the Shaleskin Shale.
 - See Rocket-Chief Fuselage to turn in
 Off To Area 52, accept
  You’re Hired!
 - Head out the east gate and grab the flight path on your left.
- Back in town, head straight to find the Wanted Poster. Read it to accept
 Breaking Down Netherock and
  Wanted: Annihilator Servo!
 - Go into the inn (it’s the building the wanted poster is in front of) and make the inn your new home.
- [ALDOR] Speak to Anchorite Karja to accept
 Assisting the Consortium. Also speak with Exarch Orelis to accept
  Distraction at Manaforge B’naar.
 - [SCYER] Speak to Spymaster Thalodien to accept
 Assisting the Consortium and
  Manaforge B’naar.
- [ALDOR] Speak to Anchorite Karja to accept
- Outside of the inn, speak to Nether-Stalker Khay’ji to turn in
 Assisting the Consortium and accept
  Consortium Crystal Collection.
 - Cross the bridge by the inn and go right to find Ravandwyr to accept
 The Archmage’s Staff.
- Talk to Boots to accept
- Leave town heading east, and you’ll find Shaleskin Flayers south of the road, kill them until you’ve completed Securing the Shaleskin Shale. Then return to Area 52 and speak with Boots to turn in
 Securing the Shaleskin Shale and accept
  That Little Extra Kick.
 - Leave town again via the eastern gate, and take a right at the first fork and a left at the second fork to reach the Arklon Ruins. Once you’re in the ruins:
- Just a bit into the ruins, you’ll see an unlit brazier on your right at (41, 72).
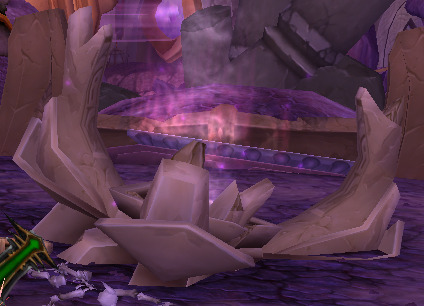 Use your Conjuring Powder while near the brazier to summon Ekkorash the Inquisitor. Defeat her and loot Archmage Vargoth’s Staff.
 - East of the brazier you should be able to see Pentatharon (42.5, 72.8). Defeat him too, take his Arklon Crystal Artifact. Don’t miss the chest behind him either!
- Go down the trail that leads east out of the ruins, and just north of the road are Nether Rays to kill for
 That Little Extra Kick. It’s OK to leave even if you don’t get all the Nether Ray Stingers you need after clearing the area.
- Just a bit into the ruins, you’ll see an unlit brazier on your right at (41, 72).
- Hearthstone back to Area 52:
- Outside the inn, speak with Nether-Stalker Khay’ji to turn in
 Consortium Crystal Collection and accept
  A Heap of Ethereals.
 - If you finished it, see Boots nearby to turn in
 That Little Extra Kick.
 - Talk to Papa Wheeler and accept
 Pick Your Part.
 - Talk to Ravandwyr to turn in
 The Archmage’s Staff, accept
  Rebuilding the Staff.
- Outside the inn, speak with Nether-Stalker Khay’ji to turn in
- Take the road west out of town toward Manaforge B’naar:
- While doing the below steps, Aldor and Scryer players should keep an eye out for an Arcane Annihilator. If you see it, try asking in chat for help taking it down, as it can be tough to solo for melee classes. If you manage to take it down, loot the Annihilator Servo from it for
 Wanted: Annihilator Servo.
 - [ALDOR] Continue west on the road to reach Manaforge B’naar (27, 65). Once there, kill Sunfury Magisters and Bloodwarders until you’ve completed
 Distraction at Manaforge B’naar.
 - [SCRYER] Take a right at the fork to find Captain Arathyn in a small camp on a hill at (27, 65), he’s riding a mount and should be easy to spot. Note that if you CC him at the start of the fight he won’t summon his mount as an add. Kill him and loot the B’naar Personnel Roster from him.
- While doing the below steps, Aldor and Scryer players should keep an eye out for an Arcane Annihilator. If you see it, try asking in chat for help taking it down, as it can be tough to solo for melee classes. If you manage to take it down, loot the Annihilator Servo from it for
- Go southeast from the manaforge to reach The Heap (28, 78). If you want to avoid having to fight a lot of mobs, you’ll want to take the valley east of the manaforge to get to The Heap. Kill Zaxxis Raiders and Stalkers here until you’ve collected 10 Zaxxis Insignias. Also collect the 10 Ethereal Technology you need for
 Pick Your Part — they are the cubes and cylinders scattered around the area.
 - Return to Area 52:
- [ALDOR] In the inn, speak with Exarch Orelis to turn in
 Distraction at Manaforge B’naar, accept
  Measuring Warp Energies. Then, talk to Anchorite Karja to accept
  Naaru Technology.
 - [SCRYER] In the inn, see Spymaster Thalodien to turn in
 Manaforge B’naar, accept
  High Value Targets. Then speak with Magistrix Larynna to accept
  Bloodgem Crystals.
 - Find Nether-Stalker Khay’ji outside the inn to turn in
 A Heap of Ethereals, accept
  Warp-Raider Nesaad.
 - Talk to Papa Wheeler to turn in
 Pick your Part (and
  Wanted: Annihilator Servo if you did it), accept
  In A Scrap With The Legion and
  Help Mama Wheeler.
- [ALDOR] In the inn, speak with Exarch Orelis to turn in
- Leave town heading west again to return to Manaforge B’naar:
- [ALDOR] Once you’re near the manaforge, go to the following coordinates and use the Warp-Attuned Orb where the pipes enters the ground:
- Northern Pipeline – (25.4, 60.4)
- Western Pipeline – (21.2, 67.5)
- Southern Pipeline – ( 20.9, 71.0)
- After you measure the southern pipeline, go north and enter the manaforge, then find a console (23.2, 68.1) to turn in
 Naaru Technology and accept
  B’naar Console Transcription. Then continue on your counter-clockwise collection of the measurements
 - Eastern Pipeline – (28.9, 71.8)
- [SCRYER] Continue to the west side of the manaforge and kill Sunfury Magisters until one of them drop a Bloodgem Shard. Then head to the nearest big red crystal (you can find one at (26.4, 74.6) and use the Bloodgem to complete the objectives for
 Bloodgem Crystals. While doing so, find and kill Sunfury Warp-Masters, Geologists (they can be found west of and inside the manaforge) and Warp-Engineers inside the manaforge for
  High Value Targets.
- [ALDOR] Once you’re near the manaforge, go to the following coordinates and use the Warp-Attuned Orb where the pipes enters the ground:
- Optionally, you can complete
 It’s a Fel Reaver, But With A Heart. [WIP]
 - Warp-Raider Nesaad (28.4, 79.5) is southeast of the manaforge, near the southern edge of the map. You can find him easily by heading due south from the manaforge’s western pipeline. Kill him.
- Haerthstone back to Area 52:
- [ALDOR] In the inn, talk to Anchorite Karja to turn in
 B’naar Console Transcription, accept
  Shutting Down Manaforge B’naar. Speak with Exarch Orelis to turn in
  Measuring Warp Energies, accept
  Attack on Manaforge Coruu.
 - [SCRYER] In the Inn, speak with Spymaster Thalodien (32, 64) to turn in
 High Value Targets and accept
  Shutting Down Manaforge B’naar. Speak to Magistrix Larynna next to him to turn in
  Bloodgem Crystals.
 - Outside, see Nether-Stalker Khay’ji to turn in
 Warp-Raider Nesaad, accept
  Request for Assistance.
- [ALDOR] In the inn, talk to Anchorite Karja to turn in
- Leave town heading northwest on the road, then go right at the fork and you’ll soon reach the Ruins of Enkkat:
- Speak with Bot-Specialist Alley to accept
 Recharging the Batteries.
 - Next, when you’re ready for an escort quest, talk to Maxx A. Million Mk. V to accept
 Mark V is Alive! Let the robot tank the mobs, and make sure you’re grabbing the red glowing Etherlithium Matrix Crystals (for You’re Hired!) which you’ll find around the ruins — also be killing ghosts to collect the 4 Flawless Crystal Shards you need for Rebuilding the Staff. Don’t get too far away from Maxx though, or you’ll fail the quest and have to abandon/accept
  it again.
 - When finished with the escort quest, if you haven’t finished the other 2 quests, do so. Then turn in
 Mark V is Alive! at Bot-Specialist Alley.
- Speak with Bot-Specialist Alley to accept
- Go north of the ruins and look for Nether Rays and Phase Hunters. You only need the Nether Rays if you haven’t finished That Little Extra Kick. The Phase Hunters are for
 Recharging the Batteries — make sure you use the Battery Recharging Blaster on them once they’re below 30% hp (you’ll get a message “The phase hunter is very weak” when you can use the blaster on them. Note that you have to kill them after you’ve drained them to get quest credit. Make your way west to find more of the mobs you need, and just move on if you can’t find enough, you should find more Phase Hunters on your way to the manaforge in the next step, if you follow the northern pipeline in.
 - Go south to Manaforge B’naar. Head to the southern entrance of the manaforge and go inside, start clearing the room. In the southeast in a small room you’ll find Overseer Theredis — kill him and loot the B’naar Access Crystal. Then clear the room and when ready, right click to the console (which is really just a big crystal near the middle of the room) and select “Begin Emergency Shutdown”. Defend the console until the quest is complete.
- Hearthstone to Area 52:
- [ALDOR] Speak with Anchorite Karja in the inn to turn in
 Shutting Down Manaforge B’naar, accept
  Shutting Down Manaforge Coruu. Talk to nearby Exarch Orelis to accept
  Attack on Manaforge Coruu.
 - [SCRYER] Find Spymaster Thalodien in the inn to turn in
 Shutting Down Manaforge B’naar, accept
  Stealth Flight. Go out the eastern gate and find Veronia (33.8, 64.2) to turn in
  Stealth Flight and accept
  Behind Enemy Lines, but don’t tell Veronia you’re ready yet.
 - See Rocket-Chief Fuselage to turn in
 You’re Hired! and accept
  Invaluable Asset Zapping and
  Report to Engineering.
 - Go south across the bridge to Chief Engineer Trep to turn in
 Report to Engineering and accept
  Essence for the Engines.
 - Speak with Ravandwyr to turn in
 Rebuilding the Staff and accept
  Curse of the Violet Tower. Then immediately use the Archmage Vargoth’s Staff to summon the Image of Archmage Vargoth. Speak to it to turn in
  Curse of the Violet Tower and accept
  The Sigil of Krasus.
- [ALDOR] Speak with Anchorite Karja in the inn to turn in
- Leave Area 52 via the northern gate, and head due north from the gate to find Mana Wraiths. The wraiths spawn from here to a fair bit east, so kill them until you’ve collected 7 Mana Wraith Essences for
 Essence for the Engines.
 - You should be close to the Ruins of Enkaat — head to the entrance to speak with Bot-Specialist Alley and turn in
 Recharging the Batteries.
 - Return to Area 52, speak with Chief Engineer Trep to turn in
 Essence for the Engines, accept
  Elemental Power Extraction.
 - Head south and slightly east of Area 52 to the edge of the map and you’ll find Sundered Rumblers and Warp Aberrations, use your Elemental Power Extractor on them and then kill them, they should drop a little blue crystal you can loot to grab Elemental Power. Repeat until you’ve completed
 Elemental Power Extraction.
 - Now go northeast to the Arklon Ruins (41, 73):
- You’ll need to use the Ultra Deconsolodation Zapper on 4 different objects here (you can just right click them), they’re all relatively close together:
- Dig-A-Matic at (41.1, 71.8)
- Dredging Claw is at (41.5, 71.8)
- Terrain Analyzer at (40.3, 72.9)
- Big Wagon at (42.5, 72.2)
- Now you’re going to take one of two paths to Manaforge Coruu, depending on if you chose Aldor or Scryer. Either way, keep an eye out for the Arcane Annihilator that’s inside the manaforge, you can kill it to complete
 Wanted: Annihilator Servo if you haven’t yet.
- [ALDOR]
- Head southeast from the Arklon Ruins to the bridge that leads to Manaforge Coruu (46, 81). Once there, start killing Sunfury Arcanists outside. Once you’ve gotten most or all the 9 arcanists you need, go inside to kill 5 Sunfury Researchers for Attack on Manaforge Coruu.
- Inside the manaforge, you should be able to find Overseer Seylanna at (49, 81) — kill her for the Coruu Access Crystal, then right click the console, Begin Emergency Shutdown, and protect it for 2 minutes just like at the other manaforge.
- [SCRYER]
- Get back to Area 52, then speak again with Veronia and tell her you’re ready. You’ll fly to Manaforge Coruu and land near Caledis Brightdawn (48.2 86.6). Speak with him to turn in
 Behind Enemy Lines and accept
  A Convincing Disguise.
 - Head north towards the manaforge and kill Sunfury Arcanists until you get Sunfury Arcanist Robes (found anywhere), Sunfury Researchers until you collect Sunfury Researcher Gloves (found inside the manaforge) and Sunfury Guardsmen until you find a Sunfury Guardsman Medallion (found near entrances to the manaforge). Once you’ve collected all three pieces, return to Caledis Brightdawn to turn in
 A Convincing Disguise and accept
  Information Gathering.
 - Put on your Sunfury Disguise and go into Manaforge Coruu. Avoid the Arcane Annihilator (who can see through your disguise) as you make your way to the side room near (48, 84). Stand close to Commander Dawnforge and Arcanist Ardonis and listen to their conversation, then return to Caledis Brightdawn to turn in
 Information Gathering and accept
  Shutting Down Manaforge Coruu.
 - Use your Sunfury Disguise again, and go back into the manaforge to find Overseer Seylanna (49, 81). Take the Coruu Access Crystal she drops to the console and use it to begin the shutdown. Defend the console for 2 minutes. Once finished, return once more to Caledis Brightdawn to turn in
 Shutting Down Manaforge Coruu and accept
  Return to Thalodien.
- Get back to Area 52, then speak again with Veronia and tell her you’re ready. You’ll fly to Manaforge Coruu and land near Caledis Brightdawn (48.2 86.6). Speak with him to turn in
- [ALDOR]
Part 2
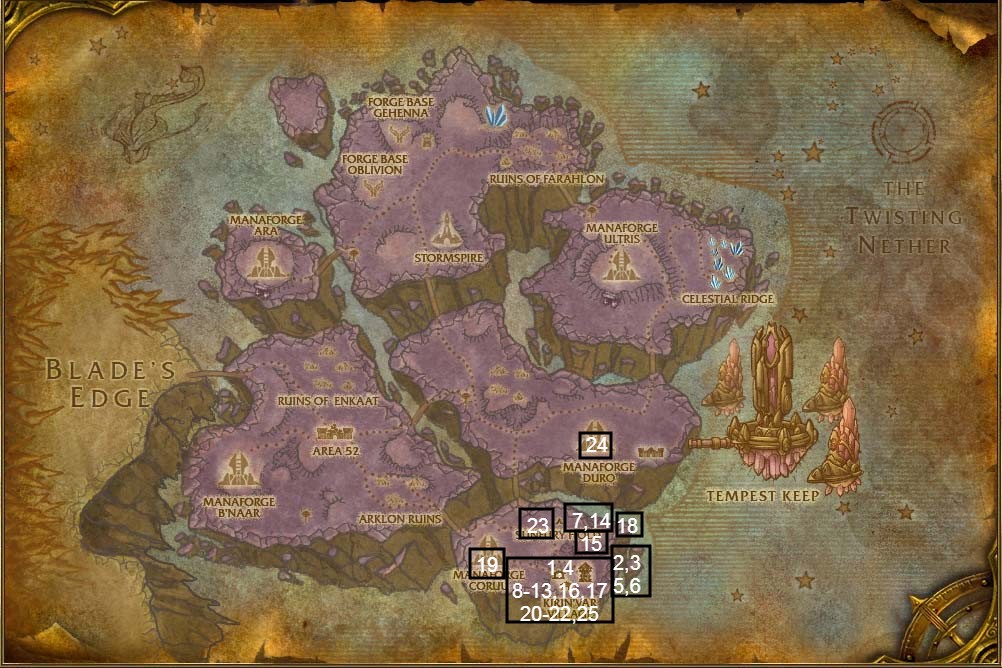
- Leave the manaforge and go southeast on the road to reach Kirin’var Village, and make your way to the town square (57, 85). Once there::
- Speak with Apprentice Andrethan (57.6, 85.2) to accept
 Indispensable Tools.
 - Nearby, talk to Thadell (57.6, 85) to accept
 Needs More Cowbell.
 - Speak with the custodian Dieworth (57.4, 86.2) to accept
 Malevolent Remnants. From now on, kill Severed Spirits until you’ve completed the objective for this quest. Also accept
  A Fate Worse Than Death. From now on kill Mana Seekers and Mageslayers you see until you’ve completed this quest. Last but not least, accept
  The Sunfury Garrison.
 - See Lieutenant-Sorcerer Morran to accept
 The Unending Invasion.
- Speak with Apprentice Andrethan (57.6, 85.2) to accept
- Be careful! The aggro range on the mobs in the town are very long. Head south from the tower and find Abjurist Belmara, who patrols near (59,88). Kill her and loot her book, Belmara’s Tome, then right-click it to accept
 Abjurist Belmara.
 - Next head east to the building at (60, 87) with the clock-tower. Find Battle-Mage Dathric inside and kill him. Pick up Dathric’s Blade from him and right-click it to accept
 Battle-Mage Dathric.
 - Head outside and find the path that runs past the south side of the building; Cohlien Frostweaver should be around (59, 86). Kill him and pick up Cohlien’s Cap and right-click it to accept
 Cohlien Frostweaver.
 - Go north to the blacksmith’s house (61, 85) and kill the Kirin’Var Apprentices that hang out by the forge until you retrieve the Smithing Hammer.
- Conjurer Luminrath patrols the road (60, 85), northwest of the blacksmith’s house. Kill him and grab Luminrath’s Mantle and right-click it to accept
 Conjurer Luminrath.
 - Head northeast and then over the bridge to the Chapel Yard. Continue north and find Bessy (59, 78) out in a field. This is an escort quest, so make sure you’re ready before you begin it. Once prepared, speak with Bessy to turn in
 Needs More Cowbell and accept
  When the Cows Come Home. This is soloable as long as you let Bessy take aggro first, and buff her if you can. It also seems possible to die and come back and res and continue escorting Bessy. Once she makes it to Thadell you can turn in
  When the Cows Come Home to him.
 - Speak with Apprentice Andrethan to turn in
 Indispensable Tools and accept
  Master Smith Rhonsus.
 - Now we’re going to put some ghosts to rest!
- Go west to the nearby houses, killing Mana Seekers and Mageslayers if you haven’t completed
 A Fate Worse Than Death yet. Go into the house closest to the tower, and get close to the weapon rack (56.9,86.8) — it should sparkle when you’re close enough — and use Dathric’s Blade in your inventory.
 - Leave this house and continue southwest up the road, skip one house and then go “into” the next one and find the dresser at (56.4, 87.8). Use Luminrath’s Mantle near it.
- Turn around from the dresser and go straight, you’ll find the Mana Bomb Fragment for
 The Unending Invasion (55.7, 87.2). Then enter the house just to the northwest and find the bookshelf at (55.5, 86.5) and use Belmara’s Tome near it.
 - From the doorway of Belmara’s house, turn right and you’ll see across the street a house with a footlocker at (55, 87), use Cohlien’s Cap near it.
- Go west to the nearby houses, killing Mana Seekers and Mageslayers if you haven’t completed
- Return to the tower with all the NPCs, and speak with Morran to turn in
 The Unending Invasion and accept
  Potential Energy Source. Then speak with Dieworth to turn in
  Battle-Mage Dathric,
  Conjurer Luminrath,
  Cohlien Frostweaver,
  Abjurist Belmara,
  Malevolent Remnants, and
  A Fate Worse Than Death. Then accept
  The Annals of Kirin’Var.
 - Now you’ll have to kill poor Battle-Mage Dathric again! Go east to the town hall building (the one with the clocktower) at (60, 87) and slay Dathric once more; this time he’ll drop the Annals of Kirin’Var.
- Go northeast to the blacksmith’s house and kill Master Smith Rhonsus (61, 85).
- Return to the tower and speak to Dieworth to turn in
 The Annals of Kirin’Var and accept
  Searching for Evidence. Then go talk to Apprentice Andrethan (57.6, 85.2) and turn in
  Master Smith Rhonsus.
 - Go northeast across the bridge to the farm again, and go into the barn at (60, 78). Interact with the Necromantic Focus to turn in
 Searching for Evidence and accept
  A Lingering Suspicion.
 - Exit the barn, and find Tormented Citizens in this part of the village. If you get close enough, they’ll transform into the Loathsome Remnants you need to kill/loot to complete
 A Lingering Suspicion. Make sure you let the spirits transform into ghosts before you kill them, or you wont get the quest item drops. Also try not to DPS them when they cast soulbind.
 - Return to the tower in the middle of the town, talk to Dieworth to turn in
 A Lingering Suspicion, accept
  Capturing the Phylactery.
 - Go across the bridge again, go straight until you hit a small hill, then go right and look on your right for the three outhouses (small buildings) on the side of the chapel. Click on the middle one to find Naberius’s Phylactery — return to Dieworth to turn in
 Capturing the Phylactery.
 - You can accept
 Destroy Naberious! from Dieworth if you want, and try to solo it or get a group. Cross the bridge to the Chapel Yard, then head to the chapel at the northeast end of the area (62, 79) to find him. If you defeat him, turn the quest in with Dieworth. Some notes on Naberious:
- Clear the interior adds before you aggro him, and you can clear the ones outside if you plan on kiting him a lot.
- Avoid the red circles on the ground by constantly moving, otherwise you’ll lose a lot of HP
- If you aren’t solo (or if you’re a balance druid), he can cast mind control.
- You can avoid his frost bolt by breaking LOS.
- Leave the village and go west to Manaforge Coruu. North of the road, go through the camp and look on the ground for the Energy Isolation Cubes with a purple glowing light inside — you want to collect these — and find Spellbinder Maryana nearby. Kill her and loot the Sigil of Krasus, then use the Archmage Vargoth’s Staff to summon Vargoth and turn in
 The Sigil of Krasus, accept
  Krasus’s Compendium. Finish collecting Energy Isolation Cube for
 Potential Energy Source before you leave.
 - Return to the Town Square of Kirin’var Village, talk to Lieutenant-Sorcerer Morran by the tower to turn in
 Potential Energy Source and accept
  Building a Perimeter.
 - Now we’re going to look for some scrolls:
- Head to the fountain just south of the tower, then enter the house to the southwest to find Krasus’s Compendium – Chapter 2 at (57.6, 89.6).
- Leave this house and go to the 2nd house on your right to grab Krasus’s Compendium – Chapter 1 (58.6, 89.2).
- Exit that house, and go to the closest house to the northeast to find Krasus’s Compendium – Chapter 3 (58.8, 87.9).
- Use Archmage Vargoth’s Staff to summon him again, turn in
 Krasus’s Compendium and accept
  Unlocking the Compendium.
- Time to activate some runes! They are coin-shaped, blue, semi-transparent, and hang out in the air.
- Go east of the central tower to (59.2, 85.3) and use the Rune Activation Device on the Eastern Rune.
- Go north across the bridge and head west up the hill to (57.4, 82.9) and use the Rune Activation Device on the North Eastern Rune.
- Now jump down the hill and go southwest to (54.3, 86.1) and activate the Western Rune, which is at the base of the cliff that the village sits on.
- Return to Lieutenant-Sorcerer Morran and turn in
 Building a Perimeter, accept
  Torching Sunfury Hold. Look back as you leave the village to see the perimeter you set up!
- Leave the village on the northwestern road, and go right (north) at the fork to Sunfury Hold (56, 81).
- Start killing the archers for
 The Sunfury Garrison, finish the objectives for this quest before you leave the area.
 - Look for a Sunfury Flamekeeper to kill so you can steal their Flaming Torch. Once you have one, it will last for 5 minutes. Burn 4 tents and 4 Ballistas, and note that they will stop burning quickly, so you can clear one area and burn the stuff tthere until you’ve completed
 Torching Sunfury Hold.
 - Head to (56, 79) near the center of the camp and wait for Spellreaver Marathelle to show up (if she isn’t there), clear any nearby adds before engaging her. Kill her and loot the Heliotrope Oculus, then use Archmage Vargoth’s Staff to summon him. turn in
 Unlocking the Compendium and accept
  Summoner Kanthin’s Prize.
- Start killing the archers for
- Go west on the road from Sunfury Hold, then go right at the fork and cross the bridge. Follow the road to again go right at the fork and you’ll reach Manaforge Duro. Summoner Kanthin patrols the road in front of the manaforge — kill Kanthin, loot the Stone of Glacius and use Archmage Vargoth’s Staff to summon the Archmage. turn in
 Summoner Kanthin’s Prize, accept
  Ar’kelos the Guardian.
 - Head back the way you came and return to Kirin’var Village:
- Speak with Morran to turn in
 Torching Sunfury Hold.
 - Speak with Dieworth to turn in
 The Sunfury Garrison and accept
  Down With Daellis.
 - Enter the tower and you’ll be confronted by the arcane golem Ar’kelos. Take that big boy out (kill him) and then go to the top of the tower and find Vargoth. Talk to him to turn in
 Ar’kelos the Guardian, but don’t worry about accepting the follow-up
  Finding the Keymaster, though you can certainly follow the quest chain if you want to and you can find a partner.
- Speak with Morran to turn in
Part 3
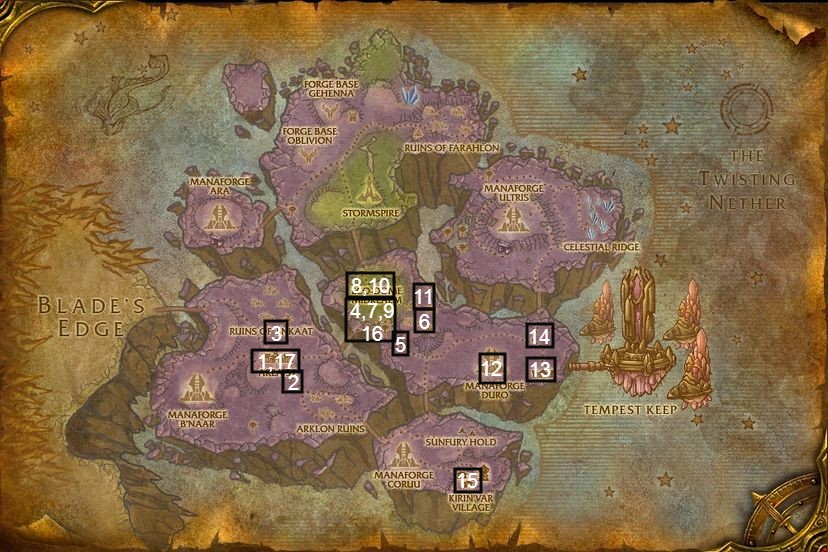
- Hearthstone back to Area 52:
- [ALDOR] Speak with Anchorite Karja to turn in
 Shutting Down Manaforge Coruu, accept
  Shutting Down Manaforge Duro. Talk to Exarch Orelis to turn in
  Attack on Manaforge Coruu, accept
  Sunfury Briefings.
 - [SCRYER] Speak with Spymaster Thalodien to turn in
 Return to Thalodien, accept
  Shutting Down Manaforge Duro. Then speak with Magistrix Larynna to accept
  Kick Them While They’re Down.
 - See Chief Enginner Trep to turn in
 Elemental Power Extraction.
- [ALDOR] Speak with Anchorite Karja to turn in
- Leave via the eastern gate, then take a right and head south into the trench to find Lead Sapper Blastfizzle (34, 68). turn in
 Invaluable Asset Zapping and accept
  Dr. Boom!
 - Go back to the gate you left out of (the eastern one) and go north to Camp Boom (34, 60). This quest can be a pain in the butt, as you might struggle to avoid the tiny bombs Dr. Boom sends out, and the Dr. hits pretty hard himself. You’re supposed to be able to run in, throw a Boom’s Doom, and run out while you wait for the cooldown. If you die, try resurrecting on top of the smallest oil drum to Dr. Boom’s right — this can sometimes make him unable to target you. You might have to experiment a bit to find the best place to stand where he won’t aggro.
- Go south to find the road, and follow it east and go left at the fork to cross the bridge that leads northeast to Eco-Dome Midrealm. Follow the road to the signpost and take a left to enter the dome and find Midrealm Post:
- Talk to Gahruj to turn in
 Request for Assistance, accept
  Rightful Repossession and
  Drijya Needs Your Help. Ask in chat and see if you can find a group for Drijya Needs Your Help while you grab the rest of the quests here.
 - See Mama Wheeler to turn in
 Help Mama Wheeler, accept
  One Demon’s Trash…
 - Speak with Mehrdad to accept
 New Opportunities and
  Run a Diagnostic!
 - Talk to Shauly Pore to accept
 Keeping Up Appearances.
- Talk to Gahruj to turn in
- Leave the dome and go south on the road to find Drijya (48, 63.4) and turn in
 Drijya Needs Your Help. If you have a group, you can now easily do Drijya’s escort quest
  Sabotage the Warp-Gate! You can probably still solo it if you want. Let Drijya go first and get attacked by the mobs, or he won’t help you fight them. When Drijya says “Let’s get outta here”, don’t leave until he does, or you’ll fail the quest.
 - Southeast of the Eco-Dome lies the Scrap Field (50, 59). Head there by going north on the road, and then taking a right at the signpost. Start killing Mo’arg Doomsmiths and Gan’arg Engineers for In A Scrap With The Legion
 In A Scrap With The Legion. While there, look for Fel Reaver Part for
  One Demon’s Trash…Make your way north as you do so.
 - As you clear north, you’ll pass under a big purple pipeline. Once you do, take a left into the eco-dome and a few meters north you should find the Diagnostic Equipment at (48.2, 55).
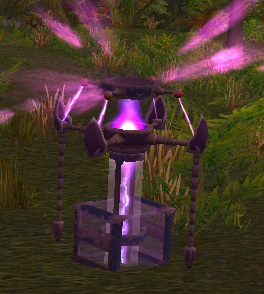 Click on it to get the Diagnostic Results. Kill the rest of what you need for
  In A Scrap With The Legion and find the rest of the Fel Reaver Part for
  One Demon’s Trash…
 - Head into the eco-dome and kill Ripfang Lynx (they hang out in the western side of the dome) for their Ripfang Lynx Pelts to complete Keeping Up Appearances. While doing so , look for the Ivory Bell you need for
 New Opportunities, they tend to grow near other plants.
 - Return to Midrealm Post:
- Speak with Mama Wheeler (46.6, 56.4) to turn in
 One Demon’s Trash… and accept
  Declawing Doomclaw.
 - Talk to Mehrdad (46.4, 56.4) to turn in
 Run a Diagnostic! and
  New Opportunities, accept
  Deal With the Saboteurs.
 - Talk with Shauly Pore (46.4, 56) to turn in
 Keeping Up Appearances and accept
  The Dynamic Duo.
 - Speak with Gahruj to turn in
 Sabatoge the Warpgate!
- Speak with Mama Wheeler (46.6, 56.4) to turn in
- Go north to the center of the eco-dome and kill 8 Barbscale Crocolisks for
 Deal With the Saboteurs.
 - Leave the dome heading east, and head towards Doomclaw at (50.6, 57.2), who is underneath the pipeline, right before it curves downhill. If you don’t want to fight through mobs, head further east and swing around to approach him from the east. Kill him and grab Doomclaw’s Hand from his corpse.
- Go southwest to get back on the road and make your way to Manaforge Duro:
- [ALDOR] You’ll need to collect the Sunfury Military Briefing (drops from Sunfury Bowmen and Centurions) and the Sunfury Arcane Briefing (drops from Sunfury Conjurers).
- [SCRYER] You need to kill Sunfury Conjurers, Bowmen, and Centurions for
 Kick Them While They’re Down.
 - While here, look for the Box of Surveying Equipment scattered around the area to complete
 Rightful Repossession.
 - Look for Master Daellis Dawnstrike patrolling west of the manaforge near (56, 66); kill him to complete
 Down With Daellis.
 - Once done with that stuff (or while waiting for respawns), it’s the same drill as the other manaforges: Enter (the northeast entrance is less heavily guarded) and head to the the southern part of the building, kill the Overseer (59.8, 68.2), take their Duro Access Crystal and use the console to begin the shutdown, then protect the console.
- Leave Manaforge Duro and go east to find Cosmowrench (67, 66). Get the flight path outside, and then enter the town and speak with Sab’aoth (66.4, 67.2) to accept
 Bloody Imp-ossible!
 - Leave town and head just a bit north, where you should find plenty of Warp Chasers. Make sure you’re near the Warp Chaser, then use Zeppit’s Crystal and kill the Warp Chaser. If done correctly, the little imp will gather the blood and you’ll receive a Warp Chaser Blood vial. Make sure you’re decently close when the mob dies (no long-ranged mage spells), and you’ll need to wait a few moments for Zeppit to collect the blood, so don’t go running off right after you kill the Warp Chaser. Also note that Zeppit can only drain one at a time, so don’t bother killing a bunch with AoE. Return to Sab’aoth and turn in
 Bloody Imp-ossible! once you’ve collected enough blood.
 - If you’re really close to Level 70 and lazy, you can skip this step and go west to Midrealm Post. Otherwise, take the bridge west of Manaforge Duro to go south to Kirin’var Village, and see Custodien Dieworth to turn in
 Down with Daellis.
 - Go north all the way to the Eco-Dome Mideralm to return to Midrealm Post:
- Speak with Gahruj to turn in
 Rightful Repossession, accept
  An Audience with the Prince.
 - Talk to Mama Wheeler to turn in
 Declawing Doomclaw, accept
  Warn Area 52!
 - See Mehrdad to turn in
 Deal with the Saboteurs, accept
  To the Stormspire.
- Speak with Gahruj to turn in
- Hearthstone back to Area 52:
- [ALDOR] See Anchorite Karja to turn in
 Shutting Down Manaforge Duro, accept
  Shutting Down Manaforge Ara. Then speak with Exarch Orelis to turn in
  Sunfury Briefings, accept
  Outside Assistance.
 - [SCRYER] See Spymaster Thalodien to turn in
 Shutting Down Manaforge Duro, accept
  Shutting Down Manaforge Ara. Then speak with Magistrix Larynna to turn in
  Kick Them While They’re Down, accept
  A Defector.
 - Speak with Rocket-Chief Fuselage to turn in
 Warn Area 52! and accept
  Doctor Vomisa, Ph. T.
 - See Papa Wheeler to turn in
 In A Scrap With The Legion.
 - Leave town via the eastern gate, go right and down into the trench to speak with Lead Sapper Blastfizzle, turn in
 Dr. Boom!
- [ALDOR] See Anchorite Karja to turn in
You should now be level 70! If you aren’t, you can continue doing the quests in Netherstorm, as there’s still almost half the map to clear. You could also choose to start questing in Shadowmoon Valley if you’re tired of purple, and there’s always the option to do instances.
Extra XP In Netherstorm
Grinding Mobs
The Netherstorm is not a good place to grind mobs for XP, but if you must, try in between Forge Base Gehonna and Forge Base Oblivion (39, 20) — the Terrorguards and Wrathbringers are decently easy to take down — or else the Ethereum Staging Grounds (56, 37).

![tbc classic horde leveling guide netherstorm [level 68 70]](https://www.warcrafttavern.com/wp-content/uploads/2021/11/TBC-Classic-Horde-Leveling-Guide-Netherstorm-Level-68-70-1024x400.jpg)
